Epsxe 2.0.15 b139
Содержание:
- Configuration & Trobleshooting
- HowTo
- Что нужно знать перед загрузкой?
- Touchscreen and Gamepads Configuration
- Установка необходимых библиотек
- Review
- Что нужно знать о работе эмулятора
- Gameplay options
- How to Setup your gamepad in the emulator
- Описание и возможности
- Disadvantages
- Запуск BIOS
- Создание кнопки запуска
- Известные проблемы
- ePSXe для Андроид
- Версия ePSXe с необходимыми плагинами
- Настройка ePSXe
- Как установить эмулятор PS на Андроид и запустить игры
- Как установить эмулятор PS на Андроид и запустить игры
- Описание
- Особенности и преимущества ePSXe
- Скачать ePSXe
Configuration & Trobleshooting
In this section you will find the how to setup instructions, information about the config options and detailed information about the different options on preferences as well as a FAQ with the common questions.
The official ePSXe for Android got from Google Play includes support, read this page to get the customer support service conditions.
How to set up the emulator
The emulator requires a previous configuration before starting to play. It includes to get the PSX Bios and getting the games in the some of the formats supported by the emulator.Continue Reading »
How to set up your gamepad
Using a external gamepad requires a previous configuration before starting to play. It includes to connect your gamepad to the smartphone and configurating the gamepad in the emulator.Continue Reading »
Configure & Tunning options
Screen and Video configuration. In this part the video and screen possible options are explained. Continue Reading »
Sound configuration. This section explains the different options avalaible on the sound emulation. Continue Reading »
Input configuration. In this part it is explained how to configure the touchscreen and how to use external gamepads. Continue Reading »
Memcards configuration. This section explains how to use the memcards and savestates. Continue Reading »
CPU and Misc configuration. In this part the rest of possible configuration options are explained. Continue Reading »
On Gameplay options. In this part it is explained the on gameplay available options. Continue Reading »
Frequently Asked Questions
- Q: Iso or rom, what does it mean? A: PSX games are stored on cdrom discs, and a dump of a cdrom disc is currently called «iso». In other platforms (Nintendo64 for example), the games are stored in memory ROM in a cartridge, so it is commonly called rom. We will use rom or iso to refer to a game dump.
- Q:I got black screen when running the game, what is the problem? A: Some games requires somes seconds to initialize. If you are using the hardware renderer, the number of incompatible games is really really low (1%), it is very likely a problem with the rom format or dump (it is incomplete, corrupted or non compatible format — PSX games are usually 600-700Mb) check psxdatacenter.com to know if this game is compatible, and if it is in the compatible list then get a different dump from this game
- Q:When I run the game, it says «system.cnf» not found. A: PSX games are disc dumps, which must contain a file system, when the emulator does not find the filesystem this message is shown. It means that the game is incomplete, in non compatible format or corrupted (we recommend to use 7zipper to uncompress). Remember PSX games are usually 600-700Mb. Get a different dump of the game.
- Q:There is repeated or jerky sound. A: ePSXe uses only sync spu emulation, it is done to get sound/video sync and highest compatibility. So you will need 50/60 frames per second (100% speed) to get proper sound.
- Q:How can I hide the on screen buttons? A: Preferences->TouchScreen->Hide/Show Gamepad
- Q:The buttons are too small or big, can I edit the gamepad skin? A: Yes Preferences->TouchScreen->Edit Gamepad
- Q:Choosing analog mode the touchscreen gamepad has just the left stick, where is the right stick? A: By default it is disabled, you can edit the touchscreen gamepad and enabling it on Preferences->TouchScreen->Edit Gamepad
- Q:Some games don’t work or have graphics error using OpenGL Plugin. A: OpenGL plugin is limited in smartphone GPUs (some games or graphics effects simply doesn’t work or will be very slow), you can fix some graphics problems using the OpenGL toolbar
- Q:What are the iso formats supported? A: bin/cue, img/ccd, multi-bin/cue, mds/mdf (v1), pbp, cdi, nrg, ecm and iso. We recommend bin/cue, img/ccd or pbp.
- Q:Why can’t it run compressed isos? A: Most common compressed formats such as zip, 7z and rar can’t provide random file access to the data which is required given the large size so uncompressing on the fly is not possible. If you need to compress your games, the best format is PBP. Recent SD cards can hold more than 100 games without compression.
HowTo
- Unpack the emulator wherever you want.
- Replace the stock kailleraclient.dll inside the emulator folder with the multiplayer version (Jul-2011) IF you want to play with more than 2 players, OR you have horrible ping while using the P2P version.
- Replace the stock kailleraclient.dll with the P2P version (v0r7) IF you just want to play with 2 players AND you have a >100ms (>150ms tops).
- Place SCPH7502 (unzipped) inside the «BIOS» folder inside your emulator folder
- Place your video plugin, Eternal SPU and Cyberpad in the «plugins» inside your emulator folder
- Configure your emulator: map buttons (physical controller preferred!), change resolutions (no fullscreen supported), apply filters (if you want them). Make sure you ONLY pick Digital or Analog, no rumble on, Multitap disabled and a blank profile for Controller 2
- Go to Config, then click Sound
- Click Configure
- Make the following configuration changes:
- Audio device — Wave Mapper; Buffer size: 64
- Audio Out Method — SPUasync; Async mode: Simple
- Misc — Show realtime config window: blank; Cache VAG decode: blank
- Fine tune: 0; Reverb: Off
- Special game fix — Update before accessing register: checked
- Click OK to close this window and again to close Config Sound
- Go to Config, click Netplay. A window will popup
- In Select Netplay Plugin, choose CyberPad 1.4, then click OK
- Load a game
Что нужно знать перед загрузкой?
В1: Могу ли я играть в игры PlayStation 4 на своем компьютере с помощью этого эмулятора?
О: да, вы можете играть в игры PlayStation 4 на своем компьютере с помощью этого эмулятора. Это тестируемый эмулятор со многими играми для PS4. Если вы все еще не можете играть в игры PS4 на своем персональном компьютере, тогда нужно перезагрузить его. Возможно, был нарушен процесс загрузки.
В2: Что если мой компьютер не соответствует требовнаиям?
О: Оборудование PlayStation 4 действительно мощное. Играть максимальное количество игр в 1080p. Так, вам как раз нужно убеждаться ваше требование к минимума системы. Если ваши системные требования не соответствуют минимальным требованиям, вы не можете играть в игры PlayStation 4 на своем компьютере.
В3: Мне нужен BIOS для запуска этого эмулятора?
О: нет, вам не нужен никакой файл BIOS для запуска этого эмулятора. Этот эмулятор не требует каких-либо файлов BIOS. Файл BIOS в сборке с этим эмулятором.
В4: Что делать, если я сталкиваюсь с какой-либо ошибкой проблемой с эмулятором PlayStation 4?
О: Не беспокойтесь, напишите мне в Facebook или Twitter. Я помогу Вам решить ваши проблемы.
https://youtube.com/watch?v=ZRRMin5hTu4
Рекомендуемые системные требования
- Процессор: Intel Ci7 (4Core)
- Оперативная память: 8 ГБ DDR3
- HDD: 100МБ
- Графика: Nvidia Gforce 2GB 128Bit
- Также нужен контроллер ps
Итог: Рабочий эмулятор PS4 был выпущен 21 июня 2016 года. Изначально эмулятор работал неправильно. В этом обновлении эмулятора ошибки исправлены. Поставьте «нравится» и подпишитесь на уведомления, чтобы быть в курсе обновлений. Если вы столкнулись с какой-либо проблемой, вы можете оставить комментарий или связаться со мной на FACEBOOK, я помогу вам найти решение.
Touchscreen and Gamepads Configuration
1. Number of players
ePSXe supports 1/2 Players mode, 1 a fun 2 players mode for tablets (using split screen mode), and 3/4 players support (in games supported multitap), Because the PSX has 2 gamepad ports, you can choose plug the multitap to port1 or port2 (depending on the game you could choose one of them).
2. PSX Pad Type
Choose the kind of emulated PAD (Digital, Dual Shock, Namco Gun or Justifier Gun). ePSXe includes a database of supported pad modes for the games, and automatically will disable analog or gun when it is not supported in the game. Namco Gun and Justifier Gun are emulated using the touchscreen.
3. Select Gamepad
It scans the system for gamepads, and you have to choose the one which you select for this player (if you prefer the touchscreen you have choose virtual).
- Touchscreen, choose virtual.
- Xperia play to have to choose xperiaplay here (in order to support touchpad and l2/r2 mapping to touchpad on digital).
- Moga devices choose moganative (using native driver for moga pocket) (mapping is automatically done)
- Other options: Xbox, PS3 DS, PS4 DS, Logitech, Nvidia Shield, iPega HID, Nyko PRO, Ouya, Moga HID and so on (a lot of gamepad will be full configurated automatically when choosed — mapping not required)
4. Vibration Mode
You can select enable/disabled/enabled on device. Enabled on device will be used for phone vibration. Vibration emulation is limited, it depends on your gamepads drivers, and Android does not supports different actuators or effects.
Allows you to assign a hardware button/key to each of the virtual controller buttons. This should also be used with gamepads (Moga devices using moganative)
6. Player n map axis
Allow you to assign axis from native joysticks on Android 3.1+. Because in some gamepads the triggers and the dpad are analog (L2/R2), these controls could have to be mapped here. If you pad is included on the previous list and you selected the profile, you haven’t to do anything here, if it is not, using the option «Gamepad Test Axis» to see the right values.
1. Dynamic DPAP/Lstick and Dynamic Action Buttons
By default when using touchscreen the dpad/stick and action buttons are static, enabling this options you can move your character or press action buttons doing swipe in left (dpad/stick) and right (actions buttons) of the screen. You can get a more native experience using these options.
2. Pad Skin Landscape
ePSXe includes 6 kind of pads on landscape or no on-screen pad for use with hardware buttons. Choose None if you don’t want to see the gamepad on screen (for example if you are using a external gamepad).
6. Gamepad Editor Landscape (default 1/4)
Hide/Show/Resize/Move buttons. Edit your touchscreen PAD (move/resize and enable/disable buttons). (Use SWAP MODE to edit the Analog pad — add/remove analog axis)
7. Gamepad Editor Portrait (default)
Hide/Show/Resize/Move buttons. Edit your touchscreen PAD (move/resize and enable/disable buttons). (Use SWAP MODE to edit the Analog pad — add/remove analog axis)
You can add until 6 extra buttons with savestate/loadstate functions, framelimit, combo action buttons and sticky buttons.
Установка необходимых библиотек
ePSXe для корректной работы требует наличие установленных библиотек libgtk-1.2. Проблема в том, что на момент написания данной статьи эти библиотеки являются устаревшими и не входят в официальный репозиторий Ubuntu Lucid Lynx (10.04).
Скачать данные библиотеки в виде deb-пакетов можно по следующим ссылкам:
- Или подключив репозиторий Jaunty Jackalope в источники приложений
deb http://archive.ubuntu.com/ubuntu jaunty universe
Данные операции необходимо провести только если версия Вашей ОС выше, чем 9.04 (Jaunty Jackalope).
sudo apt-get install libgtk1.2
или установив необходимые пакеты через менеджер пакетов Synaptic.
Данные операции необходимо провести только если версия Вашей ОС выше, чем 9.04 (Jaunty Jackalope) или не установлен пакет libgtk1.2
Review
ePSXe is a plugin-based PlayStation emulator (includes internals plugins for sound and CD-ROM, and GPU in Linux and Android versions). It supports multiple CD-ROM formats (bin/cue, multibin/cue, mdf/mds, ccd/bin/sub, iso, ecm, pbp, etc), including subchannel support and PPF patching on the fly. The newer version (ePSXe 2.0) now supports pad plugins. Multitap up to 8 players are supported too.
There are versions for Windows (free), Linux (free) & Android (pay)
PC version 1.9.25 introduced HLE support, so an original PlayStation BIOS is not absolutely required anymore. However, a real PlayStation BIOS is recommended as the HLE is known to break some games.
Currently there is a known bug with the Windows version- the emulator does not have the CPU overclocking option set to 1x by default, so the user must select it manually otherwise the emulator will freeze or crash upon starting a game.
Что нужно знать о работе эмулятора
Multi PSX Emulator позволяет запускать игры от разных консолей и расширяет возможности Андроид-устройства. Но для корректной работы приложения недостаточно скачать только установочный файл. Пользователь должен найти в Сети образы игр и Bios-файлы, без которых эмулятор работать не будет.
Процесс установки Multi PSX Emulator на гаджет состоит из нескольких этапов.
-
Необходимо скачать бесплатный .apk-файл и запустить его на устройстве.
-
После установки Multi PSX Emulator потребует дополнительный Bios-файл. Его легко найти и загрузить через Сеть. Разместить Bios-файл лучше в корневую папку эмулятора.
-
ROM-файлы (или образы игр) также доступны для бесплатной загрузки. Существуют целые каталоги игр, в том числе и редких, которые хранятся в виде zip- или rar- архивов.
-
Файлы с играми можно разместить в любом удобном месте на устройстве, подойдет внутренняя или внешняя память (в том числе и SD-карты). После этого приложение будет взаимодействовать с выбранной игрой.
-
По желанию можно настроить эмулятор по своему вкусу: выбрать качество воспроизведения звуковых эффектов, графики, расположение управляющих клавиш. В десктопной версии приложения доступна функция подключения внешних устройств (джойстика, игровой клавиатуры).
Эмулятор предоставляет пользователю только аппаратную оболочку: элементы игрового управления и способ взаимодействия со сторонними игровыми файлами. Образы игр необходимо скачивать отдельно, и это объясняется спорами с правообладателями.
Не все игры корректно воспроизводятся на Multi PSX Emulator. Чаще всего пользователи жалуются на искажение графики и звука. И если звук значительно улучшается после включения режима сохранения, то игровая графика от PS и других игровых консолей еще недостаточно хорошо адаптирована под Андроид-гаджеты. Единственный совет, который дает разработчик — использовать образы игр в несжатом ROM-формате.
Gameplay options
5. Cheatcodes
In this option, you can enable/disable cheat codes for the game which you are playing. If you don’t have cheat codes for this game, you will see a download button to get cheatcodes file from our server. ePSXe supports GameShark cheat codes. You can download the cheat codes from our server with the Download button on cheatcode option during gameplay or create your own file.
In the second case, you can load cheat codes in the emulator creating a file called «sdcard/epsxe/cheats/SXXX_XXX.XX.txt (where SXXXX_XXX.XX is the PS-EXE name of the game, which you can see in exit option, or in the cheat code option during gameplay) in your sdcard. For example in Final Fantay 8 US-NTSC the file name is:
«epsxe/cheats/SLUS_008.92.txt».
ePSXe supports 256 codes per file. The file format is:
#description of cheat code 1
XXXXXXXX YYYY
ZZZZZZZZ AAAA
#descripion of cheat code 2
NNNNNNNN MMMM
For example for Final Fantasy 8 US-NTSC, it could be:
#Zell level 20
800778a4 4a38
Currently, only 80XXXXXX, 30XXXXXX, 50XXXXXX, 1F800XXX, D0XXXXXX, D1XXXXXX, D2XXXXXX, D3XXXXXX, E0XXXXXX, E1XXXXXX, E2XXXXXX, E3XXXXXX gameshark codes are supported, the rest will be ignored. You can find GameShark codes in a lot of webpages in internet, like:
http://psxdatacenter.com
http://www.gamegenie.com/cheats/gameshark/ps1/index.html
After that, re-load your game, and you will be able to enable/disable the gameshark codes from the menu «cheat codes» on gameplay (disabled by default).
6. Toggle GLConfig
Using the opengl external plugin in this option, you can enable/disable the opengl settings tools to change options on the fly.
- FS: Enable/Disable frameskip
- OD: Enable/Disable Off screen drawing. OD is used to detect drawings which are outside the front/backbuffer, doing such stuff in software (or by tweaking polygon coords).
- FI: Enable/Disable filtering. Give it a try… the real PSX doesn’t support BF, so there will be some glitches if you turn BF on. Several games will look nicer… there are two main filtering modes… the Extended mode is slightly slower, but even better with most games.
- AM: Enable/Disable Alpha Multipass. Draws opaque texture pixels the way it should be. Of course it could be a bit slower (and if your OpenGL driver draws black rectangles around objects, turn this option off).
- AB: Enable/Disable Advanced Blending. Depending on your drivers OpenGL implementation using ‘Advanced blending’ will be nice or slow
- FT: Enable/Disable Framebuffer texture. To get whirling screen effects and psx motion blurring.
- MB: Enable/Disable Mask Bit (it usually requires restart). A really rarely used ability of the real PSX is the usage of mask bits to avoid drawing into some parts of the screen. Well, to increase compatibility you can turn the mask bit emulation on, but as far as I know only Silent Hill is really needing it. If you activate it, there are also some chances that 3D shutter glasses will work… Another hint: because most games don’t need the mask detection, you can turn it off to get more available texture vram.
- SAVE: Save to a file in sdcard/epsxe/config/GAME-CODE.txt the options selected.
- EXIT: Hide the toolbar.
7. Split Mode options
You must choose 2 players in input preferences, and then there are 3 split modes available:
- SplitVert: Used in games which don’t have split screen (Tekken3, Soul Blade …)
- SplitHorz1: Used in games which have split horizontal screen (Gran Turismo 2…)
- SplitHorz2: The same as SplitHorz1, but with the pads swapped
8. More options
You can in lastest version modify on the fly some parameter, edit cheat codes, reset the game …. Be careful the options modified during game play are not saved, you have to set that options in preferences.
How to Setup your gamepad in the emulator
1. Auto-setup the gamepad
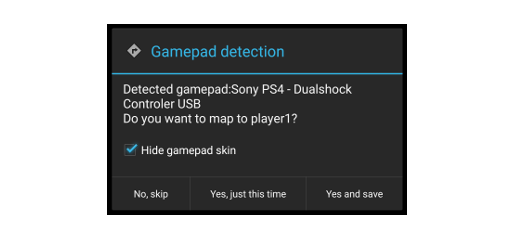
ePSXe is auto-detecting a lot of gamepad models. If your gamepad is a very common gamepad, you can use the auto-setup from the emulator. In the first place, you have to connect the gamepad to your smartphone. You can use a OTG adaptor or using bluetooth if it is supported by your phone (example for a PS4 gamepad). After that your should be able to manage your smartphone desktop with the gamepad. The next step is run the emulator, choose a game, run the game, and press a button in your gamepad during gameplay. If it is auto-detected, it will show a dialog asking you to use the gamepad to play. You should be able to use the gamepad now (if the buttons are not rightly mapped, go to the next section).
If you get too much latency using the gamepad, check that you are not using bluez (please DISABLE this option) in the epsxe config (that option is just for very old legacy smartphones), and in the case of the PS4 gamepad, check this DS4 latency fix workaround
2. Config your gamepad yourself
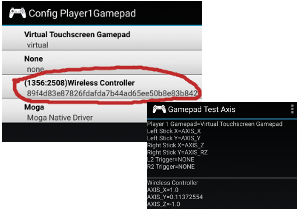
These are the standard steps to config a gamepad in ePSXe, but it will JUST work if your Android smartphone supports your gamepad (it means that the gamepad was previously working on other apps in the phone). ePSXe uses the standard gamepad android API.
0) If you connect the joystick with a OTB USB and you have android 3.1+ continue in step 1. If it is by bluetooth, see the documentation in your gamepad or search in google about how to connect your gamepad — (example for a PS4 gamepad) (in old devices sixaxis controller app or similar name on google play could be needed or if it id xbox gamepad, use ms wireless receiver). After connecting go to step 1.
1) Test whether the pad is working on Android. With your gamepad paired and switched on, run ePSXe, go to «Preferences>Player1>Player1 map axis>Gamepad Test Axis», and moving the sticks, you should see values on screen. (android 3.1+ required).
2) With your gamepad paired and switched on, run ePSXe, choose your gamepad in «Preferences>Player1>Select Gamepad» (moga is JUST for Moga devices). After that go «Preferences->Player1->Player 1 Map Buttons» and map your buttons and go to «Preferences->Player1->Player 1 map axis» and config the axis detected in the step 1.
3) Go to «Preferences->Player1->Pad Type PSX» and select «Dual shock»
4) Run a game. Be careful some games are not dualshock compatibles in the original Playstation (check the PSX datacenter to check if the game is compatible), in those cases «Preferences>Player1>Pad type PSX» = Digital (Only) could be needed
5) if it is running please in ePSXe title screen press back button, and choose «report gamepads» and we will add autoconfig in future versions. Thanks.
Disclaimer and copyright
Sony Playstation is a registered trademark of Sony. All mentioned games are registered trademarks of their authors or marks (basically you have to own the original Playstation game which you will be going to use). You may only be in possession of the copyrighted BIOS if you’re legally entitled to do so (basically you have to own a Sony Playstaion or borrow one). ePSXe team will NOT provide in any case links to copyrighted software. Neither the ePSXe Team software nor its authors are affiliated with Sony, videogame companies, roms/isos websites, «7zipper» authors or companies.
Описание и возможности
В первую очередь разберем основные и дополнительные возможности эмулятора ePSXe BIOS. Их список сводится к следующему:
- Воспроизведение игр от Sony PlayStation различных версий.
- Поддерживается несколько типов рендеринга, например, DirectX или OpenGL.
- Клавиатуру можно гибко настраивать.
- Поддержка множества самых разных моделей проводных и беспроводных джойстиков, а также работа с G-сенсором.
- Поддерживается установка плагинов.
- Поддержка эмуляции: Analog/DualShock, турбо эмуляция Multitap, GunCon, Justifie и так далее.
- Автоматическое скачивание таких полезных функций как, обложки дисков, читы для различных игр, справочная информация и так далее.
- Поддерживается игра по сети.
- Мы можем подключить даже 3D-гарнитуру.
Disadvantages
- It’s slightly (significantly still) prone to freezing/crashing/BSOD (in that order)
- Random, inconsistent FPS drops due to the server trying to keep everyone synched, sometimes stuttering. It’s annoying, but rarely does it make it unplayable
- The emulator is based upon (ePSXe 1.60, a 10 year old version) lacks A LOT of options, and incorrectly emulates several games
- Everyone needs to have the exact same ROM version or NetPlay won’t work (if it somehow does, it’ll desynch rather quickly)
- Everyone needs to have the exact same save file, or no save file at all. Else, it desynchs
- You need to constantly switch focus back and forth between chat and emulator window in order to chat.
- You will hear no sound while the window is unfocused.
- The emulator is extremely sensistive and desynchs if you focus on another window, move the window around or minimize it
- Not long after the game desynchs, the entire emulator will freeze
- Dropping from a game or trying to exit Kaillera will freeze or crash the game
Запуск BIOS
Для запуска BIOS консоли необходимо выбрать на панели меню пункт File — Run BIOS.
Произойдет запуск файла BIOS, указанного в настройках BIOS.
Создание кнопки запуска
Для быстрого запуска ePSXe можно создать кнопку запуска на рабочем столе / в меню / на панели.Тип: ПриложениеИмя: ePSXe (или по желанию)Команда: путь к файлу epsxe в папке с эмулятором (укажите с помощью кнопки Просмотреть…)Примечание: по желанию
Известные проблемы
- Эмулятор зависает после открытия окон настроек (главное окно остается неактивным даже после закрытия окна настроек).
- Эмулятор зависает и не реагирует на нажатия.
ePSXe для Андроид
Связи со стремительным развитием компьютерных технологий в начале 2000-х появилась программа ePSXe, которая распространялась по лицензии freeware (свободного доступа). Главной её задачей было – эмуляция игр для PlayStation на персональных компьютерах.
Это позволило многим геймерам запускать и играть на своих ПК, даже не имея саму приставку. Но технологии не стоят на месте, с резким развитием мобильных технологий и появлением Андроид платформы, разработчики смогли адаптировать её и для них.
Имеет специальный apk файл Вы без труда сможете запустить ePSXe на своем Андроиде и играть в любимые игры, в данной инструкции мы рассмотрим все шаги поэтапно.
Установка и настройка ePSXe для Андроид
Для начала нам необходимо скачать саму программу, видео плагин и БИОС, все это находить в одном архиве по этой ссылке, а далее следуем нашей инструкции ниже:
2.Подключаем свой смартфон или планшет к компьютеру и копируем все три файла на него;
3.Устанавливаем apk файл, процесс установки мы детально описывали тут;
4.Запускаем ePSXe;
5.Заходим в настройки и указываем путь к файлу биос (один из трех скачанных файлов) — scph1001.bin;
6.Опускаем ниже и переходим к настройкам видео – включаем GPU Accurate Mode (Enabled) и указываем путь к Плагину GPU (файл libopenglplugin.so);
7.Возвращаемся в меню и выбираем пункт «Запустить игру»;
8.Программа автоматически просканирует систему на наличие образов игр, после этого выбираем необходимый и наслаждаемся игрой;
9.Если автоматическое сканирование не нашло образ, то можно указать его расположение вручную.
Где найти образы игр для ePSXe
Большая коллекция образов представлена на данном сайте free-iso.org, но помните, что их использование незаконно, так как у Вас нет лицензии.
Версия ePSXe с необходимыми плагинами
Для упрощения настройки эмулятора был собран специальный архив с эмулятором ePSXe, содержащий все необходимые для работы плагины и библиотеки (кроме файла BIOS).
В данную сборку вошли следующие deb-пакеты:
Пакет libgtk1.2 с зависимостями для 32-х и 64-битных ОС.
В данную сборку вошли следующие плагины:
- Pete’s XGL2 Linux PSX GPU
- P.E.Op.S./Pete’s MesaGL Linux PSX GPU
- P.E.Op.S. Soft GPU (Linux)
- Linux GPU configs
- P.E.Op.S. Linux OSS/ALSA PSX SPU
- Pete’s Linux NULL PSX SPU
- Joy-Device plugin 0.82 PAD
Работоспособность проверена в ОС Ubuntu 10.04 i686 с подключенным USB-геймпадом.
Ссылки для загрузки:
Зеркало 1
Настройка ePSXe
Настройка эмулятора осуществляется в несколько этапов благодаря системе поддержки внешних плагинов.
Далее мы рассмотрим основную настройку эмулятора для успешного запуска игр.
Как установить эмулятор PS на Андроид и запустить игры
Установка эмулятора — одна из самых простых задач в процессе запуска игр для PlayStation. Пользователю достаточно иметь учётную запись Google Play.
- На главной странице магазина вбейте в поисковую строку либо название искомой программы, либо «эмулятор PS».
- После установки приложение может потребовать от пользователя файл BIOS. Чаще всего используется SCPH1002, являющийся системным ROM для Европы. Его можно скачать из интернета, просто вбив в поисковую строку название. Загруженный файл необходимо разместить в корневой папке эмулятора или же оставить среди скаченных документов, а в самой программе настроить путь к BIOS через меню.
-
После установки BIOS пользователь может смело приступать к скачиванию самих игр. Процесс довольно прост, ведь вам достаточно вбить в поисковой строке «Игры для PS1 скачать», чтобы получить доступ к сотням игр для японской консоли. Чаще всего игры скачиваются в архивах *.rar или *.zip, которые далеко не все проводники на Android способны открыть. Не забудьте заручиться поддержкой программы RAR, чтобы извлечь из пака необходимый образ в форматах img, iso или bin. Этот файл и является игрой, с которой эмулятору предстоит работать.
После установки эмулятора станет возможным запуск игр PS
Размещайте игру в удобной для вас папке на устройстве или карте памяти. Теперь необходимо войти в эмулятор и произвести настройки. Они не обязательны, однако современные приложения предлагают игрокам выбрать качество графики, звука, настроить расположение клавиш навигации на экране и, даже, использовать внешний геймпад.
Теперь осталось лишь нажать заветную кнопку «Запустить игру», выбрать из списка или в проводнике тот самый скаченный образ и наслаждаться любимым с детства геймплеем!
Как установить эмулятор PS на Андроид и запустить игры
Установка эмулятора — одна из самых простых задач в процессе запуска игр для PlayStation. Пользователю достаточно иметь учётную запись Google Play.
- На главной странице магазина вбейте в поисковую строку либо название искомой программы, либо «эмулятор PS».В Google Play Market предлагается огромное количество эмуляторов
- После установки приложение может потребовать от пользователя файл BIOS. Чаще всего используется SCPH1002, являющийся системным ROM для Европы. Его можно скачать из интернета, просто вбив в поисковую строку название. Загруженный файл необходимо разместить в корневой папке эмулятора или же оставить среди скаченных документов, а в самой программе настроить путь к BIOS через меню.Перенесите файл BIOS в корневую папку эмулятора
-
После установки BIOS пользователь может смело приступать к скачиванию самих игр. Процесс довольно прост, ведь вам достаточно вбить в поисковой строке «Игры для PS1 скачать», чтобы получить доступ к сотням игр для японской консоли. Чаще всего игры скачиваются в архивах *.rar или *.zip, которые далеко не все проводники на Android способны открыть. Не забудьте заручиться поддержкой программы RAR, чтобы извлечь из пака необходимый образ в форматах img, iso или bin. Этот файл и является игрой, с которой эмулятору предстоит работать.
После установки эмулятора станет возможным запуск игр PS
Размещайте игру в удобной для вас папке на устройстве или карте памяти. Теперь необходимо войти в эмулятор и произвести настройки. Они не обязательны, однако современные приложения предлагают игрокам выбрать качество графики, звука, настроить расположение клавиш навигации на экране и, даже, использовать внешний геймпад.
Теперь осталось лишь нажать заветную кнопку «Запустить игру», выбрать из списка или в проводнике тот самый скаченный образ и наслаждаться любимым с детства геймплеем!
Описание
ePSXe openGL Plugin – это бесплатный плагин к программе ePSXe для устройств на ОС Андроид. С его помощью можно открывать и наслаждаться любимой игрой от PlayStation в качестве HD. Для этого необходимо просто установить его и активировать в разделе настроек эмулятора ePSXe.
Стоит обратить внимание, что не во всех играх есть поддержка качества HD, из-за этого в них могут возникнуть проблемы с графикой и падение скорости работы. Перед установкой следует убедиться, что на Вашем устройстве установлено последнее обновление эмулятора ePSXe
Возможности плагина
Благодаря мощностям современных смартфонов на них можно без потерь производительности открывать эмулятор приставки и игру. Естественно запустить новые разработки от PS 4 никак не получится, однако можно насладиться классическими играми от PS 1. Настройки эмулятора позволяют подобрать комфортное для каждого пользователя управление.
Возможности приложения после установки плагина:
- вручную выбирать настройки графических и звуков плагинов, а также необходимую версию BIOS;
- использование образа для запуска игр;
- прогресс сохраняется на виртуальную карту памяти;
- настройки качества графики;
- регулировка скорости геймплея;
- настройка элементов управления;
- каталог скачанных игр сохраняется.
У программы существует поддержка всех видов игр как официальных, так и взломанных с русификаторами, модами и всевозможными читами.
Настройка эмулятора
Перед установкой плагина, требуется скачать программу ePSXe и настроить ее. Для этого необходимо:
- установить эмулятор;
- найти совместимую версию BIOS, скачать и распаковать в корневой каталог программы ePSXe;
- скачать плагины на любой накопитель памяти;
- запустить эмулятор и при помощи настроек выбрать версию БИОС и плагин ePSXe openGL Plugin;
- нажать кнопку «Старт» и указать образ.
После этих действий у Вас запускается выбранная игра с графикой в HD, управление игрой будет проходить посредством виртуальных клавиш на экране.
Преимущества эмулятора с ePSXe openGL Plugin
- различные типы графики;
- смена расположения элементов управления;
- совместим с USB-OTG клавиатурой и bluetooth, автоматическая их настройка при подключении;
- автоматическая установка обложек к играм и читов;
- режим мультиплеер;
- поддержка всех форматов образов;
Благодаря эмулятору ePSXe с нашим плагином Вы можете наслаждаться практически любыми классическими играми. С ним нет необходимости искать или покупать старые консоли, теперь она всегда под рукой.
ePSXe openGL Plugin на APKshki.com скачали 458 раз. ePSXe openGL Plugin распространяется бесплатно в расширении apk.
Все приложения и игры на нашем сайте проходят обязательную проверку антивирусом с последними сигнатурами.
Скриншоты
Особенности и преимущества ePSXe
- Полная поддержка Android TV и 3D очков.
- Высокая скорость и стабильность работы эмулятора.
- Совместимость с многими популярными играми.
- Наличие опций повышения точности эмуляции и улучшения графики.
- Несколько типов рендеринга, включая OpenGL.
- Полная поддержка внешнего геймпада.
- Автонастройка беспроводных и проводных геймпадов.
- Поддержка внешних скинов.
- Возможность включения и отключения ограничителя рамок и пределов экрана.
- Поддержка мультиплеера по Wi-Fi и Wi-Fi Direct.
- Поддержка PPF патчей.
- Загрузка чит-кодов с сервера.
- Возможность сохраняться в игре.
Необходимые файлы
Чтобы иметь возможность играть в игры, вам понадобиться скачать на свое устройство несколько файлов:
- Файл эмулятора ePSXe.
- Файл BIOS.
- Плагин ePSXe openGL Plugin.
- Если хотите запускать игры прямо из архивов, скачайте также ePSXe sevenzip Plugin.
Установка и настройка ePSXe
- Скачайте файл APK эмулятора ePSXe на свое устройство.
- Скачайте и распакуйте файл BIOS. Подключите его в настройках эмулятора.
- Скачайте и установите плагин ePSXe openGL Plugin
- В настройках ePSXe установите GPU Renderer = opengl plugin.
- Скачайте выбранную игру. Скачать игру можно на каком-то торрент-трекере или на сайте emuparadise.me.
- Как правило, игры скачиваются в архиве. Если хотите запускать их не распаковывая установите дополнительный плагин ePSXe sevenzip Plugin.
- В главном меню эмулятора выберите пункт «Загрузить игру».
- При появлении списка игр выберите нужную.
- Можно играть.
Смотрите полезное видео ниже.
Скачать ePSXe
Ниже представлены ссылки, по которым вы сможете скачать все необходимое для установки эмулятора на свой ТВ.
- Скачать ePSXe 2.0.15 b139apk(11,45 MB)
- Скачать BIOS zip (234,59 KB)
- Скачать ePSXe openGL Plugin apk (662,15 KB)
- Скачать ePSXe sevenzip Plugin apk (2,43 MB)
Что нового в этой версии
- Исправлена ошибка сенсорного экрана при одновременном нажатии 4 кнопок
- Улучшенные режимы Dynamic Pad со статическим стартовым положением и регулировкой положения пэда.
- Добавлено наложение изображения для поддержки экрана в режиме 4: 3
- Добавлена пауза при открытии меню — включить в настройках
- Отключить эффект кнопки увеличения при использовании пользовательского скина геймпада
- Исправлены сбои при подключении / отключении некоторых геймпадов во время игры.
- Добавлен флаг для разрешения захвата звука для стороннего приложения из Android Pie.
- И так далее.