Rainmeter 4.0 release
Содержание:
- Refresh
- Major additions and changes in Rainmeter 4.3
- Major additions and changes in Rainmeter 4.3
- Background options
- Скачайте Rainmeter для Windows 10 на русском бесплатно
- Context options
- Your First Skin
- Editing Skins
- The Layouts tab
- Rainmeter Tutorial
- Building the Clock skin
- About
- Some extra credit work
- Why should you install some of the best Rainmeter skins on your Windows system?
- Настройка Rainmeter
- What You Need
- Context Menu
Refresh
The action is important in Rainmeter. The effect of refreshing a skin is the same as if you had unloaded and then re-loaded the skin. When this happens, all variables and other options are reset according to their original values in the skin file, and all measures restart from the beginning. Refreshing a skin is also necessary to apply any changes that have been made to a skin’s files.
You can refresh any skin by selecting in the context menu, or browsing to the skin in Manage and clicking the button in the top-right.
It may be ugly, but it’s different.
Try refreshing the Clock skin that you edited before. You will see the skin’s font face instantly change.
You have now edited your first skin! This is the same basic process that you will use to customize, modify, and eventually create skins of your own.
Major additions and changes in Rainmeter 4.3
Direct2D and Hardware Acceleration
Rainmeter 4.3 has changed entirely from using an older GDI+ graphics engine in Windows to the more modern and capable Direct2D (known as D2D for short). Not only does D2D offer additional capabilities we will be taking advantage of in the near future, but it also allows us to optionally support hardware acceleration. (known as HWA for short) This means that some of the processing, and the memory used, can be offloaded from the CPU to the GPU, and things will be rendered or «draw» significantly faster.
Hardware acceleration defaults to «off». This to help us to identify general issues that might come up with the conversion from GDI+ to D2D, and isolate any problems that are strictly related to hardware acceleration. Hardware acceleration can be turned «on» in the , and we recommend it. Future versions will change the default to «on» in Rainmeter.
Hardware acceleration and Intel HD integrated graphics: There is a known issue with certain Intel HD integrated graphics chips, often seen on laptop computers, and hardware acceleration. This is due to a bug in the drivers for these chips from Intel, and the problem can generally be solved by updating your system to the most recent version of the graphics drivers from Intel. Details and suggestions for this issue are at: Intel HD Graphics drawing issue(s) with hardware acceleration
Reporting problems with Direct2D: We would be very interested in anything you see that is «different» for you when using Rainmeter 4.3. Things that looked different in Rainmeter 4.2. The goal here is to ensure that we fully protect backwards compatibility with existing skins in the change from GDI+ to D2D. Any skin you run in Rainmeter 4.2 should look and work exactly the same in Rainmeter 4.3. Please report these issues in this forum area: Rainmeter 4.3 D2D Issues.
New Container Functionality
Added a new Container option to all meter types. This will allow you to place the contents of a meter inside another meter, acting as both a «container» and a «mask». See the documentation for important details and a .rmskin with several examples.
Background options
- General image options
-
All general image options are valid for .
-
of a background image file.
- Default:
-
Defines the background mode for the skin. Valid values are:
- : Image as defined by
- : Transparent background
- : Fill with a solid color
- : Fill by scaling image as defined by
- : Fill by tiling image as defined by
: The is set by adding a option.
- Default:
-
If , defines margins of the image that are not scaled. The parameters are .
Example: .
10 pixels from the top and 20 pixels from the bottom of the image are not scaled. - , Default:
-
This option will specify the background when . If is also specified, the background is a composed of and .
Hint: can be used to make transparent areas of the background clickable.
-
Angle of the gradient in degrees (for and ) when .
- Default:
-
If enabled, draws a bevel around the edges of the entire skin when . Valid values are:
- : No bevel
- : Raised
- : Sunken
Скачайте Rainmeter для Windows 10 на русском бесплатно
| Версия | Платформа | Язык | Размер | Формат | Загрузка |
|---|---|---|---|---|---|
|
Rainmeter 4.2 |
Windows 10 |
English | 2,2MB | .exe |
Скачать |
|
Rainmeter 4.3 beta |
Windows | English | 2,2MB | .exe |
Скачать |
Обзор Rainmeter
Rainmeter (Райнметер) представлен набором виджетов, оформленных в стиле Windows 7. Программа предназначена для любителей оригинального дизайна, она эффектно украшает рабочий стол и выводит на него актуальную информации о компьютере.
Скриншоты
Похожие программы
SpeedFan
Google Earth
DirectX — пакет библиотек, необходимый системе для работы с мультимедиа
ArtMoney
Andy
Hamachi
Tunngle
Game Maker Studio — разработка игр и приложений под различные платформы
IObit Malware Fighter — для удаления вредоносных программ – троянов, кейлоггеров
Mobogenie
Nokia PC Suite
BlueStacks — программа для запуска android приложение на windows
360 Total Security — условно-бесплатное антивирусное программное обеспечение
Fences
Hotspot Shield
7-Zip — бесплатный архиватор для windows
Origin
CPU-Z
Driver Booster Free — программа для поиска и установки новых драйверов
Acronis Disk Director — пакет инструментов для работы с жесткими дисками компьютера
DriverPack Solution — для автоматической установки и обновления драйверов
Cheat Engine
VirtualBox — создание вирутальных машин
Reg Organizer — программное обеспечение для оптимизации и очистки компьютера
Bandicam — программа для снятия скриншотов и записи видео с экрана
Nox App Player — программа для запуска андроид игр и приложений на windows
2GIS
Razer Game Booster — программа для отключения неиспользуемых процессов
Punto Switcher
Radmin
Mathcad
Ammyy Admin
3DMark
Action!
FurMark
Xpadder
Adobe Dreamweaver
Driver Genius — сканирования и обновление драйверов на компьютере
PowerDVD — проигрыватель мультимедийных файлов
CheMax
GOM Player — медиапроигрыватель для Windows
FBReader
Cool Reader
Samsung Kies — подключение телефонов и смартфонов компании Samsung к ПК
Connectify Hotspot
MyPublicWiFi
Nero Burning ROM
Free Studio — пакет объединяющий более 40 мультимедийных программ
WinSCP
ImgBurn
FB2 Reader
FastStone Capture
EasyBCD
STDU Viewer
NVIDIA PhysX
ManyCam
Virtual Router
Dropbox
Adguard
Dr.Web CureIt! — бесплатная утилита для лечения компьютера от вредоносного ПО
Яндекс.Диск
Kaspersky Free — бесплатная версия антивируса от лаборатории Касперского
NOD32 — хороший антивирус для компьютера
iTunes — программа для синхронизации между мобильными устройствами Apple
Rufus
PRO100
Arduino
CGMiner
Maple
Visual Studio
Bitcoin Core
Глаз.ТВ
Kingo Root
Android Studio
Scratch
Firebird
Charles
NVIDIA GeForce
MinerGate
Microsoft .NET Framework — платформа создающая условия установки компьютерного ПО
Eclipse
NVIDIA Inspector — для работы с графической подсистемой
HWMonitor
Core Temp
Display Driver Uninstaller — для удаления устаревших драйверов видеокарт
VueScan
CrystalDiskInfo — диагностическая утилита для проверки жестких дисков
HDD Low Level Format Tool — утилита, предназначенная для форматирования жестких дисков
Ускоритель компьютера — оптимизация операционной системы Windows
Classic Shell
WinThruster — оптимизация операционных систем семейства Windows
Avast Free Antivirus — бесплатный Аваст антивирус для компьютера
Mcafee — антивирусная программа, для защиты компьютера от внешних угроз
Intel Driver
ASUS Update — утилита, предназначенная для обновления BIOS на компьютере
Clownfish
Evernote
GeForce Experience — автоматического поиск драйверов видеокарт компании Nvidia
Облако Mail.ru
CPU Control
Microsoft Security Essentials — антивирус для защищиты операционной системы
ActiveSync
BlueSoleil
Malwarebytes Anti-Malware — частично бесплатная антивирусная утилита
TV Player Classic
CyberGhost VPN
RivaTuner
PuTTY
Trend Micro HijackThis
VMWare Workstation
Supremo
AnyDesk
Rainmeter
RocketDock
Lightshot
TunnelBear
AMD Catalyst Control Center — программа для настройки видеокарт AMD Radeon
Аудио | Видео программы
Графические программы
Microsoft Office
Игры
Интернет программы
Диски и Файлы
Context options
- , , …
-
If not blank, adds an item to the skin’s context menu under «Custom skin actions». Up to 25 ContextTitleN options are allowed, with up to 30 characters per option. Additional characters are truncated with an ellipsis (). If more than 3 ContextTitleN options are given, «Custom skin actions» becomes a submenu. If a ContextTitleN option is not valid, all subsequent ContextTitleN options are ignored. In addition, if more than 3 options are given, and the value of ContextTitleN includes only dashes (), the item is displayed as a separator.
Note: Variables in are always . Variable values are read at the time the context menu is opened. This means that the bang can be used to change these values.
- , , …
-
triggered by clicking the corresponding item. ContextActionN is required for ContextTitleN to be valid, unless the item is a separator.
Note: Variables in are always . Variable values are read at the time the context menu is opened. This means that the bang can be used to change these values.
Your First Skin
Until now, you have been working with the pre-made illustro skins that come with Rainmeter. Now, you’re going to create a new skin from scratch.
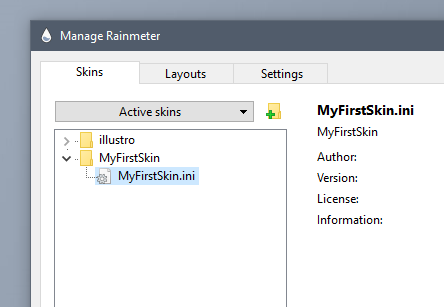
Creating a new skin is quite easy. In , click the «Create new skin» button. This will create a new config folder in the skins list, offering a default starting name of «NewSkin». Name this folder «MyFirstSkin» and hit enter.
This will do several things. It will create a new folder with the name «MyFirstSkin». In it it will create an empty @Resources folder, will create a new basic MyFirstSkin.ini skin file, and will open this new skin in your default or defined text editor, so you are off and running.

Your new skin is created in the proper folder, and ready to work with in Manage and your text editor.
The «Hello, World!» Skin
The very first thing you will see in your skin is the section. This is a skin’s «header» property, like the tag in an HTML webpage. In the section, you will see an option. Like this:
Update=1000 |
The option is what sets the length of the skin’s . The length is given in milliseconds, or 1/1000ths of a second, so means that the skin will update once per second. Updating is how the skin will react to changes in information. You’ll see how this works in more detail later on.
Now that you’ve given your skin a «head,» it’s time to give it a «body.» Let’s change that default string meter. This is one of the most common types of meters, and it is used to create text.
Update=1000Meter=StringText=Hello, world! |
The option is required to tell Rainmeter that this section is, in fact, a meter. All meters have this option. The value of the option determines what type of meter it is.
The option, on the other hand, is unique to the string meter. As you might have guessed, this is where you provide a string of text for Rainmeter to display.
Believe it or not, what you have now is a complete, valid, working Rainmeter skin! Let’s load it to see what it looks like. Load the skin using one of the methods that you learned before. You can either:
-
Open the Manage window by left-clicking the Rainmeter tray icon, find in the , then click the button in the upper-right.
-
Open the context menu by right-clicking the tray icon, then select → → .
(As you get comfortable with Rainmeter’s user interface, you’ll decide whether you prefer working with the context menu or the Manage window.)
Now, look up in the top-left corner of your desktop. There’s your skin!
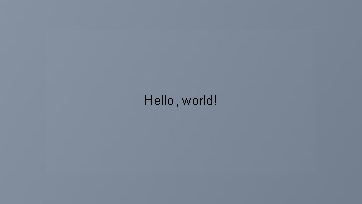
Can you see me?
It’s… not very big. Or pretty. Meters without any options tend to be very simple and unimpressive. So let’s add some formatting.
Meter=StringText=Hello, world!AntiAlias=1FontColor=255,255,255FontFace=Segoe UIFontSize=20 |
Here’s what we’ve added:
-
A general meter option that smooths out the edges of a meter. This almost always improves the appearance of a string meter.
-
A that changes the color of the text in this meter.
-
An option that changes the font used for this meter. Rainmeter can use any font that you have installed in Windows, or another font in a skin’s @Resources folder—but we’ll get to that.
-
The size of the font.
Now, let’s apply these changes by the skin. Once again, you can either press in the Manage window, or → in the context menu.

Much nicer.
Congratulations! You have just created a new skin. You are now ready to move on to the Basic Tutorials. This series will guide you through the entire process of creating several example skins, while teaching you about the fundamental elements of a Rainmeter skin.
Continue to: Anatomy of a Skin »
« Back to: Customizing
Editing Skins
You have already learned how to change basic skin settings in Rainmeter. Now, it’s time to learn how to make edits to a skin itself.
Controls
It is possible that your skin will provide some kind of built-in graphical interface for changing its own code. In this case, all you need to do is follow the instructions provided, clicking buttons and typing or pasting new text values as needed. The skin may have control buttons embedded in the skin itself, or it may summon a separate skin or addon where you can change all customization options in one place.
This kind of sophisticated control system is more the exception than the rule, and is usually found only on large suites. More often, you will need to edit the skin code directly in order to change or add your own values.
Variables
What a skin looks like on the inside.
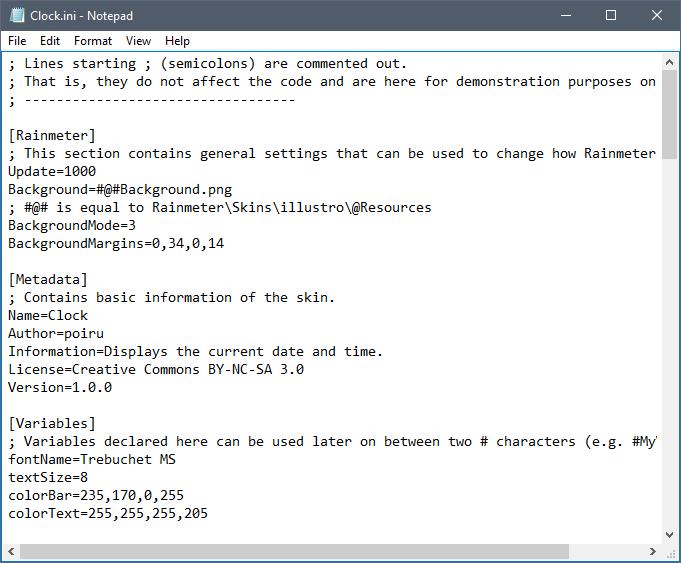
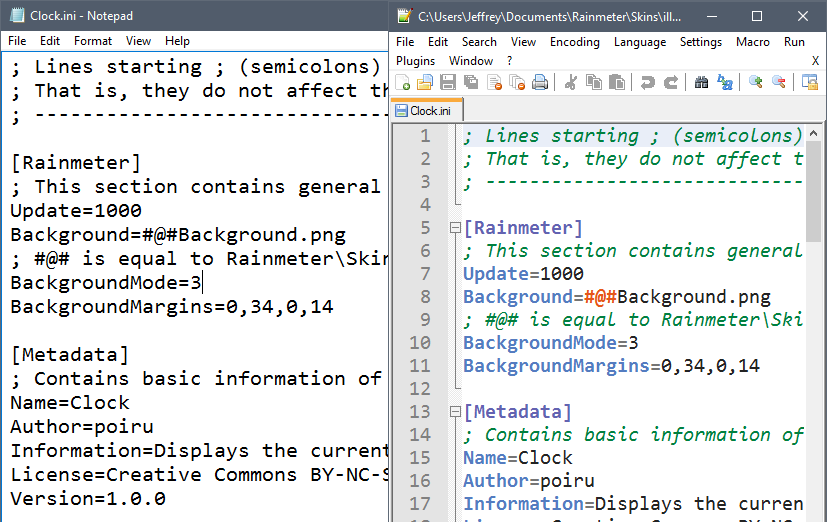
Most of the time, a skin’s customization options—that is, options that the author intends and expects you, the user, to change around—are saved as variables. To see an example, right-click the illustro «Clock» skin on your desktop, and select . The file «Clock.ini» will open in Notepad (or your default text editor).
This is what Rainmeter’s configuration code looks like. (Click the image on the right to zoom in.)
Although it may look complex, everything in this file is actually one of three basic elements:
-
A section. Section names are contained in brackets () and are used to «declare» some property of the skin.
-
A key. Keys are found at the beginning of each line in a section, followed by an equal sign ().
-
A value. The value is whatever meaning is assigned to a key—everything after the first equal sign () is the value. (Values must be constrained on a single line.) In Rainmeter, the pairing of a key and a value is called an option.
Key1=ValueKey2=ValueKey3=ValueKey1=ValueKey2=ValueKey3=Value |
When you’re editing variables in a skin, the values are what you are going to change.
Scroll down in your text editor to the section called . Here’s what it looks like. (Code examples in this manual are highlighted to help you easily identify sections, keys and values.)
fontName=Trebuchet MStextSize=8colorBar=235,170,,255colorText=255,255,255,205 |
Try changing one of these variable values. Go to the line that begins with the key, and change to another font — say, Times New Roman:
Then, save the file.
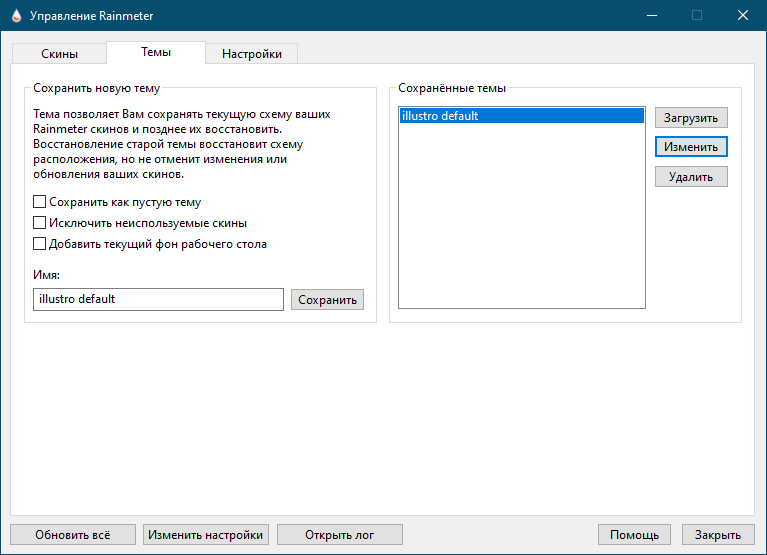
The Layouts tab
Layouts in Rainmeter are a way to save and load the current state of the Rainmeter settings. This saves the positions of currently active and inactive skins, as well as all other settings stored in the current Rainmeter.ini file. The layout can then be loaded to restore any saved state. Layouts are saved in the Rainmeter .
Note: The skin folders and files themselves are not saved with a layout.
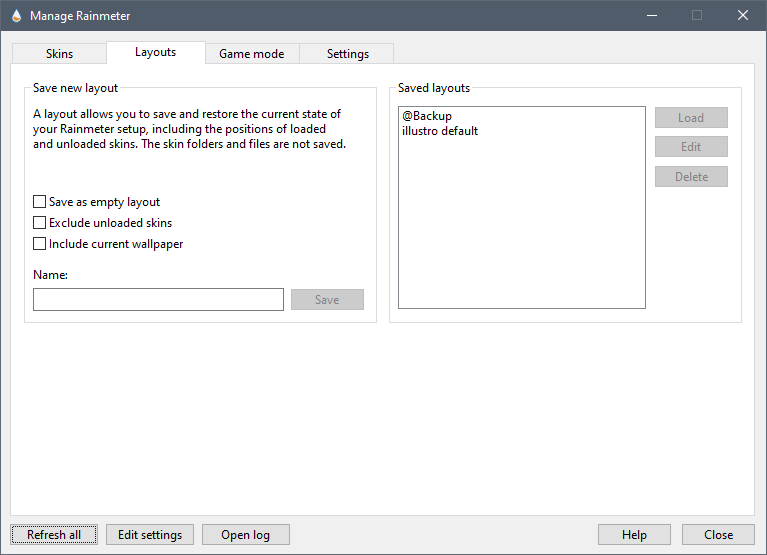
There are two main areas in this tab.
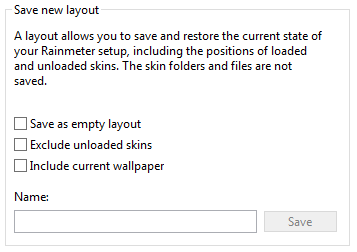
Save new layout
Enter the desired Name: and click Save.
- Save as empty layoutRemoves all sections before saving.
- Exclude unloaded skinsRemoves all inactive sections before saving.
- Include current wallpaperSaves the current Windows desktop wallpaper with the layout.
Note: If an existing layout is selected from the Saved layouts list or typed in, saving will replace the existing saved layout with the current state.
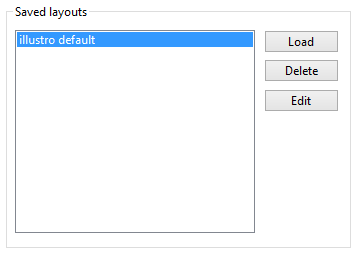
Saved layouts
Click on any layout name in the list.
- LoadLoads the selected layout. If a Windows desktop wallpaper was saved with the layout, it will be applied to the desktop.
- DeletePermanently deletes the saved layout.
- EditEdits the saved layout (Rainmeter.ini) file with the text editor associated with .ini files.
Global options under are not replaced when a layout is loaded, preserving local settings such as:
- ConfigEditor
- SkinPath
- DisableVersionCheck
- Language
When loading a layout, the current Rainmeter state will automatically be saved as a layout named @Backup.
Hint: A layout can be loaded from the Windows command line using the bang.
The current Rainmeter state will be replaced with the named layout. If Rainmeter is not running, it will be started.
Rainmeter Tutorial
How to install Rainmeter
-
Download the latest release from https://www.rainmeter.net/
-
Find the downloaded file and for this example, you can see the file on the desktop. Click «open» to install.
- Once you have opened it, it will bring to the Rainmeter Setup like the picture below and select the Standard Installation. Click the «Next» button and wait until it is fully installed on your computer.
How to open rainmeter
-
Once it’s installed, it will automatically load a widget on your desktop, to open the settings, you need to Left-Click the Rainmeter icon in the Windows Notification Area on the taskbar.
-
From the Windows menu, you also can search the Rainmeter app via search tab. Otherwise, you also can Right-Click the Rainmeter icon and it will show the «Manage» tab and click this to bring to the Manage Rainmeter setting.
How to set up rainmeter
- From the Rainmeter’s setting, you can click the «Skins» tab then you can take a look at the «Active Skins» and you can manage whatever widget to appear on your desktop.
- On the Settings tab, the best advice for a newbie you can stick to the default setting.
Building the Clock skin
This tutorial will introduce using Measures in a skin. Measures are used to obtain some information in Rainmeter, from your computer’s system, text files, web sites, and other sources. In addition, we will be using some more features of the String meter and dip our toes a little deeper into using and Bangs in your skin.
First, as we did in our earlier tutorial, let’s add the section to control the Update speed of the skin.
Update=1000 |
Now let’s add our first Measure, in this case a Time measure to retrieve information about the system time from your computer.
Measure=TimeFormat=% |
Do check out the manual entry for the measure to see how that option is used to obtain the time information you want. We are using a format of «hour in 12 hour time:minutes» for this measure.
So let’s add a meter to display this value we obtained with our measure. First, we are going to use the MeterStyle option by creating a section to set up some common string formatting options. This way we won’t have to repeat them in every meter we create. Then add the new meter.
FontFace=Trebuchet MSFontColor=255,245,207,255SolidColor=,,,1StringStyle=BoldStringAlign=RightAntiAlias=1Meter=StringMeterStyle=TextStyleMeasureName=MeasureTimeX=165Y=FontSize=40 |
The key to using measures and meters together is using the option to «bind» the measure to the meter. What that means is that this meter will display the value returned by the measure on each Update.
So let’s load our new skin and take a look at where we stand. From the dialog, find the Clock.ini entry in the list and click on the Load button on the upper right.
Drag the skin anywhere on the screen you like. Rainmeter will remember the position any time you load this skin in the future. You can also right-click the skin to change other skin options as desired.
About
The last part of Rainmeter’s interface is the About window. Open About by selecting from the context menu, or by clicking in Manage.
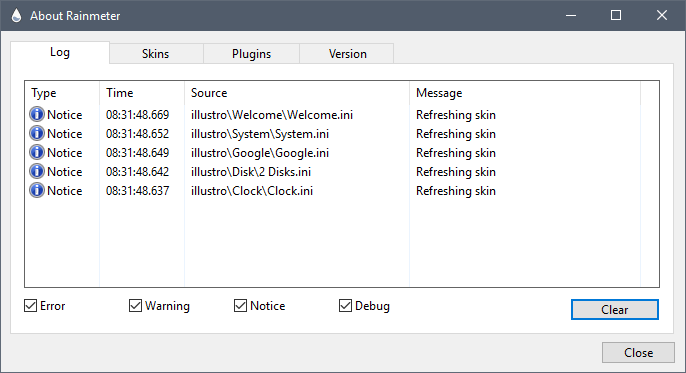
The «About» window shows you what Rainmeter is doing in real-time.
Log
The tab is where Rainmeter keeps a running record of what it is doing. This is also where Rainmeter reports errors related to a skin or the program itself. In addition, the tab will show you the current values of all measures and variables in the skin. (You’ll learn more about those later.) This makes the About window an invaluable assistant whenever you’re writing, editing or troubleshooting a skin.
Version
The other tabs show information about the version of Rainmeter you are using, as well as the versions of plugins that you have installed. If you are ever having a technical issue and need to ask for support from the Rainmeter community, the About window is where you can find a wealth of information about your Rainmeter setup that may be helpful in solving your problem.
Some extra credit work
We are going to add a couple more features to our clock, so we can touch again on using and Bangs in your skins.
First, let’s add the ability to toggle the display of the time between 12-hour and 24-hour when we hover the mouse over the meter. Find that meter, and add a couple of lines.
Meter=StringMeterStyle=TextStyleMeasureName=MeasureTimeX=165Y=FontSize=40MouseOverAction=MouseLeaveAction= |
This is using a Mouse action and a handful of Bangs.
What we are doing when we move the mouse over the meter is to use the bang to change the option of the measure to obtain the time from the system using the code for 24-hour time (%H) instead of 12-hour time (%I). Then we are using the , , and bangs to have the change take place as soon as we move the mouse over, and not wait for the next update of the skin.
When we move the mouse away from the meter, we are using the same combination of bangs to set the format back to 12-Hour time and update things.
Mouse Off
Mouse Over
Why should you install some of the best Rainmeter skins on your Windows system?
For those of you not in the loop, Rainmeter is a great open-source Windows customization tool that proffers easy customization options for your desktop and embellishes its overall look/layout substantially. The next question that arises is “how to use these skins, man?” Well, with RainMeter at the helm, you can do away with the need to download hundreds of wallpapers, widgets or bogus apps since there are hordes of RainMeter themes that a user can sift through without changing their wallpaper every now and then.
Of course, you can customize these Rainmeter themes to the brim and craft a distinctive look for your desktop! So, are you ready to find out the best Rainmeter skins for Windows 10/8.1/8 and Windows 7? Without further ado, let’s get started.
Настройка Rainmeter
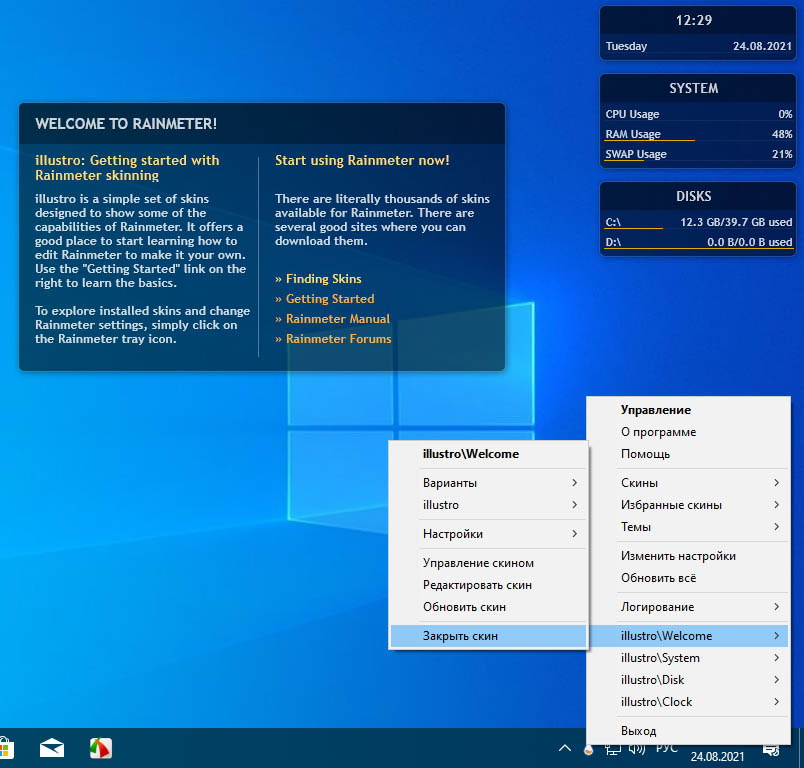
По умолчанию запущенное приложение размещает на рабочем столе четыре виджета — приветственный, часы, система и диск, из которых вы наверняка захотите скрыть первый. Сделать это можно либо из контекстного меню виджета (контекстное меню доступно для всех модулей),
либо из главного контекстного меню иконки Rainmeter в системном трее.
Внешний вид, координаты и прочие параметры отображения настраиваются в окне управления, вызываемом из главного меню. Окно настроек имеет три вкладки.
Скины — Вкладка содержит список установленных виджетов, которые могут быть добавлены на рабочий стол. Чтобы добавить модуль, выделяем его в списке и жмем «Загрузить». На этой же вкладке можно настроить поведение виджета, его координаты расположения на рабочем столе, уровень прозрачности и порядок загрузки.
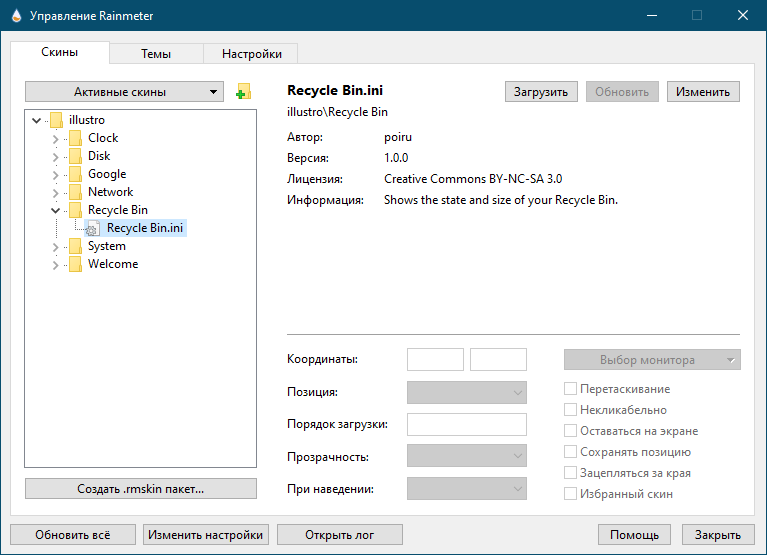
Темы — Вкладка «Темы» содержит список тем — наборов виджетов. По умолчанию в Rainmeter будет доступна только одна тема — illustro defaul.
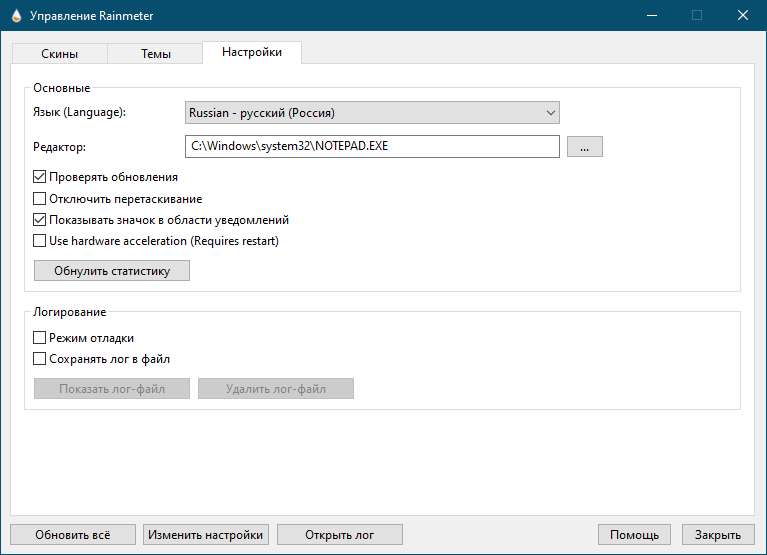
Вкладка «Настройки» содержит локализации, путь к используемому редактору INI-файлов и некоторые другие дополнительные опции. В качестве редактора конфигурационных файлов скинов по умолчанию используется Блокнот.


What You Need
An enhanced text editor with code highlighting makes a big difference.
Here’s what you need to create Rainmeter skins:
- Rainmeter.
- A text editor.
And that’s all. No extra software or materials of any kind are required.
Text Editor
That being said: while you can edit skins using Windows’ built-in text editor, Notepad, we strongly recommend downloading an enhanced text editor, such as Notepad++, Sublime Text or Atom. These applications come with powerful features like tabs, auto-completion, embedded file browsers and more. You can even download extensions that add Rainmeter-specific code highlighting, which makes it much faster and easier to read a skin’s code and spot errors.
For more information, see Notepad Alternatives.
Image Editor
Depending on the kind of skin you want to make, you may also want to find a good piece of image editing software. Rainmeter can create text by itself, as well as simple or complex vector shapes, like rectangles and circles. But you will find you often want a separately-created image file.
Adobe Photoshop is the usual gold standard for image editing, but there are other, less expensive alternatives worth considering, such as Paint.NET, GIMP, or Inkscape.
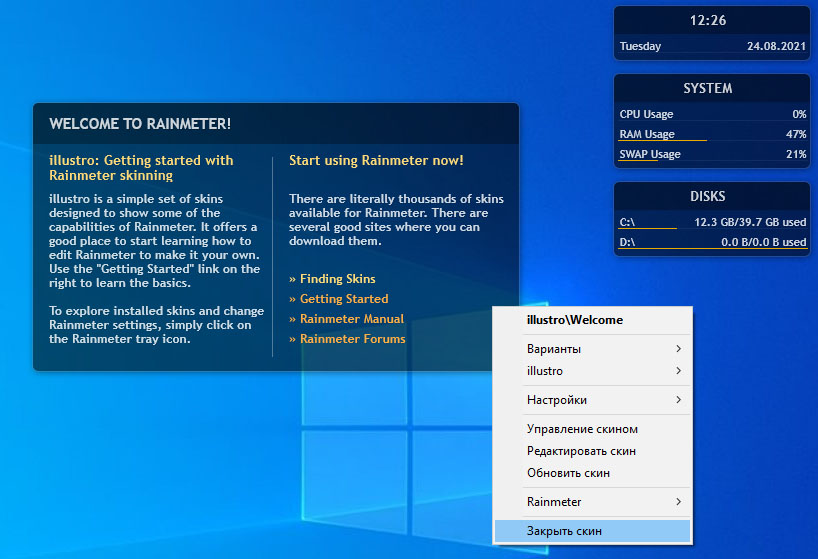
Context Menu
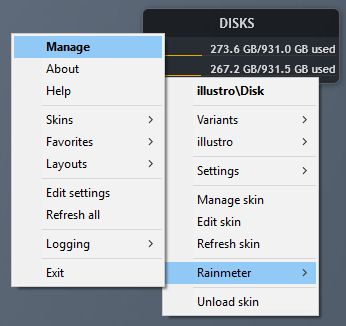
A typical skin’s context menu.
The easiest way to interact with Rainmeter skins is through the . A skin may have any number of tabs, buttons, menus, or other bells and whistles in its design—but no matter what, you can still access the context menu by right-clicking on the skin.
All skins have the same basic context menu items that you can see in the screenshot on the right. Some skins may have to their context menus, but these these will not replace the basic items. Instead, both types of items will appear alongside each other.
Loading and Unloading
You can use the context menu to load skins from your library. Right-click on any of the illustro skins, and select → → . The «Google» skin will appear in the top-left corner of your desktop. You can now drag it into place alongside your other skins.
The Google skin has been loaded.
You can also unload a skin with the context menu. Right-click the new Google skin, and select . You will see the skin fade away and disappear.
When a skin is unloaded, its location and settings are still saved. To see how this works, load the Google skin again. Notice that, instead of appearing in the top-left, it appears in the same location where you dragged it before.
Variants
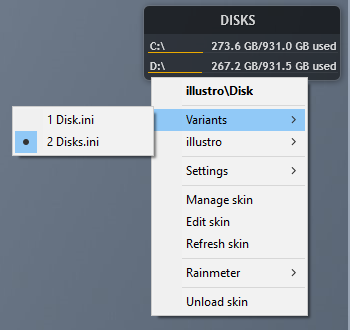
«Disk» has two variants.
When you loaded the Google skin, there was only one option under the «Google» menu, . This is how most skins work: each skin is saved as a «» file in a separate folder. What happens when there is more than one skin in the same folder? The answer is that these skins become of each other.
To see an example of a skin with variants, right-click the «Disk» skin and select in the context menu. You can see that the variant is already active. Click to switch to that variant. Notice how the new variant replaces the old variant on the desktop. Variants share the same location and settings, and only one of a skin’s variants may be loaded at one time.
Settings
Rainmeter keeps track of a number of basic skin settings. These settings are created automatically for each skin. They include things like (whether a skin stays on top of all windows or is pinned to the desktop), (whether skins automatically align with other skins when they are dragged close together), and of course, the skin’s (location on the desktop) and which variant is loaded.
«Welcome» is now transparent.
One of the most popular skin settings is . Try changing the transparency of the «Welcome to Rainmeter!» skin in the center of your desktop. Right-click the skin to open the context menu, then select → → . Now you can partially see through the skin and onto the desktop below.
Rainmeter does not manage any other «settings» beyond the basic ones found here. Extra customization options—like fonts, colors, images and passwords—are all stored and managed separately by the skins themselves, as variables. This means that saving and restoring your layout settings in Rainmeter will not affect your customizations for specific skins. (It also means that backing up your Rainmeter settings will not protect your customizations, so make sure to back up your skin files, as well.)