Shotcut
Содержание:
- Описание и возможности
- Установка Shotcut
- S’y retrouver dans la timeline de Shotcut
- ОПИСАНИЕ
- Why does it frequently crash on Windows?
- Guides and How to’s
- Other Notes
- Player
- All I see is white or green instead of video, and I know there is video in this file….
- Скачайте Shortcut для Windows 8.1 на русском бесплатно
- Changes
- All features
- How does Shotcut use the GPU (or not)?
- Why do I not have the __ filter?
- Une compatibilité hardware inégalable
- Возможности
- Adding Intro and Outro Panels #Adding Intro and Outro Panels
- Where are the log, presets, cache, and settings stored?
- OPEN 24
Описание и возможности
Итак, чем же хороша данная программа для монтажа видео? Shotcut video editor весит немного, работает быстро и не требует какой-то особой производительности от ПК или ноутбука. Это простейший редактор видео, обладающий лишь базовыми возможностями. Например, мы можем:
- Обрезать видео, склеить его, добавить какие-то эффекты или переходы.
- Поддерживается работа со звуком, а также базовая цветокоррекция.
- Экспортировать результат можно в один из популярных форматов.
- В программе присутствует временная шкала и некоторые другие возможности, позволяющие комфортно обрабатывать видео.
Долго останавливаться на обзоре приложения мы не станем. Давайте лучше сразу перейдем к делу и рассмотрим, как производится его инсталляция.
Установка Shotcut
Получить доступ к программе можно в открытом источнике, что является одним из главных преимуществ данного редактора. Так же на официальном сайте разработчики предусмотрели большое количество полезного, простого материала с обучением для начинающих пользователей.
ПО распространяется в виде архива с исходным кодом в виде бинарного файла либо документа с библиотеками, представляющего собой Appimage. Это универсальный формат, позволяющий совместимость большинству 64-битных ОС большинства систем. Никаких дополнительных ПО при этом загружено вместе с пакетом не будет.
Внимание! Загрузка и учебные материалы на английском языке.
Первое, что нужно сделать после загрузки пакета на устройство, это запустить файл Shotcut.exe, обязательно поставить согласие на приятие условий лицензионного соглашения. Затем вам предложат выбрать путь для указания расположения программы в системе устройства. Лучше всего помещать программу на Рабочий стол, если вы собираетесь загружать ПО на постоянное использование. Если система выдаст запрос на формат выполнения программы, установите флажок в нужном пункте в разделе свойства. Теперь дождитесь, когда появится оповещение, что установка завершена.
Следующим шагом необходимо закрыть программу-инсталлятор (кнопка Close). Чтобы начать работу с видеоредактором, нужно выбрать ее либо на рабочем столе, либо из пускового меню. Регистрации программа Shotcut не предусматривает.
Видеоинструкция по установке:
S’y retrouver dans la timeline de Shotcut
Il est aisé de s’y retrouver dans Shotcut grâce à son système de « timeline ». Si ce terme ne vous est pas familier, cela viendra très rapidement puisque c’est une fonctionnalité essentielle dans le monde du montage vidéo qui rend vos éditions bien plus simples.
Voici comment se présente la fameuse timeline de Shotcut :

1) Menu de la Timeline : on retrouve quelques cases à cocher qui sont à connaître, comme Propager toutes les pistes qui activera le décalage qu’il y aura entre vos pistes lors de glissés/déposés ou encore Agrandir ou Raccourcir les pistes qui vous permettra d’ajuster la hauteur de la piste dans la timeline à votre écran. Pour le reste, ce menu est suffisamment explicite et vous pourrez vous y retrouver très simplement pour ajouter ou insérer des pistes vidéo et/ou audio par exemple.
2) Couper / Copier / Coller : on ne peut pas faire plus classique que cela !
3) Ajouter à la piste en cours : cela aura pour effet d’ajouter le clip que vous aurez sélectionné (dans votre onglet Source au niveau de la piste active) en fin de piste, collé au clip qui précède.
4) Suppression propagée : le clip que vous aurez sélectionné sera supprimé de la timeline tout en décalant les pistes, ce qui peut supprimer des bouts des autres pistes (à manipuler avec précaution).
5) Enlever : aucun décalage, une simple suppression pure et dure du clip que vous aurez sélectionné de la timeline.
6) Placer le clip en écrasant la piste courante : depuis votre onglet Source, sélectionnez un clip que vous insérerez ensuite dans la piste active pour qu’il débute au curseur. Si un clip se trouvait déjà là, alors la partie correspondante sera écrasée par le clip que vous aviez sélectionné.
7) Découpe au curseur de lecture : Découpez à l’endroit du curseur un clip que vous aurez tout simplement sélectionné dans la timeline.
8) Magnétisme : le magnétisme sous Shotcut est une option qui permet de rendre la timeline plus « intelligente » en vous permettant « d’attirer automatiquement » vos clips lorsque vous les déplacez. Très pratique et même nécessaire pour du montage vidéo simple et très efficace.
9) Balayage pendant le déplacement : Faites suivre votre curseur de lecture lorsque vous déplacez, réduisez ou augmentez un clip tout en visualisant vos progrès en temps réel dans l’onglet Projet.
10) Rogner et déplacer propagé : Pour répercuter vos réductions ou déplacements d’une piste sur les autres.
11) Zoomer/dézoomer dans la timeline : équivalant de Ctrl + molette souris avec votre pointeur placé sur une piste, cela aura pour effet d’avoir une meilleure vue d’ensemble ou de détail.
12) Liste des pistes : C’est ici que vous pourrez modifier le nom, couper le son, activer le compositing (transparence entre les pistes) et verrouiller vos listes.
ОПИСАНИЕ
Серия турниров CUT-SHOT TOUR создана инициативной группой любителей пляжного волейбола и проводится с 2016 года. Целью CUT-SHOT TOUR является предоставление волейболистам различного уровня возможности участвовать в турнирах по пляжному волейболу, а также пропаганда пляжного волейбола в качестве активного образа жизни и средства укрепления здоровья.
Турниры разделены по уровню, тем самым каждый спортсмен может получать игровой опыт с равными по силе командами, а также повышать уровень своего спортивного мастерства. Все турниры проводятся по заранее определённому формату с чётким соблюдением регламента и соединены общим рейтингом. В конце каждого сезона определяются лучшие игроки и проводится КУБОК CUT-SHOT TOUR.
Со всех турниров серии CUT-SHOT TOUR ведётся прямая видеотрансляция матчей. Комментируют матчи в прямом эфире профессиональные спортсмены и эксперты в области пляжного волейбола.
Дружеская атмосфера и отличная организация турниров способствуют развитию интереса к пляжному волейболу и популяризации пляжных видов спорта в целом. Соревнования проводятся по действующим в Российской Федерации официальным правилам пляжного волейбола.
Why does it frequently crash on Windows?
While some systems have a video adapter driver with at least version 2.1
OpenGL, there may be some incompatibility between the OpenGL code in
Shotcut or Qt and the driver that causes a crash. You can try to upgrade to
the latest driver for your hardware.
Versions 15.09 and higher can also use DirectX when GPU processing is not
enabled, and that should improve compatibility. Try the different options under
Settings > Display Method: OpenGL or DirectX.
If you are using the 32-bit version of Shotcut on 64-bit Windows (it may appear
in “Program Files (x86)”), try using
the 64-bit version of Shotcut instead. You may be experiencing issues with
drivers or running into memory limitations.
Of course, there can still be other reasons we have not yet discovered.
If you believe none of the reasons above applies to you, then you can
locate your shotcut-log.txt file in AppData (see other question below
for more information) and paste it into a bug
report.
Guides and How to’s
Shotcut video tutorials
| 14 reviews, Showing 1 to 5 reviews |
Post review Show all 14 reviews |
Report!
on
Aug 11, 2021 Version: 21.08 Beta
OS: Windows 10 64-bit Ease of use: 10/10
Functionality: 10/10
Value for money: 10/10
Overall: 10/10
Report!
on
Sep 4, 2020 Version: 20.09.01
OS: Windows 10 64-bit Ease of use: 10/10
Functionality: 10/10
Value for money: 10/10
Overall: 10/10
Report!
Audio time stretch only in full pro-cent value steps. It is not enough precise for align it to the video duration.
on
Apr 26, 2020 Version: Shotcut 20.04.12
OS: Windows 7 64-bit Ease of use: 3/10
Functionality: 3/10
Value for money: 10/10
Overall: 3/10
Report!
Spent 15 min to edit a TV movie Recording to remove commercials and selected a 1280×720 MKV file and after 15 min. it was only at 1% and no way to see the progress?????? Even the freeware out there does that. Uninstalled it and would not recommend it as it is WAY too SLOW. vidcoder will do it in less tha 50 min for a TV movie.
on
Nov 17, 2019 Version: Shotcut19.10.20
OS: Windows 7 64-bit Ease of use: 1/10
Functionality: 1/10
Value for money: 1/10
Overall: 1/10
Report!
Stay away from version 2019.09 Beta if you are exporting to x265. The videos do not play well in many devices. I didn’t have the same issue with version 2019.08.16.
on
Sep 7, 2019 Version: 19.09 Beta
OS: Windows 10 64-bit Ease of use: 5/10
Functionality: 3/10
Value for money: 10/10
Overall: 6/10
| 14 reviews, Showing 1 to 5 reviews |
Post review
Show all 14 reviews |
Other Notes
Player
Press and hold Shift+Alt to skim — scrub/seek using the horizontal
position of the mouse cursor without clicking and dragging.
Timeline
- While dragging shot or trimming, press and hold Alt to temporarily
suspend snapping. On Linux, pressing Alt before dragging will
usually move the app window; so, press Alt after you start dragging. - Press and hold Shift+Alt to skim — scrub/seek using the horizontal
position of the mouse cursor without clicking and dragging. - Double-click a fade in/out control (circle) to toggle it between one second and none.
- To select a range (multiple consecutive clips) click the first (or last) clip, press and hold
Shift and click the last (or first) clip. - To select or deselect multiple clips individually hold Ctrl (command on macOS)
while clicking the clips.
Keyframes
- Hold Ctrl (command on macOS) while dragging a keyframe to lock the time
and change only its value. - Hold Alt while dragging a keyframe to lock the value and change only its time.
- Double-click a regular keyframe curve/line to add or remove a keyframe. (Not all parameters support a curve/line
for its keyframes.) - Double-click a simple keyframe to toggle it between one second and none.
Mouse Wheel
Timeline and Keyframes
- scroll horizontally*
- use Alt to scroll vertically
- use Shift to change track height
- use Ctrl (command on macOS) to zoom in/out (change time scale)
* NOTE: On macOS, in order to scroll Timeline or Keyframes horizontally with a mouse wheel (not Magic Mouse or track pad), you must also use one of the following:
- control (not command)
- control+option
- control+command
- option+command
Timecode fields—such as the prominent one at the bottom of the
player—do not require you to enter a full timecode value. There are some
short-hand ways to enter time values. First of all, a number with no
colons (e.g., 100) is a frame number. Remember, frame numbers start
at 0; so 100 is the 101-th frame! Including a colon (:) makes it
interpret as timecode (HH:MM:SS:FF where FF = frames) or a clock
value (HH:MM:SS.MS where MS = milliseconds or any fraction of a second).
The difference between the two is that the last field is delimited by a
colon or decimal point (a comma in some locales). Next, not all of the
fields of the time value need to be included. For example, you can enter
“::1.0” for one second. However, not all of the separators need to be
included — they are evaluated from right-to-left. Thus, for our example,
“1:” is short for one second; however, “:1.0” or “:1.” is also one
second but not “1.0” because it does not contain a colon. “:1.5” is one
and a half seconds. “1::” is one minute. “1:30:” is one minute and
thirty seconds. “1:::” is one hour.
Player
| Action | Windows/Linux | macOS |
|---|---|---|
| Play | L or Space | L or space |
| Pause | K or Space | K or space |
| Rewind | J | J |
| Fast Forward | L | L |
| Set In | I | I |
| Set Out | O | O |
| Next Frame | Right or K+L | right or K+L |
| Previous Frame | Left or K+J | left or K+J |
| Forward One Second | Page Down | page down |
| Backward One Second | Page Up | page up |
| Forward Two Seconds | Shift+Page Down | shift+page down |
| Backward Two Second | Shift+Page Up | shift+page up |
| Forward 5 Seconds | Ctrl+Page Down | command+page down |
| Backward 5 Seconds | Ctrl+Page Up | command+Page up |
| Forward 10 Seconds | Ctrl+Shift+Page Down | shift+command+page down |
| Backward 10 Seconds | Ctrl+Shift+Page Up | shift+command+page up |
| Seek Start | Home | home |
| Seek End | End | end |
| Seek Next Edit | Alt+Right | option+right |
| Seek Previous Edit | Alt+Left | option+left |
| Switch Source/Program | Esc | esc |
| Grab Focus | Shift+Esc | shift+esc |
| Enter Timecode | Ctrl+T | cmd+T |
All I see is white or green instead of video, and I know there is video in this file….
First, use Properties to see if the Video tab is disabled. If it
is disabled, then Shotcut is not compatible with this format or codec.
If the video tab is enabled, more than likely OpenGL (or also DirectX on
Windows) is not working on your system, or it is too old. First, make
sure GPU Processing is disabled in Settings. GPU processing
requires OpenGL version 3.2. When it is disabled, you only need OpenGL
version 2.0 (or also DirectX on Windows). If you are on Windows, after
ensuring GPU processing is disabled, try forcing the usage of DirectX by
choosing Settings > Display Method > DirectX (ANGLE).
Скачайте Shortcut для Windows 8.1 на русском бесплатно
| Версия | Платформа | Язык | Размер | Формат | Загрузка |
|---|---|---|---|---|---|
| * скачайте бесплатно Shortcut для Windows, файл проверен! | |||||
|
Shortcut 18.01 64-bit |
Windows 8.1 |
Русский | 183.57MB | .exe |
Скачать |
|
Shortcut 18.01 32-bit |
Windows | Русский | 72.41MB | .exe |
Скачать |
|
Shortcut 18.01 64-bit Portable |
Windows | Русский | 256.42MB | .zip |
Скачать |
|
Shortcut 18.01 32-bit Portable |
Windows | Русский | 101.33MB | .zip |
Скачать |
|
Shortcut 18.01 для MAC |
MAC | Русский | 62.75MB | .dmg |
Скачать |
|
Shortcut 18.01 для Linux |
Linux | Русский | 59.69MB | .zip |
Скачать |
Обзор Shortcut
Shortcut – программа, предназначенная для редактирования и монтажа видео. Позволяет создавать и изменять ролики, добавлять эффекты, работать со звуком и изображениями. Видеоредактор поддерживается операционными системами Windows, Linux и OS X, корректно работает с 32- и 64-битными версиями.
Скриншоты
Похожие программы
Adobe Flash Player — программа для воспроизведения flash-контента
Sony Vegas Pro — создание многодорожечных видео и аудио записей
Xvid Video Codec — библиотека для сжатия видео в стандарте MPEG-4
KMPlayer — мощный проигрыватель файлов звуковых и видеоформатов
Aimp — музыкальный проигрыватель с хорошим эквалайзером
SopCast — просмотр видео и аудиотрансляций в Интернете
iTools
Audacity — звуковой редактор, поддерживающий работу с несколькими дорожками
Reason
Camtasia Studio — программа для захвата видеоизображения с монитора компьютера
Windows Media Player — проигрыватель видео и аудио файлов от Microsoft
VLC Media Player — бесплатный кроссплатформенный медиапроигрыватель
DirectX — пакет библиотек, необходимый системе для работы с мультимедиа
Adobe Premiere Pro — программное обеспечение для нелинейного видеомонтажа
Adobe Audition
VKMusic — поиск и скачивание музыки из ВКонтакте, RuTube и YouTube
Windows Live Movie Maker
Fraps
K-Lite Codec Pack — набор кодеков для воспроизведения видео и аудиофайлов
Winamp — проигрыватель мультимедиа c поддержкой потокового контента
Realtek HD — пакет драйверов, предназначенный для HD Audio кодеков
Unity Web Player
MorphVOX Pro
VirtualDub
Freemake Video Converter
DivX — набор кодеков и утилит для воспроизведения аудио и видео
Adobe After Effects
Bandicam — программа для снятия скриншотов и записи видео с экрана
Ableton Live Suite
Steinberg Cubase
Pinnacle Studio — программа для обработки видео файлов
Movavi Video Editor — утилита для монтажа видеофайлов
iMovie — бесплатный видеоредактор от компании Apple
Sound Forge
Ace Stream Media
Virtual DJ — программа, имитирующая пульт диджея для микширования музыки
Action!
PowerDVD — проигрыватель мультимедийных файлов
GOM Player — медиапроигрыватель для Windows
Format Factory
CyberLink PowerDirector — видеоредактор с возможностью захвата видео с внешних источников
Finale
JetAudio — плеер с хорошим эквалайзером
Corel VideoStudio — профессиональный видеоредактор от компании Corel
Free Studio — пакет объединяющий более 40 мультимедийных программ
Avidemux — для создания новых и обработки готовых видео
Edius — программное обеспечение для нелинейного монтажа видео
ManyCam
Kodi — программа для воспроизведения мультимедиа
Daum PotPlayer — плеер с поддержкой всех мультимедийных форматов
ФотоШОУ PRO — программа для создания из фотографий видеороликов и слайд-шоу
Guitar Pro
MIRO
Shortcut
Light Alloy — бесплатный медиаплеер
GeForce Experience — автоматического поиск драйверов видеокарт компании Nvidia
HyperCam
Magix Music Maker — утилита для записи и обработки музыкальных дорожек
VideoPad Video Editor — частично бесплатный видеоредактор
Proshow Producer — условно-бесплатная программа для создания слайд-шоу
Free Video Editor — бесплатный видео редактор для нелинейного видео монтажа
Wondershare Filmora — условно-бесплатная программа для работы с видеофайлами
Zune
Аудио | Видео программы
Графические программы
Microsoft Office
Игры
Интернет программы
Диски и Файлы
Changes
- Renamed Timeline > Master to Output.
- Stop selecting Output (formerly Master) by default when opening a project.
- Removed Settings > External Monitor > DVEO VidPort.
- Export now sets color primaries automatically based on the Video Mode colorspace.
- Use Qt’s internal image orientation detection instead of libexif.
- Upgraded Mesa software OpenGL in Windows build to version 19.2.7.
- Upgraded SDL audio output library in Windows build to version 2.0.12.
- The keyboard shortcut to open a playlist item is changed to Ctrl+Enter (Cmd+Return on macOS).
- Changed the keyboard shortcut to open the web page of keyboard shorcuts to ?.
- Change the timeline toolbar icon for Timeline > Split to something more clear and obvious.
- Timeline no longer shows thumbnails for video when the track height is at its lowest.
- The Timeline toolbar button to toggle Scrub while dragging is now saved to settings.
- Export > Video > Deinterlacer is no longer disabled when Scan mode is Interlaced (Anything that causes a change to the vertical resolution of an interlaced source is automatically deinterlaced.)
- Deprecated the following video filters. These will be removed in the next version.
- Rutt-Etra-Izer
- Swirl
- Text: 3D
- Text: HTML
- Added a Detect button to the Use hardware encoder > Configure dialog.
- Memory is now released when you choose File > New, File > Close, or Export File. (Previously it would keep most of it for reuse.)
- Improved constant quality rate control mode for Intel Quick Sync Video.
- Changed Playlist > Sort > By Name to be case insensitive.
- Improved the performance of image sequences.
- Significantly improved the performance of the automatic image padding.
- Show a project’s current Video Mode as selected in the Settings menu when opened.
- Added a timecode tooltip to the mouse pointer when over the player, Timeline, or Keyframes scrub bars.
- Filter VUIs (video user interfaces) are now disabled when the filter is disabled.
All features
Wide Format Support
Support for the latest audio and video formats thanks to FFmpeg
Supports popular image formats such as BMP, GIF, JPEG, PNG, SVG, TGA, TIFF as well as image sequences
No import required — native timeline editing
Frame-accurate seeking for many formats
Multi-format timeline: mix and match resolutions and frame rates within a project
Webcam capture
Audio capture
Support for 4K resolutions
Network stream playback (HTTP, HLS, RTMP, RTSP, MMS, UDP)
Frei0r video generator plugins (e.g. color bars and plasma)
Color, noise, and counter generators
EDL (CMX3600 Edit Decision List) export
Export single frame as image or video as image sequence
Audio Features
Audio scopes: loudness, peak meter, waveform, spectrum analyzer
Volume control
Audio filters:
Balance, Bass & Treble, Band Pass, Compressor, Copy Channel, Delay, Downmix, Expander, Gain, High Pass, Limiter, Low Pass, Normlize: One Pass, Normalize: Two Pass, Notch, Pan, Reverb, Swap Channels
Audio mixing across all tracks
Fade in and out audio and fade video from and to black with easy-to-use fader controls on timeline
Cross-fade audio and video dissolve transitions easily by overlapping shots on the same track of the timeline
JACK transport sync
Tone generator
Video Effects
Video compositing across video tracks
HTML5 (sans audio and video) as video source and filters
3-way (shadows, mids, highlights) color wheels for color correction and grading
Eye dropper tool to pick neutral color for white balancing
Deinterlacing
Auto-rotate
Fade in/out audio and fade video from and to black with easy-to-use fader controls on timeline
Video wipe transitions:
bar, barn door, box, clock (radial), diagonal, iris, matrix, and custom gradient image
Track compositing/blending modes:
Over, Add, Saturate, Multiply, Screen, Overlay, Darken, Dodge, Burn, Hard Light, Soft Light, Difference, Exclusion, HSL Hue, HSL Saturation, HSL Color, HSL Luminosity.
Video Filters:
Alpha Channel: Adjust, Alpha Channel: View, Blur, Brightness, Chroma Key: Advanced, Chroma Key: Simple, Contrast, Color Grading, Crop, Diffusion, Glow, Invert Colors, Key Spill: Advanced, Key Spill: Simple, Lens Correction, 3D LUT, Mirror, Old Film: Dust, Old Film: Grain, Old Film: Projector, Old Film: Scratches, Old Film: Technocolor, Opacity, Rotate, Rutt-Etra-Izer, Saturation, Sepia Tone, Sharpen, Size and Position, Stabilize, Text, Vignette, Wave, White Balance
Speed effect for audio/video clips
Editing Features
Trimming on source clip player or timeline with ripple option
Easy-to-use cut, copy, and paste operations
Append, insert, overwrite, lift, and ripple delete editing on the timeline
3-point editing
Hide, mute, and lock track controls
Multitrack timeline with thumbnails and waveforms
Unlimited undo and redo for playlist edits including a history view
Create, play, edit, save, load, encode, and stream MLT XML projects (with auto-save)
Save and load trimmed clip as MLT XML file
Load and play complex MLT XML file as a clip
Drag-n-drop files from file manager
Scrubbing and transport control
Cross Platform & Codec Independent
Cross platform support: available on Windows, Linux, and macOS (OS X)
Codec independent so does not rely on system codecs
Can run as a portable app from external drive
UI translations: Catalan, Chinese, Czech, Danish, Dutch, English, French, Gaelic, German, Greek, Italian, Occitan, Polish, Portugese, Russian, Slovak, Spanish, Ukranian (not all 100%, but you can help
Batch encoding with job control
Encode/transcode to a variety of formats and codecs thanks to FFmpeg
Stream (encode to IP) files and any capture source
Video quality measurement (PSNR and SSIM)
Perform integrity check of an audio/video file
View detailed information about an audio/video file
Display and Monitoring
External monitoring via Blackmagic Decklink card on NTSC monitor
External monitoring on an extra system display/monitor
UI themes/skins: native-OS look and custom dark and light
Control video zoom in the player: fit viewable area (default), 50%, original (100%), and 200%
Flexible UI through dock-able panels
Detailed media properties panel
Recent files panel with search
Thumbnail and waveform caching between sessions
Hardware Support
Blackmagic Design SDI and HDMI for input and preview monitoring
Leap Motion for jog/shuttle control
Webcam capture
Audio capture to system audio card
Capture (record) SDI, HDMI, webcam (V4L2), JACK audio, PulseAudio, IP stream, and Windows DirectShow devices
Multi-core parallel image processing (when not using GPU and frame-dropping is disabled)
DeckLink SDI keyer output
OpenGL GPU-based image processing with 16-bit floating point linear per color component
How does Shotcut use the GPU (or not)?
Shotcut uses the GPU in three ways:
- OpenGL for drawing parts of the user interface and showing video
- hardware encoding (where available and enabled)
- OpenGL for the hidden GPU Effects (filters and transitions) mode
Shotcut does NOT use the GPU or hardware acceleration for the following:
- decoding and pixel format conversion
- automatic (as-needed) filters to deinterlace, scale, and pad video and to
resample or downmix audio - filters that you add
- transitions
- compositing/blending video tracks
- mixing audio tracks
Thus, you cannot expect Shotcut to use close to 0% CPU and much % of GPU
when exporting using the hardware encoder because the reading of files and
decoding alone becomes a bottleneck to feed the hardware encoder. Also, if you
have any decent amount of image processing, you should expect a significant
amount of CPU usage especially if parallel processing is enabled (it is by
default). Software from other companies may limit itself to one GPU vendor API
such as CUDA in order to provide almost entirely GPU-based pipeline. Shotcut
has not chosen to go that route because it is a cross-platform solution.
Why do I not have the __ filter?
- Some filters are not compatible with GPU Processing.
- Some filters cannot be applied to a track or the entire timeline (i.e. Master).
Please check what is currently selected. The top of the Filters panel shows
the name of what is selected. - By design, we do not make all LADSPA and frei0r filters available
through the UI. We do not want to present a confusing generic
interface to all available plugins and overwhelm users with so many,
often redundant, options. Also, the Shotcut team wants to better
understand the filters we are providing and ensure each one is
operating as intended with MLT. If you are manually authoring XML,
then you can add any filter you want. - Sometimes a MLT plugin may fail to load due to a missing or
incompatible library. Shotcut downloads provide all dependencies for
Windows and macOS, but it may rely upon some libraries provided by
distribution packages on Linux.
Une compatibilité hardware inégalable
Les configurations matérielles pour les professionnels seront compatibles avec Shotcut grâce à un support hardware étendu. Vous pourrez ainsi sous Shotcut :
• Utiliser une sortie HDMI ou Blackmagic Design SDI pour une entrée et/ou avoir un écran de preview
• Utiliser le Leap Motion pour un control jog/shuttle
• Capturez de la vidéo depuis votre webcam
• Utilisez votre micro ou l’entrée son de votre système pour la capture audio
• Shotcut supporte : Capture SDI, le HDMI, Webcam V4L2, les entrées audio Jack, PulseAudio, IP stream et les périphériques Windows DirectShow
• Traitement des images multicoeurs (lorsque l’utilisation du GPU est désactivée)
• Support d’OpenGL GPU pour le traitement d’image
• Support de l’encodage avec AMD, Intel et NVIDIA
Возможности
Полный список возможностей программы можно посмотреть на официальном сайте. Выборочно отметим:
- Программа поддерживает все основные форматы видео, аудио и файлов изображений (используются библиотеки FFmpeg).
- Поддерживается 4K видео.
- Раздельное редактирование аудио и видео дорожек. Различные инструменты для работы со звуковыми дорожками.
- Позволяет захватывать видео или звук с внешнего источника.
- Имеет встроенные генераторы шума, цвета и счетчиков.
- Имеет большой набор различных видео-фильтров, а также переходов.
- Поддерживается изменение скорости видео и аудио, авто-поворот, а также разворачивание (reverse).
- Поддерживается экспорт в различные видео-форматы, а также покадровый экспорт в виде файлов изображений.
- Работа с несколькими мониторами.
- И многое другое.
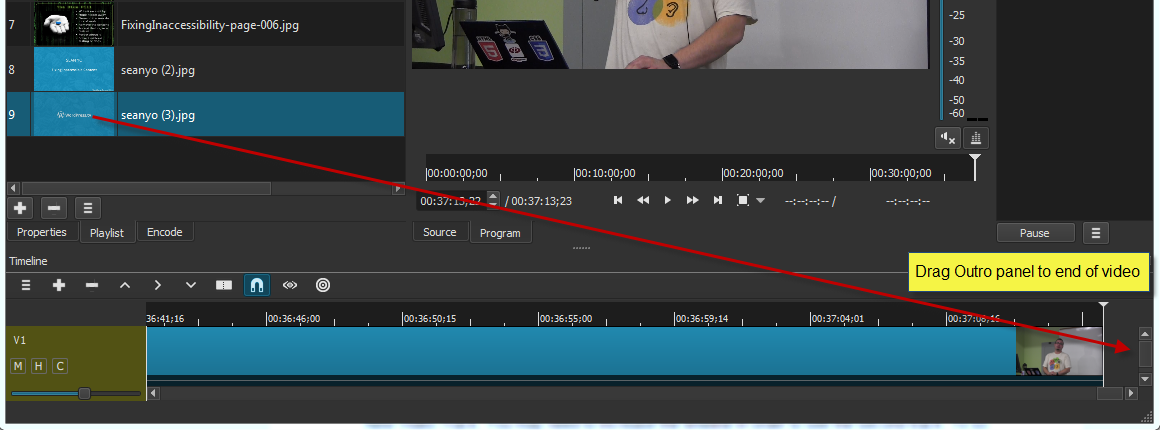
Adding Intro and Outro Panels #Adding Intro and Outro Panels
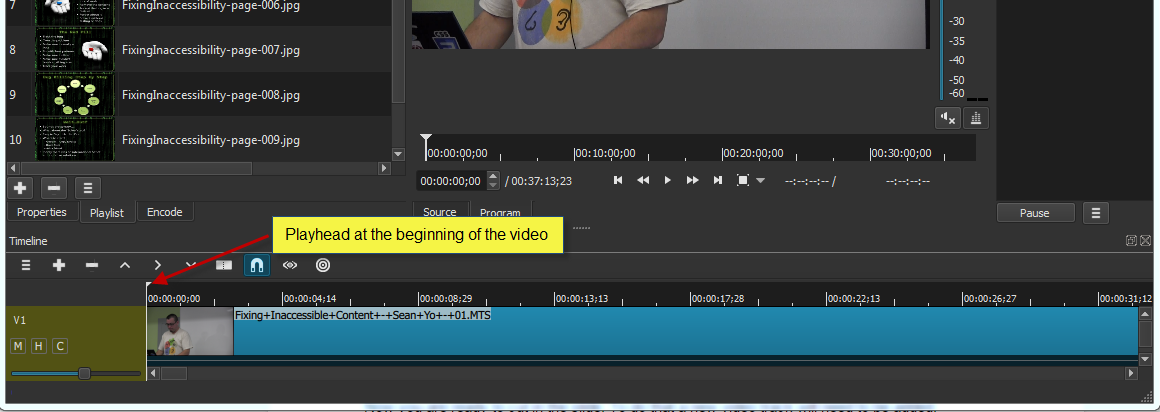
In Shotcut a transition is created when two pieces (video or slides) overlap. So the intro and the outro must be on the same timeline as the video.
Before you add the Intro panel is is important that you have the Playhead at the very beginning of the video. To ensure this is done drag the scrubber to the beginning of the video and click on the Timeline to place the Playhead in the correct position. The intro panel will be placed where the Playhead is located.

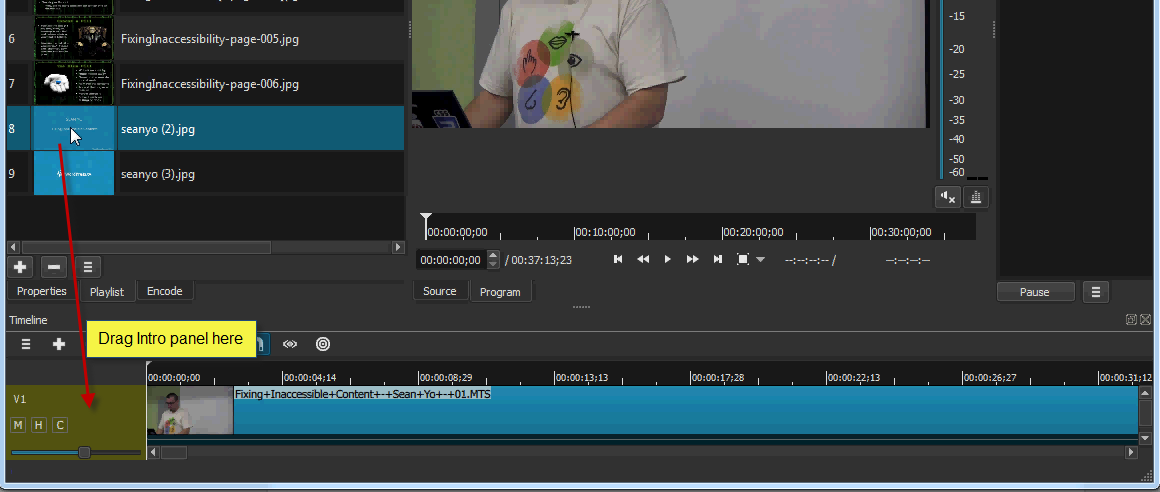
To place the intro panel drag-and-drop the panel to the front of the video timeline. Make sure you drag it completely to the beginning or it will cut into the video at a point you did not intend. To insure you insert at the very beginning you can drag it to the area in front of the video.
Placing the outro is not as precise. You can drag-and-drop the outro to any point after the end of the video. If you have any blank space between the video and the Outro panel then right click on the blank space and select remove.
Where are the log, presets, cache, and settings stored?
Currently, the cache is used to store thumbnail and waveform data.
Windows
The log, cache, and presets are stored in
%LOCALAPPDATA%\Meltytech\Shotcut\. In the Explorer location bar, enter
“%LOCALAPPDATA%” and press Enter. Then look for Meltytech\Shotcut.
The settings are
stored in the registry at key
HKEY_CURRENT_USER\Software\Meltytech\Shotcut\.
Linux
The log, cache, and presets are stored in
~/.local/share/Meltytech/Shotcut/ where ‘~’ is your home directory, of
course.
The settings are stored in ~/.config/Meltytech/Shotcut.conf, which is a
text file in INI format.
macOS
The log, cache, and presets are stored in ~/Library/Application
Support/Meltytech/Shotcut/, where ‘~’ is your home directory, of
course.
The settings are stored in
~/Library/Preferences/com.meltytech.Shotcut.plist, which is a binary
plist
file.
OPEN 24
РЕГЛАМЕНТ ПРОВЕДЕНИЯ В НОМИНАЦИЯХ МУЖСКИЕ, ЖЕНСКИЕ И СМЕШАННЫЕ КОМАНДЫ В КАТЕГОРИИ OPEN
Максимальное количество участников: 24 команды (48 человек)
Время проведения: 12:00 – 18:30
Каждой команде раздается индивидуальная карточка с расписанием игр и протоколом ведения очков, который ведется самостоятельно капитаном каждой команды.
Игры в 1 и 2 этапах состоят из одной партии до 21 очка или до 20 минут игрового времени. Игра останавливается после набора одной из команд 21 очка или строго на 21 минуте игры. Во втором случае выигравшей командой считается та, которая набрала больше очков. Баланс до 23 очков.
Игры за третье место и финалы состоят из 2-х партий до 21 очка, 3-ая партия проводится до 15 очков.
Все команды играют с интервалом в 20 минут. Команде присуждается поражение со счетом 0:21 при опоздании на игру более чем на 5 минут. Каждая команда имеет право взять таймаут сроком в 1 минуту.
1 ЭТАП | 12:00 — 15:30
4 группы по 6 команд играют на 6-ти кортах. Команды играют внутри группы каждая с каждой.
По итогам первого этапа все команды делятся на 2 группы по 8 команд: 1,2 места – лига HARD; 3,4 места – лига MEDIUM; 5,6 места – прекращают участие в турнире.
Критерии оценки: 1. Количество выигранных игр 2. Коэффициент между выигранными и проигранными очками в каждой игре 3. Личная встреча
2 ЭТАП | 15:30 — 18:30
2 лиги играют параллельно сетку на вылет до одного поражения. Игры за третье место и финалы состоят из 2-х партий до 21 очка, 3-ая партия проводится до 15 очков.
Награждение происходит во всех лигах.