Синий экран с ошибкой driver power state failure (0x0000009f)
Содержание:
- Fix Driver Power State Failure issue
- 2. Update Your Display and Network Drivers
- #6 – Perform SFC Scan To Fix Driver Power State Failure Error
- #8 – Disable or Remove Antivirus To Solve Driver Power State Failure Error
- What is Error Driver Power State Failure?
- Fixing Error Code: 0x0000246 from Device Manager
- Починка элементов ОС
- Return your Graphics Card Drivers to the Older Version
- Параметры
- Do an SFC scan
- Обновление операционной системы
- Solution 4: Fix driver conflicts
- Solution 4. Change Power Settings
- Change your Power Settings
- Manually Fixing Error Code: 0x0000246
- Изменение настроек Windows
- Способы исправить ошибку DRIVER POWER STATE FAILURE в Windows 10
- Enter Safe Mode and Remove Just Recently Installed Drivers
- Fixing Error Code 0x0000246 from Control Panel
Fix Driver Power State Failure issue
For driver updates, you’ve got three options: use the Device Manager, found in the Control Panel in most versions of Windows, and manually upgrade your drivers from there.
You may also search online to download the driver manually.
Reason for DRIVER_POWER_STATE_FAILURE
This error occurs when there is electricity state shifting, like when you put the PC into a sleep mode, when you take the PC out of sleep and when you shut the machine down. Please follow these steps very carefully and follow each step. These solutions are tested and working for us.
Method 1: Use Safe Mode
Power off your system and then boot into safe mode. You can use F8 or F10 according to your system configuration.
After entering the safe mode, you need to follow the steps below to fix the driver power state failure error:
Step 1: Right-click the Computer > Properties.
Step 2: Click Device Manager and check if there are yellow marks sign for any hardware drivers.
NOTE: Sometimes due to outdated motherboard drivers, you can face this issue. If you are using ASUS motherboard then update your drivers from here.
Step 3: Right-click on the corrupted drivers and select Uninstall.
Step 4: Reinstall Drivers
- Restart the PC.
- Open Settings and then go to System and Security.
Click on Windows Update.
Click Check for updates.
Method 3: System Restore
System Restore can be used to restore the previous version of your Windows OS. If you are facing serious issue Driver Power State Failure on Windows 10 then with using System Restore, you can fix many problems.
You can roll the system back to a normal state with the following steps:
Right-click the Computer > Property.
- System Protection > Choose System Restore.
- Click on Next and wait for the system to be restored.
- Done.
Method 4: Perform an SFC scan
Many users have fixed this Driver Power State Failure issue using an SFC scan. Follow these steps:
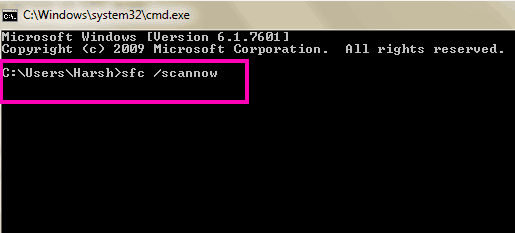
Step1: Press Windows Key + X and then choose Command Prompt (Admin) or PowerShell (Admin).
Step 2: Once the terminal opens, enter “sfc /scannow” > Enter to run it.
The scanning will now start and it will take about 10 minutes.
Also, try the following commands.
- DISM.exe /Online /Cleanup-image /scanhealth
- DISM.exe /Online /Cleanup-image /Restorehealth
After running both commands, see if Driver Power State Failure is fixed or not.
Method 5 – Change Power settings
Step 1: Open the control panel and then find Power Options.
Step 2: Now select choose what the power button does > Change settings that are currently unavailable.
Step 3: Disable Turn off a fast startup, Sleep, and Hibernate > Save.
Method 6: Update the display adapter drivers
Follow this process:
Windows key + X > select Device manager > Expand Display adapters > right click on display adapter listed > update driver software.
You can also use 3rd party driver update tools to automatically download and install drivers on Windows 10.
Fix all System Issues with IOBit Advanced PC Repair Tool
1. Download IOBit Advanced PC Repair Tool.
2. Click Scan to find issues.
3. Click Repair All to fix issues.
4. Check our Review on IOBit Advanced Systemcare.
Thanks for reading this article. If you are still facing this issue then comment below.
2. Update Your Display and Network Drivers
The most common reason for the Driver Power State Failure BSOD is a faulty Network or Display driver. That’s why it’s best to ensure that both these drivers are updated and running smoothly.
Sometimes, newer updates may cause system instability as well. In such cases, users will have to roll back these updates. Updating display drivers may also resolve screen flickering and flashing issues.
How to Update the Network and Display Drivers
- Press Windows Key + R and type in devmgmt.msc. The Device Manager window will open.
- Look for Display adapters and expand the menu.
- Right-click on the drivers and click on Update driver.
- Click on Search automatically for updated driver software. Windows will automatically download and install the latest drivers.
- Do the same for Network adapters.
How to Roll Back to Previous Versions of the Network and Display Drivers
- Open Device Manager and expand the Display adapters option.
- Right-click on the driver and select Properties.
- Navigate to the Driver tab in the Properties menu.
- Click on Roll Back Driver, and Windows will restore a previous version of the driver.
- Follow the same steps for Network adapters.
#6 – Perform SFC Scan To Fix Driver Power State Failure Error
Running an SFC scan on your computer scans your system files and if a corrupt file is found, it fixes it. As the Driver Power State Failure WIndows 10 error might occur because of corrupt or bad drivers, this can be actually helpful. Here are the steps to run an SFC scan:
Step 1: On your keyboard, press the Windows + X keys together. From the menu that opens, click on Command Prompt (Admin) option to run Command Prompt with administrator privileges.
Step 2: In the Command Prompt window, type the following commands: sfc /scannow and hit the Enter key.
The scan may take some time, around 15 minutes or so to complete. Wait for it to finish and do not interrupt the scan. Once the scan is complete, restart your PC and check if the problem persists. If not, try to run the next scan.
#8 – Disable or Remove Antivirus To Solve Driver Power State Failure Error
Some of you might hesitate from taking this step, but if none of the methods mentioned above are helping you, this might. There have been reports of antivirus software causing this issue. And, disabling antivirus solved the issue for some users. The most common name connected with this issue is Avast. So, if you are an Avast antivirus user, this method is a must try.
If disabling Antivirus doesn’t solve the issue for you, you should try to completely uninstall it as well. If it does work, try a new antivirus and see if that is interfering with your PC to cause Driver Power State Failure error.
If disabling or removing Antivirus doesn’t work, get your antivirus back on and proceed with the next method.
What is Error Driver Power State Failure?
A BSOD appears with an error message or error code. As you are below, that means you have actually come across the error Driver Power State Failing or error code 0x0000009F. Both the mistakes are the same. Usually, when you put your computer on sleep mode, and then wake it back up out of sleep mode, some devices don’t get up in time or they don’t react in any way. When this occurs, the system crashes and shows the error Driver Power State Failing.
Yet, this error can take place because of several other factors too. Sometimes BSOD reveals this error together with the data name that is causing this error. In many cases, it is ntoskrnl.exe
Other factors that can create this error are:
- Faulty NVidia Graphics Card driver
- USB Device Failing
- Startup/booting error
- Error while making use of– Photoshop, Autocad, Kaspersky Anti-virus and McAfee Antivirus.
Driver Power State Failure is a Blue Display of Fatality error and also happens primarily as a result of an inappropriate driver mounted.
Generally Windows users start to panic when they see heaven display of death however in this case, I can inform you that there are some simple steps which you can take as well as fix the Driver Power State Failure in Windows 8.1.
So proceed and follow the tutorial below for a quick fix on this problem. On 99% of the instances, Driver Power State Failure is caused by placing your operating system to sleep mode state. To be more exact you will most likely encounter this mistake message when you attempt to log in to the device.
The mistake is brought on by the power settings or due to the fact that some drivers are having incompatibility issues in the system.
Fixing Error Code: 0x0000246 from Device Manager
The first step is to remove the device from Device Manager after the failed installation. Once the device is no longer available in Device Manager, you can either try a different installation file or use the Windows driver to fix the installation process.
Removing Audio Device from Device Manager
- To open Device Manager, hit the Windows key and type “device manager,” and then select the top result.
Open Device Manager
- In Device Manager, scroll down and locate Other Devices section.
Locate Other Devices
- If you cannot locate Other Devices from the list, you may need to change the view settings by ticking the “Show Hidden Devices” option.
Show Hidden Devices
- Once you locate the audio device with the failed installation, use the right mouse button to open the context menu and select “Uninstall Device.”
Uninstall Failed Audio Device
- When prompted, click Uninstall to remove the device from your system.
Select Uninstall from Prompt
Add the Device Again using Automatic Driver Search in Windows
- The device will no longer be available in Device Manager’s list. You should restart your computer before continuing with the following steps.
Other Device Removed
- Reopen Device Manager and to start adding the device, select the Action Menu and click on “Scan for Hardware Changes.”
Scan for Hardware Changes
- In Device Manager, locate the Video, Audio and Game Controllers section and expand the list to view the new High Definition Audio device.
Locate Generic Audio Device
Note: The device should function correctly using the generic Windows Driver.
- To install the Original Equipment Manufacturer’s driver, use the right mouse button to open the Context Menu and select “Update Driver”.
Select Update Driver
- On the Update Driver page, select the “Search automatically for updated driver software” option. Windows will connect to the internet and locate the latest driver for your audio device.
Automatically Search for Updated Driver Software
- Windows will now download and install the correct driver for you from the OEM’s latest signed and verified driver list.
Updating Device Driver Automatically
- Once the process completes, you’ll receive a message indicating the successful installation of the audio device.
Driver Automatic Update Successfully Completed
- If the process does not complete successfully, you can try to add a legacy driver. For details on adding a legacy driver, see the next section.
Failed to Automatically Update Device Driver
Add the Device Using Windows Legacy Drivers
- If the previous solution did not work for you, you can attempt to add a Legacy Driver for the audio device. Use the right mouse button to open the Context Menu, and select Update Driver. Instead of letting Windows search for the latest driver automatically, select the second option to locate the driver yourself.
Select Browse my Computer for Driver
- On the Locate Driver Page, select the second option to choose a component from a list of Windows device drivers.
Choose Let Me Pick from a List of Drivers
Note: If you’ve previously downloaded a driver and know where it’s located, you can select the first option and browse the .dll file’s location. However, this will not be the same as the Windows Legacy Driver and may result in you receiving the same error.
- On the next page, there will be a list of manufacturers and associated drivers. If the option for “Show Compatible Hardware” box prevents you from seeing any devices, untick the box and scroll down to Realtek.
Select Realtek High Definition Audio from List
- You can now click on the Next Button to start the installation process.

- After the installation completes, you’ll see the success message on the final page.
Successfully Installed Legacy Driver
- Your device will now be available in the Device Manager list.
Realtek Audio with Legacy Device Driver
Try This Time-Saving ShortcutStart using Driver Support | ONE today and save time and frustration dealing with common Windows device issues. The software will inventory your computer for all active device types we support upon installation. When fully registered the service will update drivers for you automatically.Download Driver Support
Починка элементов ОС
Помимо неудачного обновления, ошибка может быть вызвана повреждением или удалением системных файлов. В этом случае поможет проверка системных файлов Windows.
Чтобы выполнить проверку, следует предпринять ряд действий.
- Запустите «Командную строку» в режиме от администратора. Проще всего это сделать, нажав сочетание клавиш Win+X и выбрав в появившемся меню «Windows Powershell» (администратор).
Запускаем «Командную строку»
- Введите в строку «sfc /scannow». Это запустит проверку целостности системных файлов Windows по контрольным суммам, а также устранит возможные ошибки.
Вводим в строку команду
- После завершения теста «со /scannow», поврежденные файлы будут восстановлены автоматически.Голубая командная строка типична для последних версий Windows 10, Черная — более старый вариант, функционирует примерно так же.
- После завершения проверки в зависимости от результатов появится одно из четырех сообщений: все нормально, ошибка выполнения, поврежденные файлы успешно исправлены, файлы найдены, но к ним нет доступа.
Окно с завершенными результатами теста
- Перезагрузите ПК и проверьте на наличие ошибки.
Return your Graphics Card Drivers to the Older Version
Sometimes Driver Power State Failing mistake can show up due to your graphics card drivers. To repair this issue, it’s advised to roll back to the older driver. This is reasonably simple, and you can do it by following these steps:
- Open Up Device Manager.
- Navigate to Display adapters section as well as dual click your graphics card.image : windowsreport.com
- When Properties window opens, go to the Driver tab and also click on Curtail Driver button.
Wait for the process to finish.image : windowsreport.com
If Roll Back option isn’t readily available, you’ll need to uninstall your graphics card driver from Device Manager. Conversely, you can utilize Display Driver Uninstaller to completely remove all files associated with your graphics card.
After you remove the driver, visit your graphics card manufacturer’s website and download the older version of the driver. After installing the driver, check if the issue is dealt with.
This issue normally affects Nvidia graphics cards, however feel free to try this solution with other graphics cards as well.
Параметры
На синем экране смерти имеется текстовая информация. Сразу после указания кода ошибки, в скобках будут находиться 4 параметра.
STOP 0x0000009F (parameter1, parameter2, parameter3, parameter4) DRIVER_POWER_STATE_FAILURE
Особого внимания заслуживает первый из них, поскольку он определяет значения остальных. Следует более подробно рассмотреть это в таблице ниже (ОУ означает объект устройство, ОЦУ – объект целевое устройство):
|
parameter1 |
parameter2 |
parameter3 |
parameter4 |
Почему появляется |
|---|---|---|---|---|
|
0x1 |
ОУ |
Является заданным |
Является заданным |
ОУ продолжает высво- бождаться, но запрос питания уже поступил |
|
0x2 |
ОЦУ |
ОУ |
Объект драйвер |
ОУ завершил выполнение запросов на ввод-выдачу при запросе состояния питания, но не вызывал Po Start Next Power Irp |
|
0x3 (может возникнуть исклю- чительно в Windows 2000) |
Указатель на объект является целевым устройством |
Указатель на ОУ |
IRP |
Произошла неправильная установка IRP драйвером в один из режимов (окончания IRP или ожидания) |
|
0x3 (Появляется в Windows XP и далее) |
PDO |
FDO |
Блокиро- ванный IRP |
ОУ блокирование IRP продолжалось излишне длительный период времени |
|
0x4 (Появляется в Windows Vista и далее) |
Показатель таймаута (задается в секундах) |
Включающий в себя блокирование PnP поток |
В операционной системе Windows 7 предполагается указание на nt! TRIAGE 9F PNP |
Переход в другое состояние питания вызывало таймаут для проведения синхро- низации |
|
0x101 (Возникает исклю- чительно в Windows 2000) |
FDO |
PDO |
Объект родительское устройство |
Объект родительское устройство выявил отсутствие установки бита DO POWER PAGABLE в дочернем устройстве |
|
0x500 (Возникает исклю- чительно в Windows XP и Server) |
Является зарезер- вированным |
Объект целевое устройство |
Объект целевое устройство |
Объект устройство завершил выполнение запросов на ввод-выдачу при запросе положения питания, но не вызывал Po Start Next Power Irp |
Do an SFC scan
If you’re obtaining Driver Power State Failure message, you could be able to resolve it by performing an SFC scan.
According to users, this trouble is caused by documents corruption, and in order to repair it you simply require to perform an SFC scan. To do that, adhere to these actions:
- Press Windows Key + X to open up Win + X menu and also choose Command Prompt (Admin) from the listing. If Command Prompt isn’t readily available, select PowerShell (Admin) instead.
- When Command Prompt opens, go into sfc/ scannow and press Go into to run it.
- The scanning process will now start. Remember that SFC scan can take about 10 mins, so do not disturb it.
If you can not run SFC scan, or if the scan can not fix the problem, users are recommending to utilize DISM scan instead. To do that, comply with these steps:
- Open Up Command Prompt as administrator.
- Run the adhering to commands:
DISM.exe /Online /Cleanup-image /scanhealth
DISM.exe /Online /Cleanup-image /Restorehealth
- After running both commands, examine if the issue is solved.
If you were not able to run SFC scan before, make certain to run it after the DISM scan is completed. When you run both scans, the issue ought to be entirely settled and the error message will quit appearing.
Обновление операционной системы
Для обладателей бета-версии Windows 10 ошибка появлялась несколько раз до релиза операционной системы, особенно отметилось крупное обновление 1709. На ноябрь 2021 ОС не является причиной ошибки сама по себе, поэтому одним из вариантов устранения Driver Power State Failure может стать обновление Windows 10 до последней версии.
Обновление Windows 10
Проверить наличие последних обновлений вручную можно через меню «Пуск».
- Нажмите на кнопку «Пуск». Выберите шестеренку в левой части меню.
Нажимаем на «Параметры»
- Перейдите в раздел «Обновления и безопасность».
Переходим в раздел «Обновления и безопасность»
- В «Центре обновления» нажмите «Проверку наличия обновлений» и перезагружаем ПК.
В «Центре обновления» нажимаем «Проверку наличия обновлений»
Для Windows 7 и 8 проблема иногда решается наоборот: полным отключением системы обновлений. Сделать это можно следующим способом.
Также деактивируем систему через «Центр обновления Windows» в «Панели управления»
Solution 4: Fix driver conflicts
Realtek has a known conflict with the Microsoft UAA Bus Driver for High Definition Audio. Follow steps below to fix the conflict.
- Go to Device Manager. Expand the System Devices branch and find Microsoft UAA Bus Driver for High Definition Audio.
- Right click on the device and click Disable.
- Go to Programs and Features and locate the Realtek High Definition Audio Driver entry. Uninstall the driver. (Do not reboot the system.)
- Go back to Device Manager and uninstall the disabled Microsoft UAA Bus Driver for High Definition Audio. (Do not reboot the system.)
- Reinstall the Realtek HD Audio Driver (If “Found New Hardware Wizard” pops up, ignore it.).
- After installation is complete, reboot the system.
Solution 4. Change Power Settings
Now, we will introduce the fourth method to fix the issue of driver power state failure. To fix this error code 0x00000009f, you can change your power settings.
Follow the below guides to continue.
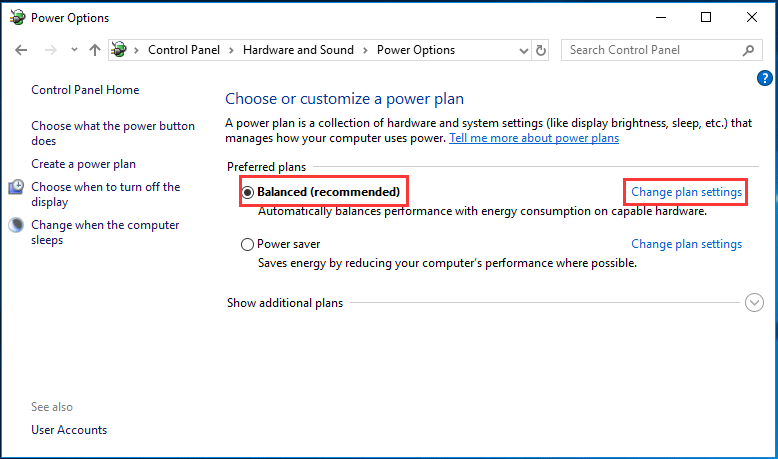
Step 1: Open Power Options
- Type Control Panel in the search box of Windows 10/8/7, select it and open it.
- In the popup window, choose Hardware and Sound.
- In the popup window, choose Power Options to continue.

Step 2: Change Power settings
1. Select the Balanced (recommended) and click Change plan settings.
2. Click Change advanced power settings.

3. In the popup window, please expand the Wireless Adapter Settings and Power Saving mode. Then change the Setting to Maximum Performance.

4. Find out the PCI Express and Link State Power Management in the Power Options window, and change the Setting to Maximum power savings to continue.

5. Then click Apply and OK buttons to execute all changes.
When you have finished all steps, you can reboot your computer to check whether the issue of driver power state failure Windows 8 is solved.
Change your Power Settings
Occasionally Driver Power State Failure error can show up due to your power settings. According to users, you could be able to repair this trouble just by disabling particular power settings. To do that, adhere to these actions:
- Press Windows Key + S as well as get in control panel. Select Control panel from the checklist
- When Control Panel opens, locate as well as click Power Options
- Click on Choose what the power button does
- Now click Change settings that are currently unavailable
- Disable Switch off fast startup (recommended), Sleep as well as Hibernate options. Click on Save changes button.
Manually Fixing Error Code: 0x0000246
If you are still experiencing issues with updating the driver or installing the Realtek software, you’ll need to fix your Registry.
Although there are third-party Registry scanning tools, these usually come with adware or only fix a limited amount of issues unless you activate the software.
To fix the issue manually, you’ll need to edit the Registry values.
Note: Before making manual updates, you should create a backup of the current Registry by exporting it to a location on your PC.
If anything goes wrong, you can simply import the old Registry to restore it to its previous state.
Manually Fixing the Device Install Settings in the Registry
- Hit the Windows Key + R and type “regedit” in the run box. Click Okay to start the Registry Editor.
Start Registry Editor
- In the Registry Editor, navigate and find Device Install Policy Key:
Device Install Registry Key
- If the Key does not exist, you’ll have to create it by navigating to the Windows folder, right-clicking on the folder and select New > Key.
Add New Registry Key
- Name the new Key “DeviceInstall”.
Create DeviceInstall Policy Key
- Add another Key below the DeviceInstall Key and name it “Settings”.
Add Settings Key
- In the Settings Key, create a new DWORD(32-Bit) entry and name it “InstallTimeout”.
Add InstallTimeout Entry
- Use the Right Hand Mouse Button to modify the value.
Modify InstallTimeout Value
- Set the value to 708 and click OK.
Update InstallTimeout Value to 708
- Restart your PC for the changes to take effect.
Note: If none of the above solves your issue, you may need to go back to a previous restore point in order to fix the problem.
As the Realtek HD audio driver failure with error code 0x0000246 relates specifically to an environment variable blocking installation privileges for the application, you should also check that your system didn’t disable the Device Install and Device Setup Manager services.
Изменение настроек Windows
Данный способ исправления driver power state failure скорее служит в роли хитрого хода, нежели в роли таблетки. Несомненно, он может вам помочь.
Все дело в режиме сна. При выходе из этого режима, все компоненты ПК проходят некоторую проверку, и при наличии каких-либо проблем на стороне устройства, выпадает stop экран. В качестве решения я предлагаю отключить данный режим.
Для этого:
- Переходим в раздел «Электропитание». Сделать это можно через иконку батареи в трее или панель управления.
- В левом меню щелкаем по действию кнопок питания, после чего попадаем в данный раздел.
- Далее нам нужно изменить параметры, которые сейчас недоступны, нажав по соответствующему пункту.
- Затем снимаем галочки с пунктов быстрого запуска и спящего режима.
- Перезагружаем компьютер.
Способ помогает избавиться от driver power state failure во многих случаях, но далеко не во всех, особенно, когда проблема находится на стороне комплектующих. Это мы рассмотрим далее.
Способы исправить ошибку DRIVER POWER STATE FAILURE в Windows 10
Как исправить ошибку в безопасном режиме
После входа в безопасный режим необходимо выполнить следующие шаги, чтобы исправить ошибку сбоя состояния питания драйвера:
- Щелкните правой кнопкой мыши Компьютер > Свойства
- Нажмите «Диспетчер устройств» и проверьте, имеются ли желтые метки для каких-либо драйверов оборудования.
- Щелкните правой кнопкой мыши по поврежденным драйверам и выберите Удалить.
- Переустановите драйверы
Перезагрузите компьютер. Откройте «Настройки» и перейдите в «Система и безопасность». Нажмите на Центр обновления Windows. Нажмите Проверить наличие обновлений.
Исправить ошибку Driver Power State Failure через восстановление системы
Восстановление системы можно использовать для восстановления предыдущей версии ОС Windows. Если вы столкнулись с серьезной проблемой Driver Power State Failure в Windows 10, то с помощью функции восстановления системы вы можете исправить многие проблемы. Вы можете вернуть систему в нормальное состояние, выполнив следующие действия:
- Щелкните правой кнопкой мыши Компьютер > Свойства.
- Защита системы > Выберите Восстановление системы.
- Нажмите Далее и дождитесь восстановления системы.
- Готово.
Выполнить сканирование SFC
Многие пользователи исправили эту проблему с ошибкой состояния питания драйвера с помощью сканирования SFC. Следуйте этим шагам:
- Нажмите клавишу Windows + X и затем выберите «Командная строка» («Администратор») или PowerShell («Администратор»).
- После открытия терминала введите «sfc/scannow» > «Enter», чтобы запустить его.
Сканирование начнется, и это займет около 10 минут. Также попробуйте следующие команды.
- DISM.exe /Online /Cleanup-image /scanhealth
- DISM.exe /Online /Cleanup-image /Restorehealth
После выполнения обеих команд проверьте, исправлена ли ошибка состояния питания драйвера.
Очистка реестра
Реестр Windows — это банк данных, который хранится в Windows и содержит важную информацию об оборудовании вашего компьютера и операционной системе. Обычно нам не нужно изменять реестр, потому что все программы и приложения обычно автоматически создают все необходимые изменения.
Если на вашем компьютере нет программы для очистки реестра, то установите на свой компьютер, чтобы добиться идеальной производительности. Вот наиболее популярный, который я рекомендую всем пользователям: https://mysitem.ru/soft/361-computer-cleanup.html
Отключить настройку быстрого запуска
Быстрый запуск — это функция Windows 8 и Windows 10, которая объединяет функции выключения и спящего режима, чтобы ваш компьютер запускался быстрее, чем обычный процесс запуска. Этот процесс достигается сохранением некоторых связанных файлов и драйверов в этом системном файле hiberfil.sys, и преимущества его использования в том, что когда вы снова откроете свои окна, он возобновит работу из этого файла гибернации, чтобы ускорить процесс запуска.
Иногда немногие драйверы имеют проблемы с совместимостью с этой функцией, и, отключив этот быстрый запуск, вы можете легко исправить эту ошибку, всего за пару минут, если имеется причина в настройках быстрого запуска.
Я надеюсь, что один из способов помог вам устранить ошибку Driver Power State Failure в Windows 10
В последнее время довольно часто читатели моего сайта пишут мне на почту письмо, с просьбой разобраться с ошибкой driver power state failure, которая в основном наблюдается в Windows 10, 8 и 7
Так как писем я получил достаточно много, то я решил уделить этой проблеме отдельное внимание и написать целую статью
Хочу заметить, что данный тип синего экрана может появляться и в Windows XP, но уже с сопровождением кода остановки 0x0000009F. По своей сути, это одно и тоже. Способы устранения будут одинаковы.
Enter Safe Mode and Remove Just Recently Installed Drivers
To start with, we will need to become part of the Advanced startup of Windows 8.1 by following these steps:
- Go into the BIOS and make certain that the initial boot device is readied to your CD/DVD drive.
- Area the Microsoft Windows 8.1 boot DVD right into the CD/DVD drive.
- Reboot your Windows 8, Windows 10 and Windows 11 operating system.
- When prompt by the message Press any key to boot from CD or DVD please boot from the Windows 8 setup media CD by pushing any type of key on your keyboard.
- In the very first home window that shows up after you booted from the Windows 8.1 DVD you will need to left click or touch on the Next button.
- Left click or touch on the Repair your computer system option existing in the next display.
- From the Pick an option home window that shows up left click or tap on the Troubleshoot option.
- In the next window left-click or tap on the Advanced options.
- In the Advanced Options home window left-click or tap on the Command Prompt option.
- Write in the black home window (command prompt) the following: C: without the quotes. Press Enter to run the command.
- Following you will require to compose the complying with in the Command Prompt: BCDEDIT/ COLLECTION DEFAULT BOOTMENUPOLICY LEGACY. Press the Enter button on the keyboard.
- Write in the command prompt home window the following: EXIT. Press the Enter key.
- Remove the Windows disc as well as restart your COMPUTER.
After doing that, you need to get in Safe Mode as well as remove any type of recently installed drivers. To do that, adhere to these actions:
- When the computer starts after the reboot keep pushing the F8 button on the keyboard.
- Listing of options will certainly appear. Select Safe Mode from the menu.
-
When Safe Modes starts, open Device Manager.
- Now uninstall the last drivers you set up just recently by best clicking on them and also and selecting the Uninstall device option.
- Reboot the Windows 8.1 typically and also see if you still have the blue display with the exact same mistake message. If the issue lingers, you’ll have to remove an additional lately set up driver. Repeat this step until your COMPUTER start working again
Keep in mind: After you discover the driver that is causing you this blue display you need to examine the producer’s web site for an upgraded version of it that works with your Windows operating system in order to avoid the mistake Driver Power State Failure from showing up once more.
Fixing Error Code 0x0000246 from Control Panel
If the preceding steps did not resolve your issue, it may be required to remove the Realtek software from your computer completely and reinstall the latest version provided by the company.
Note that this should also solve the issue with any dangling Registry Entries that may be preventing the driver from installing.
Removing Realtek Software from Your PC
- To start Control Panel, hit the Windows Key, type “Control Panel”, and select the top result.
Open Control Panel
- Once the Control Panel loads, select the Programs and Features icon to access all your installed programs.
Open Programs and Features
- Scroll down to the Realtek program, use the right mouse button to open the Context Menu, and select “Uninstall.”
Uninstall Realtek Software
- On the Prompt, select “Yes” to uninstall all Realtek software.
Confirm Uninstall of Realtek Software
- You’ll see the progress of the uninstall process.
Uninstall Progress Window
- Once the software finishes uninstalling the Realtek application, you’ll receive a prompt to restart your PC.
Restart PC to Finishes Uninstall Process
Note: It is important that you restart the PC before reinstalling the Realtek application, as the process will remove any dangling entries in the Registry automatically.
Reinstall the Latest Realtek Driver Application
- Download the latest Realtek application from the Realtek Website.
Select Download
Note: Ensure you select the correct 32bit or 64bit download for your PC’s architecture.
- On the download page, you’ll need to provide an email address and then verify that you’re human using a Captcha code.
- After the download completes, find the file on your PC and double-click to start the installer.
- Once the Realtek installer launches, click next to start installing the software.
Install Realtek Application
- The software will show a progress bar.
Installation Progress
- Another prompt will allow you to restart the PC, and you should now have resolved the Realtek HD Audio Driver Failure Error Code: 0x0000246 problem.
Realtek Audio Device Fixed
Try This Time-Saving ShortcutStart using Driver Support | ONE today and save time and frustration dealing with common Windows device issues. The software will inventory your computer for all active device types we support upon installation. When fully registered the service will update drivers for you automatically.Download Driver Support