Что делать, если в windows 10 возникает ошибка kernel security check failure
Содержание:
- Что делать, если на Windows 10 появляется ошибка KERNEL SECURITY CHECK FAILURE?
- Bug Check 0×139 KERNEL_SECURITY_CHECK_FAILURE Parameters
- 4. Use Windows System Restore
- Cause
- Solution when the problem is in the drivers or controllers
- Послесловие
- Previous steps and correction of the Kernel Security Check Failure error
- В чем причина проблемы?
- Frequently Asked Questions
- Восстановление реестра
- Resolution
- Причины возникновения ошибки
- How to FIX BSOD ERROR: KERNEL SECURITY CHECK FAILURE.
- Как исправить ошибку Kernel Security Check Failure в Windows 10
- Part 3. Other Methods to resolve the KERNEL SECURITY CHECK FAILURE on Windows 10.
- We’re hiring
- Ошибка Kernel Security Check Failure: как исправить и почему возникает при работе Windows 10
- Bug Check 0x139 KERNEL_SECURITY_CHECK_FAILURE Parameters
- Сбой жесткого диска
Что делать, если на Windows 10 появляется ошибка KERNEL SECURITY CHECK FAILURE?
Хочу разобрать очередную ошибку, которая относится к критическим в операционной системе Windows. Так я ее назвал, потому что ошибки BSoD (синие экраны смерти) всегда критичны. Самое интересное, что часто сразу выявить причину не выходит, так как их может быть огромное количество.
В данной статье мы будем рассматривать ошибку Kernel Security Check Failure Windows 10. Вообще, ошибки подобного рода в Windows 10 имеет более информативный характер, то есть там написано, что нужно делать, а еще система сама попытается ее исправить. К сожалению, ошибку KERNEL SECURITY CHECK FAILURE придется исправлять самостоятельно.
Как исправить синий экран смерти Kernel Security Check Failure?
Эта ошибка еще имеет код 0x00000139, может быть эта информация поможет вам в решении проблемы. Итак, причинами SECURITY CHECK FAILURE могут быть следующие моменты:
- Устаревшие версии драйверов, либо была произведена установка последней версии, которая привела к конфликту в системе.
- Поврежден реестр.
- Вы установили приложение, которое конфликтует с системой или BIOS.
- Что-то случилось с компонентами компьютера, например, физическое повреждение.
На самом деле эти причины не единственные, их гораздо больше, но все их здесь перечислить не получится.
Исправляем
Так как определить ошибку по-хорошему не выходит, мы можем применять только действия, которые в принципе могут устранить ее, например, восстановить целостность файлов, через безопасный режим удалить драйвер, возможно, виновный в появлении BSoD.
Хочу напомнить, что у меня есть статья на тему анализа дампа памяти, который позволяет выявить причину ошибки. Если система не запускается, то проделывать процедуру придется в безопасном режиме. Прочитайте эту статью и скорее всего вы определите, кто виновник «синего экрана смерти».
Это интересно: 5 способов войти в безопасный режим Windows 8 и 8.1
Проверка диска на ошибки
В этом случае системная утилита проверить жесткий диск на наличие проблем и попытается их устранить, либо появится сообщение, что их нет.
Откройте командную строку от имени администратора, для этого нажмите по меню Пуск правой кнопкой мыши и выберите там соответствующий пункт.
Введите там команду: chkdsk /f C:
В том случае, если у вас не один накопитель, то придется применять команду к каждому. После этого вы перезагружаете компьютер начинается проверка, которая может быть довольно длительной.
Проверка системных файлов на целостность
Ну тут из заголовка понятно, что мы будем делать. Нам также понадобится командная строка, в которую нужно ввести эту команду:
sfc /scannow
Если все будет нормально, то команда строка скажет об этом, если есть поврежденные файлы, то система попытается их восстановить.
Проблемы с реестром
Причиной может быть и реестр, который был поврежден самим пользователем, либо вирусами. Конечно не всегда изменения в реестре могут выявить такую проблему, но есть и вот такие случаи. Вам нужно попытаться восстановить реестр, но перед этим вам нужно было делать резервную копию. Хотя в Windows 10 они уже есть, поэтому волноваться не стоит. Как восстановить реестр написано здесь.
Проблемные драйвера
Хоть этот пункт и является почти последний, он не менее важен. При обновлении драйверов видеокарты или другого устройства с большой вероятностью вы получите ошибку Kernel Security Check Failure. Либо же ошибка моет появляться из-за старой версии. Поэтому здесь два варианта, как поступить – обновить драйвера до последней версии, либо откатить их на версию или две назад.
Это интересно: Как выявить проблемные драйвера с помощью Driver Verifier
Для профилактики вы еще можете сбросить BIOS, но это на ваш страх и риск.
Насчет физического повреждения компонентов сказать ничего не могу. Вспомните, может ноутбук или компьютер подвергался ударам, может быть у вас при отключении света выключался и компьютер, были скачки напряжения.Тогда тот или иной компонент придется заменить, например, тот же модуль оперативной памяти или жесткий диск.
Надеюсь это поможет вам в решении проблемы. Конечно, можно рассматривать и переустановку Windows, она то 100% поможет, но мало кто решиться на то действие.
Bug Check 0×139 KERNEL_SECURITY_CHECK_FAILURE Parameters
| Parameter | Description |
|---|---|
| 1 | The type of corruption. For more information, see the following table. |
| 2 | Address of the trap frame for the exception that caused the bug check |
| 3 | Address of the exception record for the exception that caused the bug check |
| 4 | Reserved |
The following table describes possible values for Parameter 1.
| Parameter 1 | Description |
|---|---|
| A stack-based buffer has been overrun (legacy /GS violation). | |
| 1 | VTGuard instrumentation code detected an attempt to use an illegal virtual function table. Typically, a C++ object was corrupted, and then a virtual method call was attempted using the corrupted object’s this pointer. |
| 2 | Stack cookie instrumentation code detected a stack-based buffer overrun (/GS violation). |
| 3 | A LIST_ENTRY was corrupted (for example, a double remove). For more information, see the following Cause section. |
| 4 | Reserved |
| 5 | An invalid parameter was passed to a function that considers invalid parameters fatal. |
| 6 | The stack cookie security cookie was not properly initialized by the loader. This may be caused by building a driver to run only on Windows 8 and attempting to load the driver image on an earlier version of Windows. To avoid this problem, you must build the driver to run on an earlier version of Windows. |
| 7 | A fatal program exit was requested. |
| 8 | A array bounds check inserted by the compiler detected an illegal array indexing operation. |
| 9 | A call to RtlQueryRegistryValues was made specifying RTL_QUERY_REGISTRY_DIRECT without RTL_QUERY_REGISTRY_TYPECHECK, and the target value was not in a trusted system hive. |
| 10 | Indirect call guard check detected invalid control transfer. |
| 11 | Write guard check detected invalid memory write. |
| 12 | An attempt was made to switch to an invalid fiber context. |
| 13 | An attempt was made to assign an invalid register context. |
| 14 | The reference count for an object is invalid. |
| 18 | An attempt was made to switch to an invalid jmp_buf context. |
| 19 | An unsafe modification was made to read-only data. |
| 20 | A cryptographic self-test failed. |
| 21 | An invalid exception chain was detected. |
| 22 | A cryptographic library error occurred. |
| 23 | An invalid call was made from within DllMain. |
| 24 | An invalid image base address was detected. |
| 25 | An unrecoverable failure was encountered while protecting a delay load import. |
| 26 | A call was made to an unsafe extension. |
| 27 | A deprecated service was invoked. |
| 28 | An out of bounds buffer access was detected. |
| 29 | An RTL_BALANCED_NODE RBTree entry has been corrupted. |
| 37 | An out of range switch jumptable entry was invoked. |
| 38 | A longjmp was attempted to an invalid target. |
| 39 | An export suppressed call target couldn’t be made a valid call target. |
4. Use Windows System Restore
System Restore is another great free tool from Microsoft for dealing with system crashes and errors. It works by taking your PC back to a state where everything was working fine.
This is how System Restore will fix the kernel security check failure error in Windows 10. Your computer falls back to a state where you weren’t experiencing this problem by running system restore.
Please note that for System Restore to work, you have to have a restore point beforehand. In other words, you need a previous backup that you can move Windows 10 back to.
To get started, type system restore in the Start menu search bar and select the Best Match. Under the System Restore tab, click on the System Restore button. When the wizard opens, click Next and choose a restore point that you want to go back to, then select Next.
Note: If you don’t see any restore point, it means that you do not have one. But do not worry, skip to the next method.
Click on Finish to begin the system restore process. Your system will restart during this process.
Cause
Using the parameter 1 table, and a dump file, it is possible to narrow down the cause for many bug checks of this type.
LIST_ENTRY corruption can be difficult to track down and this bug check, indicates that an inconsistency has been introduced into a doubly-linked list (detected when an individual list entry element is added to or removed from the list). Unfortunately, the inconsistency is not necessarily detected at the time when the corruption occurred, so some detective work may be necessary to identify the root cause.
Common causes of list entry corruption include:
- A driver has corrupted a kernel synchronization object, such as a KEVENT (for example double initializing a KEVENT while a thread was still waiting on that same KEVENT, or allowing a stack-based KEVENT to go out of scope while another thread was using that KEVENT). This type of bug check typically occurs in nt!Ke* or nt!Ki* code. It can happen when a thread finishes waiting on a synchronization object or when code attempts to put a synchronization object in the signaled state. Usually, the synchronization object being signaled is the one that has been corrupted. Sometimes, Driver Verifier with special pool can help track down the culprit (if the corrupted synchronization object is in a pool block that has already been freed).
- A driver has corrupted a periodic KTIMER. This type of bug check typically occurs in nt!Ke* or nt!Ki* code and involves signaling a timer, or inserting or removing a timer from a timer table. The timer being manipulated may be the corrupted one, but it might be necessary to inspect the timer table with !timer (or manually walking the timer list links) to identify which timer has been corrupted. Sometimes, Driver Verifier with special pool can help track down the culprit (if the corrupted KTIMER is in a pool block that has already been freed).
- A driver has mismanaged an internal LIST_ENTRY-style linked list. A typical example would be calling RemoveEntryList twice on the same list entry without reinserting the list entry between the two RemoveEntryList calls. Other variations are possible, such as double inserting an entry into the same list.
- A driver has freed a data structure that contains a LIST_ENTRY without removing the data structure from its corresponding list, causing corruption to be detected later when the list is examined after the old pool block has been reused.
- A driver has used a LIST_ENTRY-style list in a concurrent fashion without proper synchronization, resulting in a torn update to the list.
In most cases, you can identify the corrupted data structure by walking the linked list both forward and backwards (the dl and dlb commands are useful for this purpose) and comparing the results. Where the list is inconsistent between a forward and backward walk is typically the location of the corruption. Since a linked list update operation can modify the list links of a neighboring element, you should look at the neighbors of a corrupted list entry closely, as they may be the underlying culprit.
Because many system components internally utilize LIST_ENTRY lists, various types of resource mismanagement by a driver using system APIs might cause linked list corruption in a system-managed linked list.
Solution when the problem is in the drivers or controllers
A frequent case for which the Kernel Security Check Failure error usually appears. It is due to using old or unsupported drivers. Therefore, updating these drivers may solve the problem. To do this we will go to the Windows 10 Start menu and type Device Manager and a screen like the following will appear:
Then, we select one of the different categories, such as “Display adapters”, we choose a hardware component and right click on Uninstall device :
Then we continue with the elimination of the rest of the devices and restart the computer. Then, after the restart, we will see how the drivers for the different hardware elements are automatically reinstalled.
Once this is done, what we will do is check that we have the latest drivers installed. For which also, from the device manager, selecting a hardware element with the right button, we will click on Update driver .
The next thing we have to do is click on Search for automatically updated driver software .
Sometimes this is not enough, as Windows does not automatically have all the newest updates. Also, in that sense, it would be advisable to visit the manufacturer’s website for:
- The motherboard to get the latest chipset, network card and sound drivers.
- Check the AMD, NVIDIA or Intel website for the latest graphics drivers.
Motherboard specifications can also give us clues as to the sound and network audio chips used, and newer drivers are sometimes available.
Послесловие
Многие неисправности, связанные с системными приложениями Android, можно решить банальной чисткой кэшированных данных, удалением обновлений или конфликтных приложений. Некоторые решаются с настройкой Wi-Fi сети или перезаходом в профиль Google на устройстве. В более тяжелых случаях может только помочь сброс данных или правка системных файлов с помощью root-прав.
Чтобы обезопасить себя в дальнейшем от частых ошибок, следует:
- использовать оптимизированные приложения;
- периодически чистить кэшированные данные и удалять мусорные файлы, чтобы не заполнять полностью память устройства;
- при загрузке программ использовать стабильное Wi-Fi соединение.
На этом все! Буду рад, если вы решите проблему и отпишитесь про это. Если появятся вопросы или потребуется совет, пишите в комментарии. Возможно, общими усилиями сможем Вам помочь.
Удачи, и пусть ваши гаджеты будут исправны!
Previous steps and correction of the Kernel Security Check Failure error
The solution to the Kernel Security Check Failure in Windows 10, or earlier versions, will depend on whether this error has been caused by hardware or software problems. In that sense, it should be noted that software-related problems are in principle easier to solve than hardware problems.
An important step before making any changes would be to create a system restore point . Thus, if we have a problem we can return to the starting point. To do so we will follow these steps:
- Windows start menu.
- We write Create a restore point and hit enter.
Then a screen like this will appear:
Next, we choose the system unit that is the one that contains Windows and we press the Create button. If we need to go back to a previous point in the future, we will click on System Restore . Also another possibility to consider is to restore a previous point of the system that we are sure that it will not give us problems. If in any of the changes that you make the restart in loop occurs then you will have to start Windows in safe mode.
В чем причина проблемы?
Ошибка, содержащая код Kernel Security Check Failure, выскакивает в самый неподходящий момент. Пользователь может сидеть в браузере, смотреть фильм, играть или заниматься работой. Тип действующей операции никак не влияет на возникновение неполадок.
Однако ошибка не появляется на пустом месте. Она выскакивает по следующим причинам:
- устаревшие драйверы оборудования;
- повреждены файлы реестра;
- проблемы с BIOS;
- перегрузка системы.
Несмотря на то, что ошибка прерывает работу пользователя и не дает ему сохранить изменения, проблема решается без помощи специалиста. Каждое действие из предложенных ниже инструкций может выполнить даже новичок.
Frequently Asked Questions
How can people know that their Windows 10 driver has got corrupted?
By checking the complete list of the drivers present in your Windows 10, you will easily get to know which driver is faulty or corrupted and needs proper repairing and attention.
How can people find the reasons why their computer has crashed?
The crashing of a driver can be resolved much easier than the computer crashing. To find out about a computer being crashed or not, you should notice all the big and small changes taking place in your computer.
How to ensure the proper working of Windows 10?
The power settings of a computer are the most important aspects and these should be changed from time-to-time so that they do not hang or lose their functionality at any point. By doing this, you will ensure the safe and proper working of your Windows 10 computer.
Why does stop code occur in Windows 10?
The occurrence of any critical or crucial error in the system or Windows 10 leads to the crashing of the system and this also causes the occurrence of stop code in Windows 10 in the first place for sure.
More Guides…
- How to Remove Broken Registry Items in Windows 10
- How to Enable Copy-Paste in Windows 10 Command Prompt
- Definitive Guide To Microsoft Network Adapter Multiplexor Protocol
- Solved: Avast Won’t Open Issue – Not Opening in Windows 10
- How To Get Google Assistant For Windows PC
Восстановление реестра
Одной из причин появления ошибки Kernel Security Check Failure является повреждение системного реестра. Внести некорректные изменения в него могут как сами пользователи, так и вирусы.
Чтобы удостовериться, что с реестром все нормально, можно выполнить его восстановление из резервной копии. Если вы не делали резервную копию, то воспользуйтесь файлами реестра, в которых выставлены настройки по умолчанию. Подробнее о восстановлении вы можете прочитать в статье, рассказывающей, как восстановить реестр на Windows 7. На Windows 10 процедура выполняется аналогичным образом.
Resolution
Determining the cause of this issues typically requires the use of the debugger to gather additional information. Multiple dump files should be examined to see if this stop code has similar characteristics, such as the code that is running when the stop code appears.
For more information, see Crash dump analysis using the Windows debuggers (WinDbg), Using the !analyze Extension and !analyze.
Use the event log to see if there are higher level events that occur leading up to this stop code.
These general troubleshooting tips may be helpful.
-
If you recently added hardware to the system, try removing or replacing it. Or check with the manufacturer to see if any patches are available.
-
If new device drivers or system services have been added recently, try removing or updating them. Try to determine what changed in the system that caused the new bug check code to appear.
-
Check the System Log in Event Viewer for additional error messages that might help pinpoint the device or driver that is causing the error. For more information, see . Look for critical errors in the system log that occurred in the same time window as the blue screen.
-
Look in Device Manager to see if any devices are marked with the exclamation point (!). Review the events log displayed in driver properties for any faulting driver. Try updating the related driver.
-
Run a virus detection program. Viruses can infect all types of hard disks formatted for Windows, and resulting disk corruption can generate system bug check codes. Make sure the virus detection program checks the Master Boot Record for infections.
-
For additional general troubleshooting information, see Blue Screen Data.
Причины возникновения ошибки
Данная проблема может возникать как на этапе загрузки, так и спустя некоторое время после включения. Кроме того, сбой непредсказуем и может не проявляться даже несколько дней, после чего снова напомнит о себе. Точно знать, как устранить неисправность можно только, если известна причина, но поскольку существует целый ряд провоцирующих факторов, в большинстве случаев приходится выявлять источник проблемы путём попыток исправить ситуацию. Ошибка Kernel Security Check Failure, характерная для Windows 10 и других версий, часто появляется по таким причинам:
- Повреждение файлов системы.
- Неактуальные или отсутствующие драйверы.
- Устаревшая версия BIOS, конфликтующая с другим софтом.
- Прочие конфликты ПО.
- Повреждение/отсутствие записей реестра.
- Перегрев процессора, видеоадаптера.
- Несовместимость компонентов в составе сборки ПК.
- Прочие аппаратные неисправности.
Причины возможны и другие, в каждом конкретном случае существует вероятность, что сбой спровоцирован иным фактором и разоблачить источник неприятности удаётся нечасто.
How to FIX BSOD ERROR: KERNEL SECURITY CHECK FAILURE.
Notes before troubleshooting the «KERNEL SECURITY CHECK FAILURE» issue, by following the methods below:
1. If you face the «KERNEL SECURITY CHECK FAILURE» problem, after upgrading your system (e.g. you have added more RAM or you have replaced the VGA adapter or another component), then probably this is the reason of the blue screen problem.2. If you face the «KERNEL SECURITY CHECK FAILURE» error, after a Windows update, then Rollback Windows to previous version.3. Make sure that your system is clean from viruses and malicious programs, by following this guide: Quick Malware Scan and Removal Guide for PC’s.4. Install all available Windows updates.5. If you can login to Windows normally or in safe mode, follow the instructions in .6. If you cannot login to Windows (Windows fails to boot), then read the instructions at .7. To make your life easier, enable the F8 (Advanced Options menu & Safe Mode) in Windows 8, 8.1 & 10 OS.
Как исправить ошибку Kernel Security Check Failure в Windows 10
Есть два момента, когда ошибка Kernel Security Check Failure появляется в Windows 10. Первый, когда вы не можете войти на рабочий стол и получаете ее все время при включении компьютера или ноутбука (перейдите к способу 1). Второй, когда ошибка появляется иногда, время от времени (перейдите к способу 2). Разберем шаги по устранению двух вариантов.
1. Когда ошибка не дает загрузиться на рабочий стол
Шаг 1. Создайте установочную USB-флешку с Windows 10. Зайдите на сайт Microsoft и скачайте Windows 10, далее вам будет предложена создать ISO флешку.
Шаг 2. Начните устанавливать Windows 10 на свой ПК и когда появится окно с кнопкой «Установить», нажмите снизу «Восстановление системы«.
Шаг 3. Вас перебросит в дополнительные параметры. Далее перейдите «Поиск и устранение неисправностей» > «Дополнительные параметры» и выберите «Восстановление при загрузке«. Если не помогло, то выберите «Параметры загрузи» > «Перезагрузить» и нажать F4 «Включить безопасный режим«.
Примечание: Вы также можете запустить командную строку из дополнительных параметров, но в безопасном режиме приоритетнее.
2. Используйте проверку системных файлов, диагностику памяти и диска
Шаг 1. Как только компьютер загрузиться до рабочего стола, наберите в поиске cmd и нажмите правой кнопкой мыши, выбрав запуск от имени администратора.
Part 3. Other Methods to resolve the KERNEL SECURITY CHECK FAILURE on Windows 10.
Method A. Perform a System Restore.
1. Boot your computer from the Windows installation media (DVD or USB).2. At Language options, press Next.3. Select Repair your computer.4. Then click Troubleshoot -> Advanced Options –> System Restore.
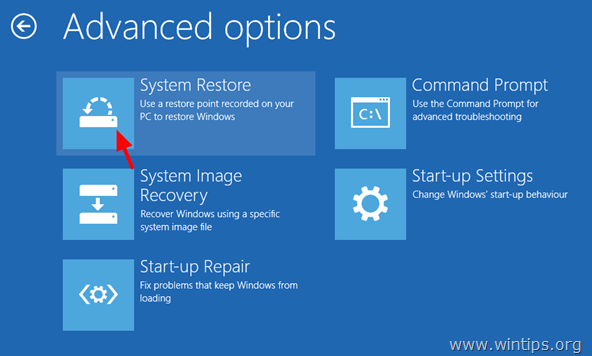
6. Select an earlier working state* and click Next.
* Note: Check the Show more restore points checkbox, to view all available restore points.
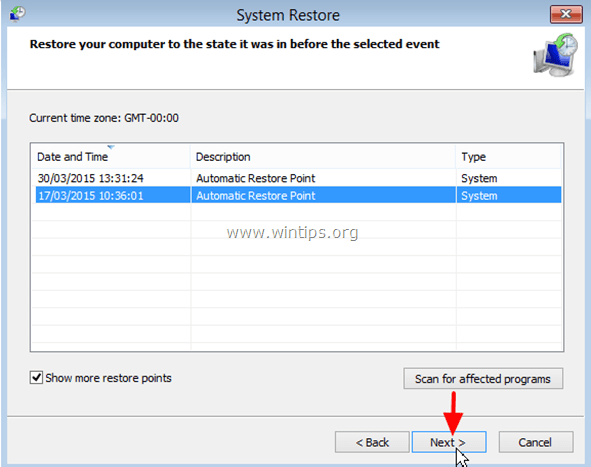
7. Finally, review your selection and if you agree, press Finish and then Yes.8. Now wait until the restore process is completed. During the restore process, your computer will restart several times and when it’s done, you should enter in Windows without problems.
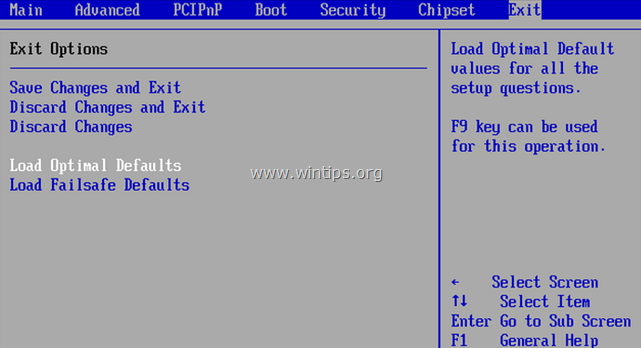
Method B. Modify SATA Mode in BIOS Settings.
1. Power On your computer and press the appropriate key (DEL or F1 or F2 or F10) to enter BIOS settings. *
* Note: The way to enter into BIOS Settings depends on the computer manufacturer. To Enter into your BIOS Settings, pay attention at the first screen as your computer starts and try to find a message like this:
2. Load Default Settings (Load Optimal Defaults)
3. Then look at all BIOS screens to locate the SATA Configuration setting.*
* Note: This setting is usually found under the Advanced section and can be named (depending on manufacturer) as: «SATA Mode» or «SATA Controller Mode» or «SATA Operation» or «Configure SATA as».
4. Make sure that the SATA Mode (Type) is set to AHCI or IDE and NOT in RAID.*
* Notes:1. Caution: If you have configured two or more Hard Drives in RAID mode, then leave this setting as is, exit from BIOS setup without saving and continue to the next solution.2. If the SATA Mode is set to AHCI then change it to IDE. If the SATA Mode is set to IDE then change it to AHCI.
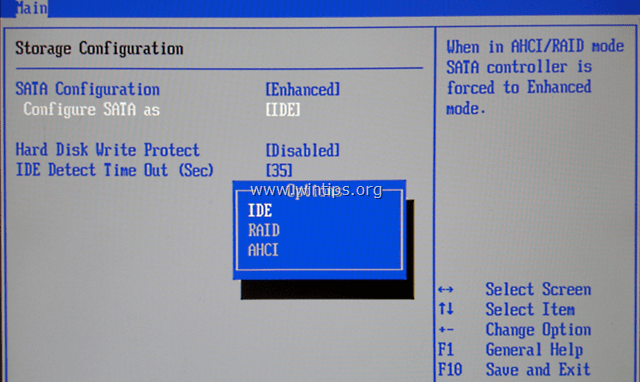
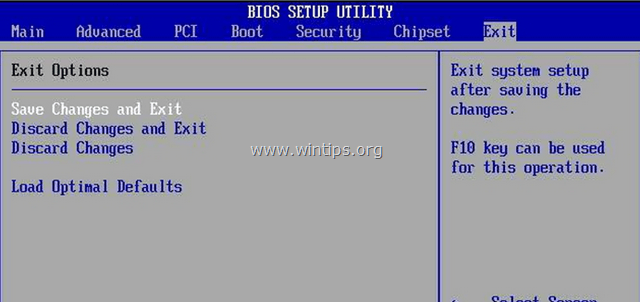
5. Save Changes and Exit BIOS Settings and try to boot on Windows.
6. If your computer doesn’t boot again, then revert the SATA setting back to what it was and proceed to the next method.
Method D. Test and diagnose the HDD for Hardware problems.
That’s it! Let me know if this guide has helped you by leaving your comment about your experience. Please like and share this guide to help others.
If this article was useful for you, please consider supporting us by making a donation. Even $1 can a make a huge difference for us in our effort to continue to help others while keeping this site free:
We’re hiring
We’re looking for part-time or full-time technical writers to join our team! It’s about a remote position that qualified tech writers from anywhere in the world can apply. Click here for more details.
If you want to stay constantly protected from malware threats, existing and future ones, we recommend that you install Malwarebytes Anti-Malware PRO by clicking below (we
do earn a commision from sales generated from this link, but at no additional cost to you. We have experience with this software and we recommend it because it is helpful and useful):
Ошибка Kernel Security Check Failure: как исправить и почему возникает при работе Windows 10
Каждому пользователю Windows хоть раз приходилось сталкиваться с так называемым «синим экраном смерти», он же BSOD. Его причина возникновения может быть разная, начиная с перегрева и выхода из строя компонентов, и заканчивая битыми файлами операционной системы. В Windows 10 «синий экран смерти» стал более информативным, чем на прошлых версиях операционной системы. При его появлении на экране пользователь может ознакомиться с названием ошибки и ее кодом, после чего компьютер перезагрузится и запустится вновь, если удастся избавиться от проблемы в конкретный момент времени. Некоторые ошибки Windows сама устранить не может, и среди них Kernel Security Check Failure. В рамках данной статьи мы рассмотрим, почему она появляется, и как ее исправить.
Ошибка Kernel Security Check Failure
Распространенная ошибка Kernel Security Check Failure также может отображаться кодом 0×00000139. В большинстве случаев операционная система без вмешательства со стороны пользователя не может устранить причину ее появления. Наиболее часто она возникает из-за следующих проблем в работе компьютера:
- Неактуальная версия драйверов;
- «Битые» файлы реестра;
- Версия BIOS конфликтует с программным обеспечением;
- Неполадки в работе компонентов компьютера.
Выше перечислены наиболее распространенные причины, почему появляется ошибка Kernel Security Check Failure, но на деле их гораздо больше.
Как исправить ошибку Kernel Security Check Failure
Однозначно сказать, почему появляется ошибка 0×00000139 при работе компьютера невозможно. Иногда она может не беспокоить пользователя несколько недель подряд, а в некоторых случаях синий экран с ошибкой Kernel Security Check Failure возникает каждые 10-30 минут, перезагружая компьютер.
Приведем алгоритм действий, который позволит протестировать систему, определить и устранить причину ошибки Kernel Security Check Failure.
1. Проверка жесткого диска
Чтобы протестировать жесткий диск, необходимо вызвать командную строку от имени администратора и прописать в ней команду:
Обратите внимание: Если у вас установлено несколько жестких дисков, последовательно потребуется проводить проверку для каждого из них. Команда выше проверяет только раздел, именуемый буквой C, он же чаще всего системный
При следующем старте компьютера начнется автоматическая проверка жесткого диска, которая может продлиться достаточно долго, в зависимости от объема накопителя и количества файлов на нем.
2. Проверка системных файлов
После сканирования жесткого диска на ошибки, нужно выполнить проверку системных файлов. Для этого снова потребуется запустить командную строку от имени администратора и прописать в ней следующую команду:
sfc /scannow
Данная команда позволяет проанализировать целостность системных файлов операционной системы Windows. Если в результате проверки будут найдены поврежденные файлы, утилита постарается их восстановить.
3. Тестирование оперативной памяти
Часто ошибка Kernel Security Check Failure возникает из-за проблем с оперативной памятью. Если в компьютере установлено несколько плашек ОЗУ, можно поочередно оставлять компьютер работать на одной из них и смотреть за реакцией, будет ли возникать в таком случае ошибка 0×00000139. Однако более эффективно провести полную проверку оперативной памяти и выявить проблемную плашку, если таковая имеется.
4. Устранение изменений в реестре
Сам пользователь, различные приложения, а также вирусы могут вмешиваться в работу реестра компьютера, изменяя различные параметры. Чаще всего пользователь вносит изменения в реестр взвешенно, выполняя действия на основе собственного опыта или авторитетных советов. Однако некоторые изменения реестра могут повлечь за собой ошибки, такие как Kernel Security Check Failure.
Уверенность, что ошибка 0×00000139 в работе Windows 10 не связана с изменениями в реестре, можно получить, если выполнить его восстановление из резервной копии.
5. Проблемы с драйверами
Еще одна причина, почему появляется ошибка Kernel Security Check Failure, это неактуальная версия драйверов и возникновение конфликтов между ними и операционной системой. В такой ситуации рекомендуется обновить драйвера до последних версий, скачать которые всегда можно с сайта-производителя компонента компьютера: видеокарты, материнской платы, центрального процессора и так далее.
Важно: Требуется обновить не только драйвера компонентов компьютера, но и BIOS до последней версии
Bug Check 0x139 KERNEL_SECURITY_CHECK_FAILURE Parameters
| Parameter | Description |
|---|---|
| 1 | The type of corruption. For more information, see the following table. |
| 2 | Address of the trap frame for the exception that caused the bug check |
| 3 | Address of the exception record for the exception that caused the bug check |
| 4 | Reserved |
The following table describes possible values for Parameter 1.
| Parameter 1 | Description |
|---|---|
| A stack-based buffer has been overrun (legacy /GS violation). | |
| 1 | VTGuard instrumentation code detected an attempt to use an illegal virtual function table. Typically, a C++ object was corrupted, and then a virtual method call was attempted using the corrupted object’s this pointer. |
| 2 | Stack cookie instrumentation code detected a stack-based buffer overrun (/GS violation). |
| 3 | A LIST_ENTRY was corrupted (for example, a double remove). For more information, see the following Cause section. |
| 4 | Reserved |
| 5 | An invalid parameter was passed to a function that considers invalid parameters fatal. |
| 6 | The stack cookie security cookie was not properly initialized by the loader. This may be caused by building a driver to run only on Windows 8 and attempting to load the driver image on an earlier version of Windows. To avoid this problem, you must build the driver to run on an earlier version of Windows. |
| 7 | A fatal program exit was requested. |
| 8 | A array bounds check inserted by the compiler detected an illegal array indexing operation. |
| 9 | A call to RtlQueryRegistryValues was made specifying RTL_QUERY_REGISTRY_DIRECT without RTL_QUERY_REGISTRY_TYPECHECK, and the target value was not in a trusted system hive. |
| 10 | Indirect call guard check detected invalid control transfer. |
| 11 | Write guard check detected invalid memory write. |
| 12 | An attempt was made to switch to an invalid fiber context. |
| 13 | An attempt was made to assign an invalid register context. |
| 14 | The reference count for an object is invalid. |
| 18 | An attempt was made to switch to an invalid jmp_buf context. |
| 19 | An unsafe modification was made to read-only data. |
| 20 | A cryptographic self-test failed. |
| 21 | An invalid exception chain was detected. |
| 22 | A cryptographic library error occurred. |
| 23 | An invalid call was made from within DllMain. |
| 24 | An invalid image base address was detected. |
| 25 | An unrecoverable failure was encountered while protecting a delay load import. |
| 26 | A call was made to an unsafe extension. |
| 27 | A deprecated service was invoked. |
| 28 | An out of bounds buffer access was detected. |
| 29 | An RTL_BALANCED_NODE RBTree entry has been corrupted. |
| 37 | An out of range switch jumptable entry was invoked. |
| 38 | A longjmp was attempted to an invalid target. |
| 39 | An export suppressed call target couldn’t be made a valid call target. |
Сбой жесткого диска
В первую очередь нужно проверить работоспособность вашего винчестера. Если на нем есть поврежденные блоки, то проблема будет появляться всё чаще и чаще. Более того, в будущем устройство может выйти из строя и все ваши данные будут утеряны.
Проверить жизнеспособность харда можно двумя способами:
- командная строка;
- различные программы.
Acronis Drive Monitor
В разделе Disk можно увидеть всю подробную информацию о ваших винчестерах. Главный показатель – указанный процент здоровья. Чем больше, тем лучше. В данном случае устройство с 3% здоровья вскоре выйдет из строя.
Но в любом случае низкий показатель – это очень плохо. Перейдите в раздел Critical events.
В этом разделе отображаются все критические события, которые происходили в вашей системе. Кликните два раза на любую строчку. В результате этого вы увидите следующее.
Вам укажут дату, событие, диск и раздел, на котором произошла ошибка. Чтобы определить, что означает Harddisk 1 и DR1, нажмите на клавиши Win+X. В появившемся меню выберите пункт «Управление дисками».
В открывшемся приложении мы можем найти виновника.
1 раздел на 1 диске: в данном случае – это системный раздел. В такой ситуации стоит задуматься о покупке нового винчестера.
Командная строка
Снова нажмите на клавиши Win+X и выберите нужный нам пункт.
Введите следующую команду и нажмите на кнопку Enter.
chkdsk /f C:
Вы увидите сообщение о том, что данный диск используется. Введите «Y», чтобы запустить процесс после перезагрузки.