Как установить гостевые дополнения virtualbox в debian 10 linux
Содержание:
- Общая информация по VirtualBox Guest Additions
- What Is VirtualBox?
- Enable Shared Folder
- Installation in EFI mode (optional)
- Шаг 2: Установка заголовков ядра и инструментов сборки
- Launch the VirtualBox guest services
- Что такое гостевые дополнения VirtualBox?
- Introduction[edit]
- Shared Folders and Clipboard
- Download Virtualbox Guest Additions
- Страница загрузки пакета virtualbox-guest-additions-iso_6.1.26-1_all.deb
- Non-Issues[edit]
- Footnotesedit
- Install VirtualBox Guest Additions on Ubuntu 21.04
Общая информация по VirtualBox Guest Additions
Для более эффективной работы и взаимодействием между реальной и виртуальной машиной, созданной в VirtualBox, используется специальное дополнение к последнему – Guest Additions. Данный пакет расширений открывает дополнительные возможности, среди которых:
- Создание реальной сети в виртуальной машине. Благодаря ней из операционной системы, которая установлена в VirtualBox можно выходить в интернет, производить обмен данными между основной машиной и виртуальной;
- Добавляет поддержку видеодрайверов. Благодаря этому вы можете менять разрешение экрана, на установленной виртуальной системе, проверять производительность программ, требующих наличие графических драйверов и т.д;
- Более удобная интеграция курсора мыши между операционными системами. Например, теперь не нужно нажимать дополнительные кнопки, чтобы курсор переместился из виртуальной системы, что стоит в VirtualBox, в вашу основную;
- Синхронизация времени между основной операционной системой и виртуальной;
- Возможность автоматического входа в виртуальную систему.
Монтирование образа VirtulBox Guest Additions
По умолчанию все пакеты этого дополнения уже внесены в VirtualBox, поэтому нет смысла скачивать что-либо дополнительно с официального сайта разработчика. Для установки нужно только подключить уже скаченный пакет:
- Остановите уже запущенную виртуальную машину в интерфейсе VirtualBox. Для этого нажмите правой кнопкой мыши по нужной операционной системе и выберите из контекстного меню пункт «Отключить».
- Выберите нужную машину и нажмите на кнопку «Настройки», что расположена в верхнем меню интерфейса.
В окне «Настроек» перейдите во вкладку «Носители».
Обратите внимание на форму «Носители информации». Под «Контроллер IDE» выберите виртуальный диск.
Если в 4-м пункте вы не нашли образ виртуального диска, то нажмите на иконку диска, расположенную напротив «Привод».
В выпавшем меню нажмите «Выбрать образ оптического диска».
Откроется окно стандартного «Проводника» Windows, где вам придётся выбрать образ. В данном случае нужно перейти в корневую папку VirtualBox и найти там элемент с наименованием «VBoxGuestAdditions.iso».
Когда образ отобразится в «Контроллер IDE» перейдите к запуску виртуальной машины.
Теперь нужно перейти в папку «Компьютер», если в качестве виртуальной машины выступает ОС Windows. Под «Устройства со съёмными носителями» должен отобразится смонтированный образ.
В качестве альтернативы этой инструкции можно воспользоваться ещё этой, но при этом виртуальная машина должна быть запущена и полностью работоспособна:
- В интерфейсе запущенной виртуальной машины нажмите на пункт «Устройства».
- Откроется контекстное меню, где нужно нажать по «Подключить образ диска дополнительной гостевой ОС…».
Подключение займёт некоторое время. После перейдите в папку «Компьютер» и обратите внимание на «Устройства со съёмными носителями». Там должен быть образ.
Установка из образа
Процесс установки выглядит следующим образом:
- Откройте смонтированный образ.
- Здесь запустите файл установщика. Всего их три: универсальный, для 64-битных систем и 32-битных систем. Последние два имеют соответствующие приписки в наименовании файла.
Откроется окно с приветствием. Здесь нужно просто нажать «Next».
Следующее окно предлагает выбрать место для установки. Здесь можно оставить всё по умолчанию. Для перехода на следующий шаг нажмите «Next».
Рекомендуется снять галочку напротив пункта «Direct 3D Support», так как установка этого драйвера возможна только в «Безопасном режиме».
Начнётся установка, в ходе которой может несколько раз появится окно, где вас просят дать соглашение на установку. Везде жмите на «Установить».
Когда завершится установка «Guest Additions» установите маркер напротив пункта «Reboot now» и нажмите на «Finish».
В установки дополнения VirtualBox Guest Additions нет ничего сложного, особенно, если у вас есть опыт взаимодействия с виртуальными машинами.
What Is VirtualBox?
Often referred to as the best virtual machine, VirtualBox is a powerful AMD64/Intel64 and x86 virtualization creation for both home and enterprise use. For the time being, VirtualBox is the only professional solution available freely as Open Source Software, which is one of the top reasons why its popularity has skyrocketed and thus several releases of it have taken place.
VirtualBox has been established with great community effort and is back by a company that is very dedicated to providing a first-class service in every aspect. It is downloaded in record numbers every day. It is currently the top Windows 10 virtual machine, and it does not seem this is going to change anytime soon.
Virtualbox Guest Additions
The VirtualBox Guest Additions consist of device drivers and system applications that optimize the operating system for better performance and usability. One of the usability features required in this guide is automated logons, which is why you need to install the Guest Additions in the virtual machine. For a Windows 7 desktop template, you also enable Windows media redirection for enhanced playback of multimedia content played in Windows Media Player (including content displayed in Internet Explorer).
To accessing this option In the Window containing the running virtual machine, select Install Guest Additions from the Devices menu. And the AutoPlay to run this guest additions will prompt.
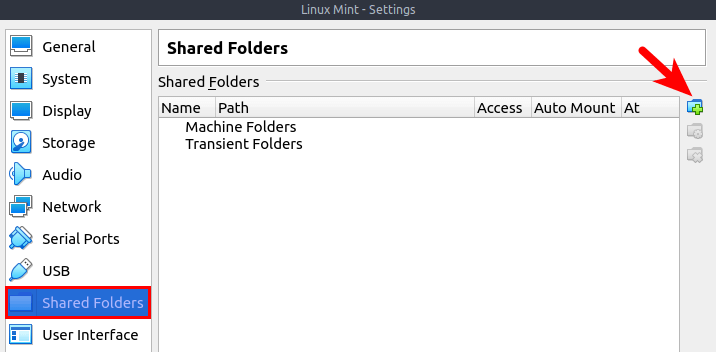
Now you can also share files between host and guest OS via the shared folder feature. Go to the virtual machine settings. In the left pane, select . Then click on the button to add a shared folder.
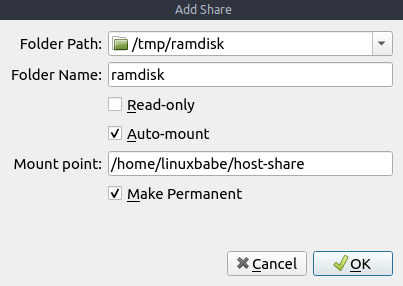
- In the field, select a folder on your host OS.
- Tick on the checkbox so that the shared folder will be automatically mounted to the guest OS when virtual machine boots up.
- In the Mount-point field, enter a path on the guest OS, such as a sub-directory in your user’s home directory.
- Tick on the checkbox.
After saving the settings, you will find the shared folder appears in your home directory in the Linux Mint virtual machine, but only the root user and members of the vboxsf group have read and write access to this shared folder. So what we need to now is add your user to vboxsf group. Open up a terminal in Linux Mint and run the following command. Replace username with your real username.
sudo adduser username vboxsf
Log out of the current session and log back in. Now you should be able to access the shared folder.
Installation in EFI mode (optional)
Enabling EFI for Arch as guest is optional. If you want to install Arch Linux in EFI mode inside VirtualBox, you must change the firmware mode for the virtual machine. This must be done before installing Arch as guest, changing the option afterwards will result in unbootable machine unless the setting is reverted.
To enable EFI for a virtual machine using the graphical interface, open the settings of the virtual machine, choose System item from the panel on the left and Motherboard tab from the right panel, and check the checkbox Enable EFI (special OSes only).
Alternatively the same can be accomplished from the command line using VBoxManage:
$ VBoxManage modifyvm "Virtual machine name" --firmware efi
will set the firmware for the virtual machine to EFI with the matching the virtual machine’s CPU. To get a specific EFI bitness, set the firmware to for x86_64 EFI or for IA32 EFI.
After selecting the kernel from the Arch Linux installation media’s menu, the media will hang for a minute or two and will continue to boot the kernel normally afterwards. Be patient.
Starting with VirtualBox 6.1 the issue of forgetting NVRAM contents on shutdown is fixed. Proceed with the installation just as on a regular UEFI system.
Installation in EFI mode on VirtualBox < 6.1
Once the system and the boot loader are installed, VirtualBox will first attempt to run from the ESP. If that first option fails, VirtualBox will then try the EFI shell script from the root of the ESP. This means that in order to boot the system you have the following options:
- from the EFI shell every time;
- Move the bootloader to the default path;
- Create a script named at the ESP root containing the path to the boot loader application, e.g. .
- Boot directly from the ESP partition using a .
Шаг 2: Установка заголовков ядра и инструментов сборки
После установки репозитория EPEL продолжите установку и установите заголовки ядра и инструменты сборки, необходимые для сборки гостевых дополнений, для этого запустите команду:
sudo dnf install gcc make perl kernel-devel kernel-headers bzip2 dkms autoconf
После установки убедитесь, что версия kernel-devel соответствует версии вашего ядра Linux, выполнив следующие команды:
rpm -q kernel-devel
uname -r
Вывод ясно указывает на конфликт между двумя версиями. Версия kernel-devel — 4.18.0-259.el8.x86_64, а версия ядра Linux — 4.18.0-257.el8.x86_64.
Чтобы решить эту проблему, обновите ядро Linux, выполнив команду:
sudo dnf update kernel-*
При появлении запроса нажмите «д» и нажмите ENTER, чтобы продолжить обновление. Когда обновление будет завершено, перезагрузите систему CentOS 8.
sudo reboot
Во время перезагрузки обязательно загрузитесь с последней записью ядра, соответствующей версии kernel-devel. Как видите, это обычно первая запись.
После того как система загрузится, войдите в систему и ещё раз подтвердите, что версия ядра теперь совпадает с версией ядра Linux.
rpm -q kernel-devel
uname -r
Две версии сейчас синхронизированы. Отлично! Теперь вы можете продолжить и установить гостевые дополнения VirtualBox.
Launch the VirtualBox guest services
After the rather big installation step dealing with VirtualBox kernel modules, now you need to start the guest services. The guest services are actually just a binary executable called which will interact with your X Window System. manages the following features:
- shared clipboard and drag and drop between the host and the guest;
- seamless window mode;
- the guest display is automatically resized according to the size of the guest window;
- checking the VirtualBox host version
All of these features can be enabled independently with their dedicated flags:
$ VBoxClient --clipboard
$ VBoxClient --draganddrop
$ VBoxClient --seamless
$ VBoxClient --checkhostversion
$ VBoxClient --vmsvga
Notice that can only be called with one flag at a time, each call spawning a dedicated service process. As a shortcut, the bash script enables all of these features.
installs that launches on logon. If your desktop environment or window manager does not support XDG Autostart, you will need to set up autostarting yourself, see and for more details.
VirtualBox can also synchronize the time between the host and the guest, to do this, start/enable the .
Now, you should have a working Arch Linux guest. Note that features like clipboard sharing are disabled by default in VirtualBox, and you will need to turn them on in the per-VM settings if you actually want to use them (e.g. Settings > General > Advanced > Shared Clipboard).
Что такое гостевые дополнения VirtualBox?
Гостевые дополнения – это дополнительные функции, которые делают VirtualBox еще более мощным. Некоторые примеры функций, добавленных гостевыми дополнениями VirtualBox, перечислены ниже:
- Лучшее разрешение экрана – позволяет работать в полноэкранном режиме
- Автоматическое изменение размера окна устройства
- Бесшовный режим – гостевая ОС сливается с хост-ОС
- Общий буфер обмена между хост-и гостевой ОС
- Улучшена производительность гостевой ОС
- Перетаскивание между гостевой и хост-ОС
Установка гостевых дополнений VirtualBox на гостевые ОС Ubuntu / Debian – это первое, что я делаю после создания виртуальной машины. Теперь давайте посмотрим, как установить гостевые дополнения в VirtualBox.
Introduction[edit]
In Whonix , VirtualBox guest additions are installed by default.
To avoid any issues with the guest additions, users are highly recommended to:
- Use the Recommended VirtualBox Version for use with Whonix .
- Leave installation of the recommended version of VirtualBox guest additions to Whonix as dcoumented and to avoid manual installation. This documentation will be updated as required. Check back later in case you have issues.
- Whonix 15: VirtualBox guest additions (from package ) are automatically being kept updated by , which is an installation helper created by Whonix developers when Whonix is updated.
- Whonix 16: VirtualBox guest additions (from packages , ) are installed by default and should be preferred over .
There might be a few odd messages during updates which are actually . Unless actual functionality is broken, please do not ask about odd messages as per .
In case of issues, see also VirtualBox troubleshooting and consider a bug report.
The virtual Guest Additions PCI device provides access to a service on the host called the Host-Guest Communication Manager (HGCM). This service is responsible for providing functionality for Shared Folders, Shared Clipboard and making configuration changes to the guest itself.
All requests to the communication manager are made with the same packet header, and there are 5 values used for the packet type field:
| Value (decimal) | Request Type |
|---|---|
| 60 | Connect |
| 61 | Disconnect |
| 62 | Call Function (32-bit) |
| 63 | Call Function (64-bit) |
| 64 | Cancel Request |
After the standard Guest Addition Header, each communication manager packet (except the cancel request packet) has a second header, depending on the request type above.
Connect
| Offset (hex) | Length | Description |
|---|---|---|
| 0x20 | 4 | Location Type |
| 0x24 | 128 | Location |
| 0xA4 | 4 | Client ID |
The Location field contains the name of the library to connect. There are 4 pre-defined library names: VBoxSharedFolders, VBoxSharedClipboard, VBoxGuestPropSvc, VBoxSharedOpenGL
Additional libraries may also be accessed by providing the library name in the Location field.
The Location Type field should be set to 1 to connect to an additional library, and 2 to connect to one of the pre-defined libraries.
The Client ID is filled by the host after the request is complete. This value should be used in any further calls to this service.
Call Function
Both the 32-bit and 64-bit call function packets use the same service header, followed by a list of parameter records. 32-bit function parameter records are 12 bytes long, and 64-bit function parameter records are 16 bytes long.
| Offset (hex) | Length | Description |
|---|---|---|
| 0x20 | 4 | Type |
| 0x24 | 4 | Client ID |
| 0x28 | 4 | Function Code |
| 0x2c | 4 | Parameter Count |
| 0x30 | * | Parameters |
Parameter Types
| Value (decimal) | Request Type |
|---|---|
| 1 | 32-bit Value |
| 2 | 64-bit Value |
| 3 | Physical Address |
| 4 | Linear Address |
| 5 | Linear Address (Host-to-Guest only) |
| 6 | Linear Address (Guest-to-Host only) |
| 7 | Linear Address (Pre-Locked by Guest) |
| 8 | Linear Address (Host-to-Guest only, Pre-Locked by Guest) |
| 9 | Linear Address (Guest-to-Host only, Pre-Locked by Guest) |
Physical and Linear Address parameter values have the following structure:
| Offset (hex) | Length | Description |
|---|---|---|
| 0x00 | 4 | Buffer Length |
| 0x04 | 4/8 | Address (32-Bit/64-Bit) |
Functions
| Value (decimal) | Function | Parameters |
|---|---|---|
| 1 | Query Mappings | 3 |
| 2 | Query Map Name | 2 |
| 3 | Create Handle | 3 |
| 4 | Close Handle | 2 |
| 5 | Read | 5 |
| 6 | Write | 5 |
| 7 | Lock | 5 |
| 8 | List Directory | 8 |
| 9 | Information | 5 |
| 11 | Delete | 3 |
| 14 | Rename | 4 |
| 15 | Flush | 2 |
| 24 | Set File Size | 3 |
Query Mappings
The Query Mappings command returns a list of all of the shared folders configured for this guest. The buffer passed by the guest will be filled with mapping records, and the Count parameter will be set to the number of records returned. The Root value for each record will be used to reference this shared folder in future commands. If the buffer size is insufficient to hold all of the records, the buffer pointer size field will be set to the minimum size necessary to contain the entire list of mapping records. By default, all strings returned by the host will be in UCS2 encoding. Passing the UTF8 flag will force all requests to return strings in UTF8 format. The Automount Only flag will only return shared folders that have been marked as Automount in the guest configuration.
| Number | Parameter | Type |
|---|---|---|
| 1 | Flags | 32-Bit (0 — UCS2, 1 — UTF8, 2 — Automount Only) |
| 2 | Count | 32-Bit |
| 3 | Buffer | Pointer |
Mapping Record
| Offset (hex) | Length | Description |
|---|---|---|
| 0x00 | 4 | Flags (1 — New, 2 — Deleted) |
| 0x04 | 4 | Root |
| Number | Parameter | Type |
|---|---|---|
| 1 | Root | 32-Bit |
| 2 | Buffer | Pointer |
Download Virtualbox Guest Additions
We have never realized how difficult it is to find the VirtualBox Guest additions download page. It is not accessible from the wiki. But, at this time… After some time spent on Google, we collect some vBoxGuestAdditions installation file with many version. This link will directly download the offline installer .iso from the official website. So, it’s secure and free from malware. Here is the answer:
| File Name | Version | Last Update | File Size |
| (Open the link to download) | |||
| VBoxGuestAdditions_6.0.4.iso | 6.0 | 28-Jan-2019 | 82 MB |
| VBoxGuestAdditions_5.2.26.iso | 5.2 | 28-Jan-2019 | 56 MB |
| VBoxGuestAdditions_5.1.38.iso | 5.1 | 09-May-2018 | 57 MB |
| VBoxGuestAdditions_5.0.40.iso | 5.0 | 28-Apr-2017 | 56 MB |
| VBoxGuestAdditions_4.3.40.iso | 4.3 | 22-Aug-2016 | 55 MB |
| VBoxGuestAdditions_4.2.38.iso | 4.2 | 14-Sep-2016 | 59 MB |
| VBoxGuestAdditions_4.1.44.iso | 4.1 | 11-Nov-2015 | 52 MB |
| VBoxGuestAdditions_4.0.36.iso | 4.0 | 11-Nov-2015 | 46 MB |
Страница загрузки пакета virtualbox-guest-additions-iso_6.1.26-1_all.deb
Если вы работаете в Debian, для загрузки и установки пакетов настоятельно советуем использовать менеджер пакетов, например aptitude или synaptic, а не делать это вручную через данный сайт.
Используйте любой из серверов-зеркал, добавив его в свой файл /etc/apt/sources.list, например так:
deb http://ftp.de.debian.org/debian sid main non-free
Заменив ftp.de.debian.org/debian нужным сервером.
Вы можете скачать требуемый файл из подкаталога pool/non-free/v/virtualbox-guest-additions-iso/ с любого из этих сайтов:
Северная Америка
- ftp.us.debian.org/debian
- http.us.debian.org/debian
- ftp.debian.org/debian
- ftp.ca.debian.org/debian
- ftp.mx.debian.org/debian
Южная Америка
- ftp.br.debian.org/debian
- ftp.cl.debian.org/debian
- download.unesp.br/linux/debian
- sft.if.usp.br/debian
- debian.torredehanoi.org/debian
Азия
- ftp.cn.debian.org/debian
- ftp.jp.debian.org/debian
- ftp.kr.debian.org/debian
- ftp.hk.debian.org/debian
- ftp.tw.debian.org/debian
Африка
debian.mirror.ac.za/debian
Европа
- ftp.de.debian.org/debian
- ftp.at.debian.org/debian
- ftp.bg.debian.org/debian
- ftp.ch.debian.org/debian
- ftp.cz.debian.org/debian
- ftp.dk.debian.org/debian
- ftp.ee.debian.org/debian
- ftp.es.debian.org/debian
- ftp.fi.debian.org/debian
- ftp.fr.debian.org/debian
- ftp.hr.debian.org/debian
- ftp.hu.debian.org/debian
- ftp.ie.debian.org/debian
- ftp.is.debian.org/debian
- ftp.it.debian.org/debian
- ftp.lt.debian.org/debian
- ftp.nl.debian.org/debian
- ftp.no.debian.org/debian
- ftp.pl.debian.org/debian
- ftp.ro.debian.org/debian
- ftp.ru.debian.org/debian
- ftp.se.debian.org/debian
- ftp.si.debian.org/debian
- ftp.tr.debian.org/debian
- ftp.uk.debian.org/debian
Океания
- ftp.au.debian.org/debian
- ftp.wa.au.debian.org/debian
- ftp.nz.debian.org/debian
Если загрузка с этих сайтов происходит медленно, попробуйте другие из полного списка серверов-зеркал.
Заметим, что при работе с некоторыми браузерами вам придётся указать браузеру, что вы хотите сохранить информацию в файл. Например, в Firefox или Mozilla вам нужно удерживать клавишу Shift при щелчке по URL.
Подробней о virtualbox-guest-additions-iso_6.1.26-1_all.deb:
| Точный размер | 44836956 байт (42,8 MByte) |
|---|---|
| Контрольная сумма MD5 | 4c634ee21d870331d8b6ba6d07431905 |
| Контрольная сумма SHA1 | Недоступно |
| Контрольная сумма SHA256 | 1a3238edd7ac69ccbe6c0f1353321d0c64e4d001770ae546c3cae7144e13fb77 |
Non-Issues[edit]
If the following message appears during a kernel upgrade, it is a non-issue.
None.
Footnotesedit
- Host -> Whonix-Gateway clipboard sharing enable by default?
-
https://forums.whonix.org/t/security-risks-of-virtualbox-shared-folders/10119
-
To learn more about VirtualBox shared folders, see: .
-
Admittedly, this recommendation does not have a strong rationale. Disabling additional features in other virtualizers or general applications will similarly lead to less code paths being utilized and arguably increasing security. VirtualBox software is not special in this regard.
- Because otherwise you cannot change VirtualBox VM settings.
- Using /lib/systemd/system/mnt-shared-vbox.service .
-
If the option is unavailable, upgrade VirtualBox.
-
Alternatively folder can be chosen. The VirtualBox default means that folder would be owned by owner and group .
-
This is specific to the VirtualBox version; newer versions do not have this option anymore.
Check if this setting should persist after restart of the virtual machine. Otherwise this setting will be temporary. -
This step is required. Quote :
-
↑
is still installed by default. Should there be issues with , as there was in past due to unavailability, then it’s easier to fall back to that solution. ] (installation helper created by Whonix developers) is also still installed by default for the same purpose. -
Might still be used by users who Release Upgradeed from Whonix 15 to Whonix 16.
-
Installation of VirtualBox guest additions from CD might also cause issues.
- http://www.webcitation.org/6HqJVN0br
-
https://www.whonix.org/w/index.php?title=Ga&action=edit
Whonix is Supported by Evolution Host DDoS
Protected VPS. Stay private and get your VPS with Bitcoin or Monero.
| Fosshost | About Advertisements |
Search engines: YaCy | Qwant | ecosia | MetaGer | peekier | Whonix Wiki
Follow:
Support:
Donate:
Did you know that anyone can edit the Whonix wiki to improve it?
Priority Support | Investors | Professional Support
Whonix | ENCRYPTED SUPPORT LP | Freedom Software / Open Source (Why?)
The personal opinions of moderators or contributors to the Whonix project do not represent the project as a whole.
Install VirtualBox Guest Additions on Ubuntu 21.04
Install Required Build tools and Kernel Headers
Before you can proceed to install VirtualBox Guest Additions on Ubuntu 21.04, you first need to install required build tools, the Linux kernel headers and the support modules, if not already installed.
Run the command below to verify if these requirements have already been installed.
The means that the package is installed. As you can see from the output, and are not installed.
You can then install the missing tools by running the command;
If none if these packages is installed, you can simply use the APT package manager to install them.
Install VirtualBox Guest Additions on Ubuntu 21.04
In order to install VirtualBox Guest Additions on Ubuntu 21.04, you need to have the Guest Additions ISO file. Guest Addition ISO file can be inserted into the VM in two ways;
Insert Guest Additions ISO File Manually
To manually insert the VirtualBox Guest Additions ISO file on your Ubuntu 21.04 VM, navigate to Menu bar on your VM and click Devices > Insert Guest Additions CD image. Note that before you can insert the ISO file, you need to have at least one empty IDE controller.
Install VirtualBox Guest Additions on Ubuntu 21.04 from UI
When inserted, a dialog box which prompts you to run or cancel the Guest Additions installer is launched.
Click Run to launch the installation of Guest additions on Ubuntu 21.04. You will be prompted to enter your password to authenticate the installation.
Upon successful authentication, the Guest Addition installation will now run.
Once the Guest Additions are installed, Press Enter to close the installation wizard.
Reboot your system to reload the Kernel modules.
If upon reboot the screen do not auto adjust upon login, click on the VM menu View > Auto-resize Guest Display and toggle the option to put the vm on full screen.
Install VirtualBox Guest Additions on Ubuntu 21.04 from Terminal
You can also install the Guest Additions from the terminal. Therefore press cancel when the installer dialog box opens up and the iso image will be mounted on the system.
When the Guest Addition ISO file is inserted, it is mounted on . Where x is the build version of VirtualBox.
To install guest additions from the terminal, navigate to the mount point of the guest additions and run the command below;
or simply run;
Reboot your system to reload the Kernel modules.
Installing Guest Additions ISO from Ubuntu Repositories
It is also possible to install the Guest Additions ISO file from Ubuntu repos.
Guest Additions ISO file is provided by the package.
If it is available, simply run the command below to install it.
When installed, the VirtualBox Guest Additions ISO is now available as .
To install it, you need to mount it.
Next, run the installation.
Once the installation is done, restart your system to reload kernel modules.
You should now be on full screen and can be able to enable shared clipboard, shared folders, drag and drop…
NOTE: If upon system reboot the screen doesn’t auto-resize automatically, be sure to toggle (off/on, so to say) on the VM menu bar to set right VM resolution.
That is all on our guide on how to install VirtualBox Guest Additions on Ubuntu 21.04.
Install VirtualBox Guest Additions on Kali Linux 2020.3