Hdd low level format tool для windows
Содержание:
- High Level Format & Partition a Hard Drive After Low-Level Format (Free)
- How to low level format SD card for Windows 10/8/7?
- Best Windows Low Level Format Tool (HDDGURU Overview)
- Summary
- Как сделать низкоуровневое форматирование флешки
- Программа для низкоуровневого форматирования HDD Low Level Format Tool
- MiniTool Partition Wizard Free
- The jargon
- HDD Low Level Format Tool
- Что представляет собой низкоуровневое форматирование
- Additional Knowledge About Low Level Format (LLF)
- What does low level format mean?
- Возможные ошибки при работе со съемными носителями
- A slightly safer method
- 1.Main Principles
- The ways to low-level format SSD in Windows
High Level Format & Partition a Hard Drive After Low-Level Format (Free)
The purpose of complete low-level formatting of a hard drive is to zero-filling it so that erased data can never be restored. So, behave cautiously while choosing this type of formatting process.
It doesn’t finish yet after Low-level format your hard drive if you want to put it in normal use. The hard disk must undergo three processing steps: Low-level format, partition, and high-level format (hereinafter referred to as formatting) before the computer can use them to store data.
Hence, take more steps after using HDD low-level format tool. Use EaseUS free partition manager to help you partition and format partitions on the low level formatted hard drive simply.
- Clone whole disk or a certain partition without any data loss
- Merge partition to solve the low disk space issue
- Wipe your disk completely to save all confidential and sensitive data
Format and Partition a Hard Drive with a Partition Manager
In the steps of partitioning and formatting the hard disk, it is necessary to create partitions and logical disks to format the hard disk. You can create either FAT or NTFS partition according to the physical hard disk capacity.
1 — How to Format a Partition (High-level)
And don’t panic if the partition file is formatted incorrectly, You can still use EaseUS Partition Master to convert FAT32 to NTFS on Windows 11, 10, 8, 7.
Step 1. Right-click the hard drive partition and choose the «Format» option.
Step 2. In the new window, set the Partition label, File system, and Cluster size for the partition, then click «OK».
Step 3. You can see a warning window, click «OK» to continue.
Step 4. Click the «Execute Operation» button in the top-left corner, then click «Apply» to start formatting the hard drive partition.
2 — How to Partition a Hard Drive After Formatting
As a professional disk management tool, the EaseUS partition management tool can help you easily move or resize the partition so that your hard disk can play maximum efficiency.
How to low level format SD card for Windows 10/8/7?
Insert your SD card into a computer with an SD card adapter, and ensure it is detected. And install this low level format tool, and follow the steps.
Download Freeware Win 11/10/8.1/8/7/XP
Secure Download
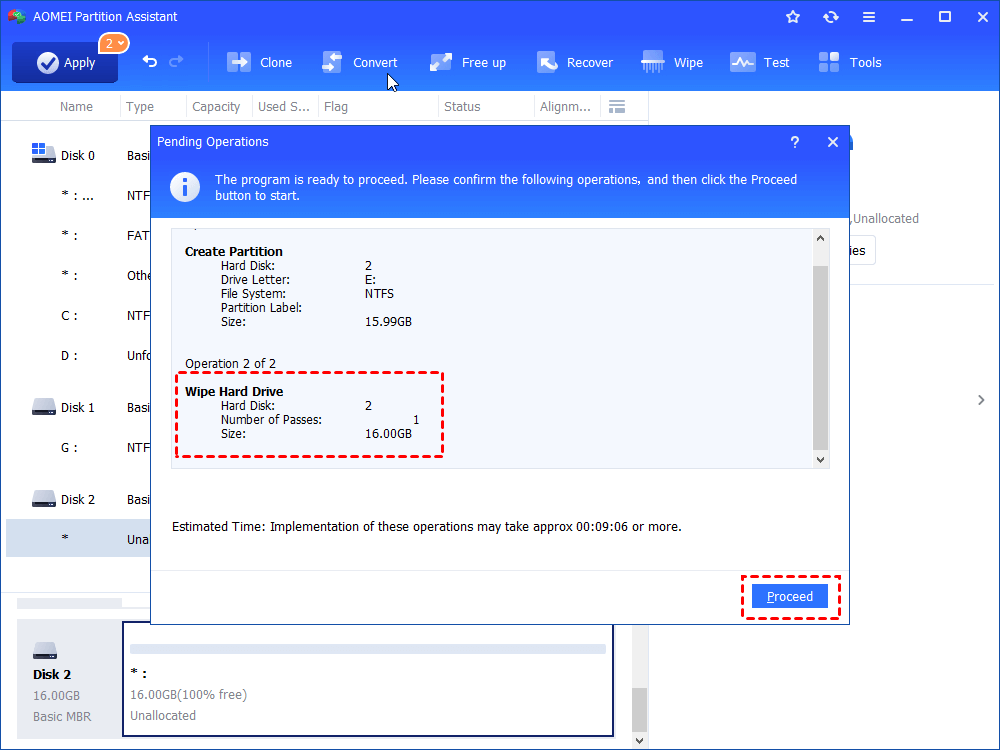
Step 1. Open AOMEI Partition Assistant. Right-click the SD card on the main interface, and select “Wipe Hard Drive”.
Step 2. And choose “Fill sectors with Zero (Safe, Quick)” as the wiping method. And click “OK”.
Tips: Filling sectors with Zero is a general method to low level format a SD. But if you have some private files you really want forever gone, you can upgrade to Professional Edition and choose other wiping methods that provide higher security.● Fill sectors with random data (Safe, Quick): It overwrites SD card with random data, which is hard to restore information data.● DoD 5220.22-M (very Safe, Quick, PRO): it writes a zero, a one, and a random character to the disk. It gets rid of all software-based and most hardware-based recovery methods to restore data.● Gutmann (35 passes, Very Safe, Very Slow, PRO): It involves 35 patterns to write the disk, which makes your data very safe but takes much more time.
Step 3. Then you will see the main interface, and click “Apply” > “Proceed” to confirm the operation.
Just wait for a whole, your SD card will be low level formatted.
Best Windows Low Level Format Tool (HDDGURU Overview)
A low-level format of the hard disk is the most thorough way to initialize the hard disk. After the Low-level format of the hard disk, the original saved data will be lost, so it is generally undesirable to perform low-level formatting on the hard disk. But when the hard disk has a certain type of bad sectors, in order to use the hard disk normally, you have to format the hard disk at a low level.
What’s the best Low-level format tool that facilitates hard drive formatting? HDD Low Level Format Tool from HDDGURU receives positive feedbacks from personal/home users as well as commercial/professional users.
HDD Low-Level Format Tool is an outstanding disk formatter for low-level hard disk drive formatting.
- Compatible with Windows XP, Vista, 7, 8, Server 2003, 2008, and 2008R2
- Low-level format a SATA, IDE, SAS, SCSI, USB, Firewire, and SSD hard disk drive
- Support most popular hard drive brands, like Seagate, Samsung, Western Digital, Toshiba, Maxtor, etc.
- Work with any USB and firmware external drive enclosures as well as SD, MMC, MemoryStick, and CompactFlash media.
- Free for personal/home use with speed limitation (the speed limit is 180 GB per hour or 50 MB/s)
Low-level formatting indeed erases all existing data on storage devices. But some people hope to find a possible way to restore data.
Summary
In general, if your hard disk drives or external storage devices get bad sectors or write protection, you can take it through low-level formatting, partitioning or high-level formatting to recovery its ability and performance.
If yours is an SSD, there is another way to restore to its factory performance – SSD Secure Erase. This can be done by AOMEI Partition Assistant Professional. Besides, AOMEI Partition Assistant Professional can do many other operations to manage a hard disk including but not limited to merge/split partitions, copy partition/disk, extend/shrink partition, convert NTFS FAT32 file system, convert MBR GPT disk, create Windows To Go as well as migrate OS to SSD.
Make your own choice and save yourself from bothering of dead disk drives.
Как сделать низкоуровневое форматирование флешки
Одним из наиболее распространённых накопителей информации, доступных большинству пользователей, является флешка. Её широкая распространённость приводит к тому, что практически каждый человек сталкивается с неисправностью флеш-накопителя. Низкоуровневое форматирование флешки позволяет последней во многих случаях восстановить свою работоспособность.
В настоящее время существует множество способов низкоуровневого форматирования накопителей. Его можно производить как встроенными в ОС средствами, так и посредством стороннего софта. Первый вариант не требует установки дополнительного ПО, а главное преимущество второго – простота. Кроме того, широкое разнообразие стороннего софта, как бесплатного, так и платного, позволяет подобрать программу конкретно для своих нужд. Для просто полного удаления информации с накопителя логичнее использовать простой по функционалу HDD Low Level Format Tool. Если же конечной целью является восстановление накопителя, логичнее использовать Victoria HDD или подобные ей программы. Она имеет большой функционал для восстановления и анализа состояния накопителя.
Для выполнения низкоуровневого форматирования флешки необходимо:
- Скачать и установить HDD Low Level Format Tool;
- Подключить к ПК флешку, которую необходимо отформатировать;
- Запустить HDD Low Level Format Tool. При запуске программы вылезает окошко с предложением купить данный софт. Вы можете вежливо отказаться, нажав “Continue for free”, а можете и приобрести ключ. Функционал платной и бесплатной версий идентичен. Единственное ограничение free версии – максимальная скорость форматирования составит 50 Мб/с. Однако, если вы используете разъем USB 2.0, эти 50 Мб/с в любом случае недостижимы;
- Выбрать в списке устройств флешку иди другой накопитель, который необходимо отформатировать, затем нажать на “Continue”;
- В появившемся окне накопителя перейти во вкладку “LOW-LEVEL FORMAT” и нажать на кнопку “FORMAT THIS DEVICE”;
- Дождаться окончания процесса форматирования;
- После низкоуровневого форматирования, необходимо отформатировать накопитель стандартным способом, выбрав нужные параметры файловой системы и размера кластера (оставляйте по умолчанию, система сама знает, как ей нужно).
Низкоуровневое форматирование флешки возможно провести также в Victoria и в командной строке. Эти способы форматирования описаны ниже.
Программа для низкоуровневого форматирования HDD Low Level Format Tool
С помощью программы HDD Low Level Format Tool можно провести низкоуровневое форматирование не только жесткого диска, но и флешки. Для этого запустите программу, отметьте ваш носитель, и нажмите Continue >>>.

В верхней вкладке выберите LOW-LEVEL FORMAT и нажмите кнопку FORMAT THIS DEVICE.

В всплывшем окне подтвердите нажав Да.

В процессе низкоуровневого форматирования вы можете наблюдать процент выполненного задания. По окончанию у вас должно быть такое вот окно.

Бывают случае, что вместо форматирования в строке информации просто пробегают надписи Format Error occurred at offset. Это происходит в связи с тем, что устройство не получилось заблокировать перед выполнением процедуры. Перезагрузить компьютер и проделайте все повторно. После всех манипуляций жесткий диск возможно придется инициализировать, при необходимости создать новые разделы.
Кейс: Восстановление жесткого диска с помощью низкоуровневого форматирования
Данный кейс является живым примером того, как можно реанимировать диск, который казалось бы уже умер.
Предыстория. Был ноутбук, состояние HDD которого “как из магазина”. В процессе работы клиент несколько раз ударил по поверхности ноутбука, после чего операционная система рухнула.
Проблема была очевидна, извлек жесткий диск и подключил через переходник к другому компьютеру. Диагностика показала, что посыпался жесткий диск, при том – кучно. Вот как он выглядит.


Посчитал, что жесткий сгодится только на доноры, но ради опыта решил прогнать с помощью низкоуровневого форматирования. И… О чудо! Перераспределение прошло успешно и рабочая поверхность имеет отличное состояние. Вот как выглядит тот же HDD после проделанной реанимации.


Вывод. Не торопитесь выбрасывать жесткие диски, попробуйте использовать низкоуровневое форматирование для лечения HDD, возможно поможет. Если нет, то списываем. Данный метод не всегда помогает решить сложившуюся проблему, обязательно проверяйте ее состояние после проделанной процедуры и возвращайте в работу лишь в случае успеха, от этого зависит сохранность ваших данных. Я бы вообще рекомендовал держать под контролем реанимированные носители с помощью вышеуказанных в скриншоте диагностических программ, к примеру, достаточно один раз установить в Windows “Hard Disk Sentinel” и вы постоянно держите “руку на пульсе”.
MiniTool Partition Wizard Free
Наиболее полноценной и расширенной по своему функционалу программой можно без сомнений считать MiniTool Partition Wizard Free. Разнообразие функции позволяет не просто исправлять ошибки, преобразовывать накопитель из одной системы в другую, но и выполнять качественное низкоуровневое форматирование. Понятный интерфейс, хорошо проработанный дизайн, высокая скорость выполнения операций позволяют работать с проблемной флешкой быстро и без каких-либо затруднений. Для проведения операции по полной очистке USB-накопителя следует сделать следующее:
- Открыть программу и найти в открывшемся окошке необходимую флешку.
- Навести на неё и нажать ПКМ.
- Выбрать «Format».
- В открывшемся окне необходимо ввести имя накопителя, выбрать систему для форматирования и размер кластера.
- Дав согласие на удаление всех файлов, нужно нажать на вкладку «Execute 1 Operation», которая находится на главной панели утилита.
- В открывшемся окне нажать на кнопку «Apply» и ждать завершения операции.
Таблица 3 – Преимущества и недостатки программы
| Достоинства | Недостатки |
| Наличие бесплатной лицензии | Отсутствие русской версии утилита |
| Хорошая оптимизация для разных версий Windows | Форматирование занимает много времени |
| Возможность восстановления разделов в случае удаления файлов | Возникают проблемы с вводом серийного номера после приобретения расширенной версии |
| Большой выбор функций |
Рассмотрев подробно принцип работы каждой из программ для низкоуровневого форматирования, можно заключить, что проведение данной процедуры в основном не вызывает особых трудностей. Для качественной очистки накопителя достаточно лишь соблюдать определенные инструкции.
The jargon
Low level formatting, as opposed to high level formatting is an operation performed directly against disk
sectors. You skip the file system layer and you go directly for the underlying storage. Let me elaborate.
Normally, operations against storage devices are performed using a logical abstraction layer called the
filesystem. Humans do not think in terms of bits and sectors and such, they think in terms of file names and
possibly file sizes. This is exactly what filesystems do, plus a few other things, like keep relations betweens
files and directories, optimize read and writes, maintain integrity of operations, and more.
In Linux, for example, you have filesystem drivers, responsible for this kind of work, called ext2, ext3, ext4,
reiserfs, and others. When you create a partition, say using GParted, you then format it with some filesystem.
The choice will dictate what you can and cannot do with the underlying storage, which is now exposed to you.
This is the so-called high-level formatting, because you do not care what kind of hardware you have. You do not
really need to know anything except that there’s a hard disk that can now contain your stuff.
The high-level formatting can be considered a sort of a possibility map — it tells the kernel, which manages
all those useful hard disk operations, where data can be stored and in what manner. This means that if you are
reusing a hard disk, old data that has been previously stored on the device may still be available in its raw
form, a series of zeros and ones physically written to the storage medium. Of course, this old data is
meaningless, as the new filesystem residing on top it does not know about it and will freely overwrite segments
during normal operations. But if you’re only using 1-2% of your total storage, theoretically, there might be
entire blocks of old data that you could read, bypassing the filesystem, so to speak.
Some consider this a privacy risk, as old disks given away or stolen or accidentally reused could be gleaned
for old data. In most cases, determined and skilled users might be able to harvest bits and pieces of randomly
stored data from the storage media. For some people, this is an unacceptable risk. Enter low level formatting.
Low-level formatting is a procedure where you write data directly to the storage medium, bypassing the
filesystem layer. You do not care if the hard disk has one partition or more, NTFS or BTRFS or anything else.
You are using the device driver, which can be IDE or SCSI or SATA or others, and you’re writing data to
physical sectors. More importantly, low level formatting will write to each and every bit on the storage
device, making sure the old states are destroyed forever, and with them, any trace of former data previously
stored.
Performing one low-level formatting operation is known as one-pass format. Some security consultants and
experts and paranoids might recommend you perform three or more passes, to make absolutely sure no trace of old
data can ever be retrieved. Statistically, this is a total overkill, but the choice is entirely yours.
Now that we know what this thing is, let’s see it in practice.
HDD Low Level Format Tool
По утверждению разработчиков, HDD LLFT способна на низкоуровневое форматирование, и этим она кардинально отличается от другого софта в нашем списке. Есть возможность выполнить быструю очистку разделов и главной загрузочной записи или запустить глубокое форматирование, которое сбросит жесткий диск до заводских настроек, приведет к очистке всех разделов и их таблиц, а также к полному удалению данных без возможности их восстановления. Чтобы после такого снова воспользоваться накопителем, придется сначала выполнить высокоуровневое форматирование, т.е. создать MBR и структуру файловой системы, поэтому программа больше подходит, например, для предпродажной подготовки винчестера или в тех случаях, когда обычное форматирование не работает.
HDD LLFT поддерживает большинство типов накопителей и интерфейсов (S-ATA (SATA), IDE (E-IDE), SCSI, SAS, USB, FIREWIRE). Все подключенные запоминающие устройства отображаются в таблице, из которой можно узнать тип их шины, модель, серийный номер, версию прошивки и объем. Программа поддерживает технологию S.M.A.R.T., позволяющую оценить состояние диска и предсказать время выхода его из строя, если, конечно, соответствующее оборудование встроено в накопитель. Для личного пользования ПО распространяется бесплатно, правда, скорость не будет превышать 50 Мбит/с, но можно купить персональную лицензию и снять это ограничение.
Достоинства:
- Функция низкоуровневого форматирования;
- Портативная версия;
- Пожизненные обновления для любой лицензии.
Недостатки:
- Отсутствуют дополнительные инструменты;
- Не поддерживает русский язык;
- Ограничение скорости в бесплатной версии.
Что представляет собой низкоуровневое форматирование
Это распределение флешки на сектора для записи информации. Подобный процесс стирает абсолютно все файлы, и не оставляет возможности восстановить их. В связи с этим следует убедиться, что удаленные данные не являются очень важными для вас.
Также низкоуровневое форматирование проводится в случае, если необходимо очистить флешку от вирусных файлов или когда нужно удалить секретную информацию во избежание попадания ее к третьим лицам, а также, если необходимо восстановить загрузочный сектор.
Эта процедура выполняется с помощью специальных утилит для форматирования. Некоторые из приложений подходят только к определенной марке устройств, а использование других универсально для всех типов флешек. В статье будут рассматриваться наиболее простые в использовании утилиты.
Способ 1: HDDGURU HDD Low Level Format Tool
Эта утилита полностью бесплатна в использовании и обладает всем необходимым функционалом для форматирования. Помимо работы с флешкой она так же может выполнить схожую процедуру и с жестким диском компьютера. Бесплатная версия имеет ограничение по объему носителя, но лимит достаточно высок, поэтому у большинства пользователей не должно возникнуть никаких сложностей.
- Активируйте программу, предварительно инсталлировав ее на ПК.
- В рабочем поле утилиты кликните на подлежащий форматированию накопитель и нажмите на пункт «Continue». Будьте крайне внимательны, ведь отформатированную информацию уже не будет возможности восстановить.
- В открывшемся окне нажмите на раздел «LOW-LEVEL FORMAT» и кликните на «Format this device».
- Высветится оповещение содержащее предупреждение о том, что вся хранившаяся информация на флешке будет уничтожена. Убедитесь, что выбран правильный носитель и нажмите «ОК».
- Запустится процедура форматирования, которая может занять достаточно длительное время, так как в бесплатной версии программы установлен лимит на скорость.
После окончания загрузки, флеш-накопитель отформатирован, и вы можете снова пользоваться им, как и прежде. Однако стоит учесть, что по завершению процедуры флешку может потребоваться дополнительно отформатировать с помощью функций Windows.
Способ 2: Low Level Formatter
Эта программа специализируется на работе с флешками марки Silicon, но ее функционал распространяется и на устройства других производителей. После подключения носителя, приложение автоматически определит, поддерживается ли он. Работа с программой достаточно проста и осуществляется всего в несколько шагов.
- Запустите утилиту и вставьте носитель в порт.
- Сразу же после активации программы высветится оповещение о том, что все данные имеющиеся на носителе будут стерты.
- Кликните на кнопку «Format this device» и ждите окончания процедуры форматирования.
Способ 3: D-Soft Flash Doctor
Преимущество этой программы в том, что для ее работы не требуется дополнительных ресурсов компьютера, а также она полностью на русском языке. Вам не придется заниматься ее установкой, так как утилита работает в портативном режиме. Выполните такие действия:
- Запустите установочный файл утилиты.
- Наведите мышкой на диск, который необходимо отформатировать и кликните клавишу «Восстановить носитель».
- После окончания загрузки нажмите «Готово». Через Проводник Windows совершите дополнительное форматирование.
Способ 4: JetFlash Online Recovery
Рассматриваемая программа работает с устройствами таких марок: JetFlash, Transcend, A-Data. Ее преимущество в том, что она полностью портативна, содержит всего пару кнопок и дает минимальную нагрузку на ПК за счет взаимодействия с облаком.
Для того чтобы начать работу нужно выполнить всего два действия:
- Скачать и запустить установочный файл.
- В правом нижнем углу нажать кнопку «Start».
Как видите, это очень легкая в использовании утилита и даже начинающий пользователь сможет с ней справиться.
Вне зависимости от того, какое ПО используется в работе, информация на носителе будет удалена безвозвратно
В связи с этим крайне важно сделать резервную копию всех имеющихся данных перед форматированием. Иногда после завершения процедуры флешка начинает работать медленнее, в таком случае достаточно будет сделать безопасное извлечение и вставить устройство заново в ПК
Additional Knowledge About Low Level Format (LLF)
Low-level formatting is recognized as one of the three disk formatting processes, the others are partitioning and high-level formatting.
By wiki’s explanation, low-level formatting marks the surfaces of the disks with markers indicating the start of a recording block and other information like block CRC to be used later, in normal operations, by the disk controller to read or write data. This is intended to be the permanent foundation of the disk and is often completed at the factory.
Pros
Low-level formatting is extremely helpful and significant when a hard disk drive or some removable storage devices developed bad tracks, such as track 0 bad, or Windows was unable to complete the format due to write protection. Besides, severe computer virus infection.
Cons
Low-level formatting does damage to the hard drive and accelerates its death. What’s more, it’s incredibly time-consuming. It is estimated that in the low-level format a hard drive of 320GB takes about 20 hours or even longer.
If you have to do low-level disk formatting, there are three typical approaches, including DOS command, inbuilt disk utility of disc or USB drive, and third-party low-level format tool (demonstrated in this article).
What does low level format mean?
Low level format, or LLF is a formatting method that completely wipe data your storage devices like SD card, HDD, USB drive and creates the tracks and sectors on it.
According to the Wikipedia information, if your low level format an SD card, it would mark the surfaces of the SD card and indicate the start of a recording block and other information to be used later, in normal ways, by the disk controller to read or write data. It can last for a long time.
Compared to the high level format, or standard format, which erases “bookkeeping” information of disk, and do some simple testing, the low level format of SD card erases all the data on the disk much more completely and permanently and initializes every sector individually, making your SD card like new and ready to start fresh.
Возможные ошибки при работе со съемными носителями
Как пользоваться HDD Low Level Format Tool, разобрались. В заключение рассмотрим некоторые наиболее часто возникающие ошибки. В частности, невозможность форматирования съемных носителей может быть связана с тем, что в системе некорректно работают USB-порты, для соответствующих интерфейсов, контроллеров или картридеров не установлены драйверы (или установлены некорректно) и т. д.
Самым простым выходом станет обновление управляющего ПО через обычный «Диспетчер устройств». Если это не поможет, можете воспользоваться утилитами автоматического апдейта вроде Driver Booster или по определенным в «Диспетчере устройств» идентификаторам нерабочего оборудования найти в Интернете, скачать и установить для него драйверы самостоятельно.
A slightly safer method
If you’re uncomfortable doing the above, there’s a safer method. Like before, plug the device in and let the
system identify it. Next, unmount partitions. Next, open GParted and destroy all existing partitions. This can
be done in one step by creating a new partition table. Next, create a new single partition and format it.


After this step is complete, go back to command line and mount the new partition somewhere, like /mnt. The next
step is to execute dd, only this time the target will be a file somewhere under /mnt. You can also specify
block size (bs) value for the dd command to get things going a little faster, but the overall time won’t be
changed much.
Now, execute the dd command. Again, be careful what you do.
dd if=/dev/zero of=/mnt/file bs=1M
Sit back, relax and watch the target partition get filled with junk data. Once the target partition runs out of
space, you’re done. Your partition will contain lots of new and meaningless data. If you’re really paranoid,
you may want to destroy the partition table again and create a new one, performing yet another high-level
format that should seal the coffin real tight.


And here’s an Ubuntu example:

1.Main Principles
Users should pay attention to the fact that under the previous disk reading technical level, low-level format is a deteriorating operation. It has a negative impact on the service life of hard disk.
However, performing low-level format on hard disk, which was produced in recent one or two years, has smaller impact on service life of hard disk, because this doesn’t belong to physical operation.
Many hard disk manufacturers suggest that users try not to perform low-level format. People can re-divide sectors by low-level format when large numbers of bad sectors appear, because hard disk has been used for a long time or is affected by external strong magnetic and magnetic field. But the premise is that hard disk isn’t physically damaged.
Function of low-level format to HDD: low-level format to HDD is a way to thoroughly initialize disk. Data previously saved on hard disk will be lost after low-level format. So, in general, we had better avoid performing HDD low-level format if it’s not very necessary to do so.
But, there are two situations in which we have to carry out low-level format. One is that hard disk manufacturers will perform low-level format to disk before it leaves the factory. The other is that when hard disk has bad sectors, performing low-level format to it can reduce spreading speed of bad sectors or shield bad sectors.
In the first case, we don’t need to describe in details, because HDD low-level format before it leaves factory only comes into contact with disk engineers. For average users, there is no need to consider this matter. In the second case, what type of bed sectors need low-level format? Let’s take a look at types of hard disk bad sectors before describing this critical question.
The ways to low-level format SSD in Windows
Since the way of writing data on SSD is completely different from that on HDD, you cannot use the «zero fillings» method for low-level format. Secure Erase is a low-level format method for SSDs, which ensures that all data stored on the SSD storage device is cleaned up, and then the SSD will reach its factory performance level.
PS: If you want to know how to safely and effectively low-level format HDD, an easy and free Seagate low-level format tool for Windows may help you.
Below I will introduce to you an effective tool for securely erasing SSD. AOMEI Partition Assistant Pro is a professional third-party utility without any bundled software. The operation is very simple and can help you achieve your goals.
Download Win 11/10/8.1/8/7/XP
Secure Download
Tip: Connect the SSD to the Windows 7 computer through the SATA port. To ensure that the erasing process goes smoothly, you cannot connect through the USB port because there may be problems.
Step 1. Install and run AOMEI Partition Assistant Professional. In the left menu of AOMEI Partition Assistant, click «SSD Secure Erase Wizard» and click «Next». Or, right-click on the SSD and select «SSD Secure Erase”. (Take disk 1 as an example)
Step 2. Select the SSD that you want to securely erase and click «Next».
Step 3. Double-check the SSD identification information in case of erasing the wrong SSD because the data is unrecoverable after the Erase. Now, you will see the SSD is in a frozen state. To continue, you need to perform a hot-swap.
To perform Hot Swap
Sometimes, Secure Erase SSD requires hot-swapping the drive to unlock it from the frozen state. To avoid unexpected issues, follow the steps below:
●Open computer case, rear cover or drive shell and find out the SSD you’ll erase.
●Unplug the power cable and then disconnect the SATA data cable from SSD.
●After a few seconds, reconnect the SATA cable to the SATA port and then plug the power cable back to complete the hot-swap.
Step 4. click «Next» to start the SSD Secure Erase.
Almost instantly, the Secure Erase process is complete and you will see the SSD shown as a block of unallocated space. If you want to wipe your current system disk where Windows is installed. You can connect your SSD to another computer that runs Windows 7 to follow the steps above to securely erase your system SSD.
Note: This method is applicable to the SSDs of several brands mentioned above.