Configure secure shell (ssh) server authentication settings on a switch
Содержание:
- Introduction
- Предварительные условия
- Deleting SSH Server Keys
- How to Enable SSH in Cisco Router with Packet Tracer
- Отрицательная сторона
- SSH Server Keys
- Как включить JavaScript в Яндексе браузере?
- Prerequisites
- Accessing the command-line interface (CLI) on the Aironet AP
- Потеря данных выходной очереди
- Troubleshooting Tips
- Configure
- Configure SSH on Cisco Router or Switch
- Prerequisites
- Включить Cisco SSH
- Cisco Switch Playlist:
- Связанный учебник Cisco Switch:
- Учебное пособие — включение удаленного доступа Cisco SSH
- Verify
- Зачем нужен
- SSH Client
Introduction
This document provides a sample configuration of Secure Shell (SSH) on the inside and outside interfaces of Cisco Series Security Appliance version 7.x and later. The configuration of the Series Security Appliance remotely with the command line involves the use of either Telnet or SSH. Because Telnet communications are sent in clear text, which includes passwords, SSH is highly recommended. SSH traffic is encrypted in a tunnel and thereby helps protect passwords and other configuration commands from interception.
The Security Appliance allows SSH connections to the security appliance for management purposes. The security appliance allows a maximum of five concurrent SSH connections for each security context, if available, and a global maximum of 100 connections for all of the contexts combined.
In this configuration example, the PIX Security Appliance is considered to be the SSH server. The traffic from SSH clients (10.1.1.2/24 and 172.16.1.1/16) to the SSH server is encrypted. The security appliance supports the SSH remote shell functionality provided in SSH versions 1 and 2 and supports Data Encryption Standard (DES) and 3DES ciphers. SSH versions 1 and 2 are different and are not interoperable.
Предварительные условия
Используемые компоненты
Содержимое данного документа основано на программном обеспечении Cisco PIX Firewall версии 7.1.
Сведения в этом документе были получены в результате тестирования приборов в специфической лабораторной среде. Все устройства, используемые в этом документе, запускались с чистой конфигурацией (конфигурацией по умолчанию). Если сеть работает в реальных условиях, убедитесь в понимании потенциального воздействия каждой команды.
Условные обозначения
Более подробную информацию о применяемых в документе обозначениях см. в разделе Cisco Technical Tips Conventions (Условные обозначения, используемые в технической документации Cisco).
Deleting SSH Server Keys
You can delete SSH server keys after you disable
the SSH server.
| Note |
To reenable SSH, you must first generate an SSH |
To delete the SSH server keys, perform this task:
Procedure
| Command or Action | Purpose | |
|---|---|---|
| Step 1 |
switch#
|
Enters configuration mode.
|
| Step 2 |
switch(config)#
|
Disables the SSH server.
|
| Step 3 |
switch(config)# |
Deletes the SSH server key. The default is to delete all the SSH keys.
|
| Step 4 |
switch(config)#
|
Exits global configuration mode.
|
| Step 5 |
switch#
|
(Optional)
Displays the SSH server configuration.
|
| Step 6 |
switch#
|
(Optional)
Copies the running configuration to the startup
|
How to Enable SSH in Cisco Router with Packet Tracer
SSH is a much safer protocol than the Telnet protocol and uses the TCP 22 port by default. The port number may vary.
There are 2 versions of the SSH protocol. These; Version 1 and Version 2.
SSH V1 exploits several patented encryption algorithms and is vulnerable to a well-known vulnerability that could allow an attacker to enter data into the communication flow.
SSH V2, this release has an advanced key exchange algorithm that is not vulnerable to the same abuse and includes more powerful and comprehensive features:
• Encryption such as 3DES and AES.
• Use voice encryption Message Verification Code (MAC) algorithms for integrity checking.
• Support for public-key certificates.
We recommend that you use SSH V2 as far as possible to remotely manage network devices.
To enable SSH in the real scenario, make sure that the file name of your Cisco IOS software is k9 (crypto).
Step 1
First, run Packet Tracer and then create a network topology as shown in the image below. Add an additional Router to the workspace, because after configuration we will connect the Router to the Router with SSH.
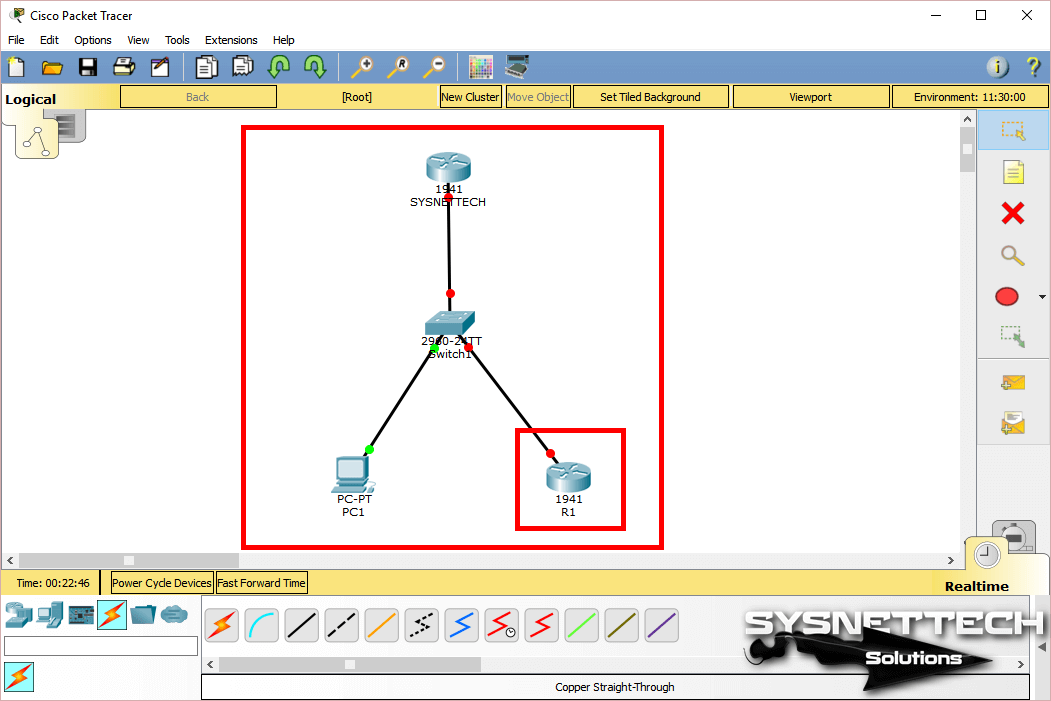
Step 2
Open the CLI prompt by clicking on the SYSNETTECH Router and press Enter to skip the initial configuration.
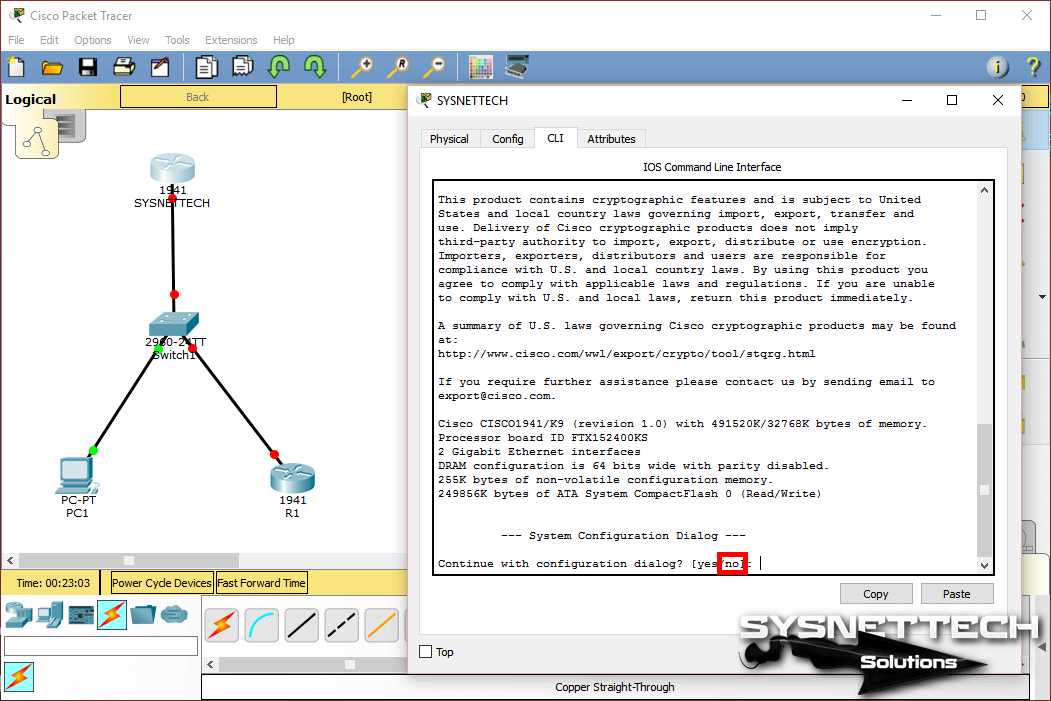
Step 3
To enable SSH on the router, perform the following commands in order.
Step 4
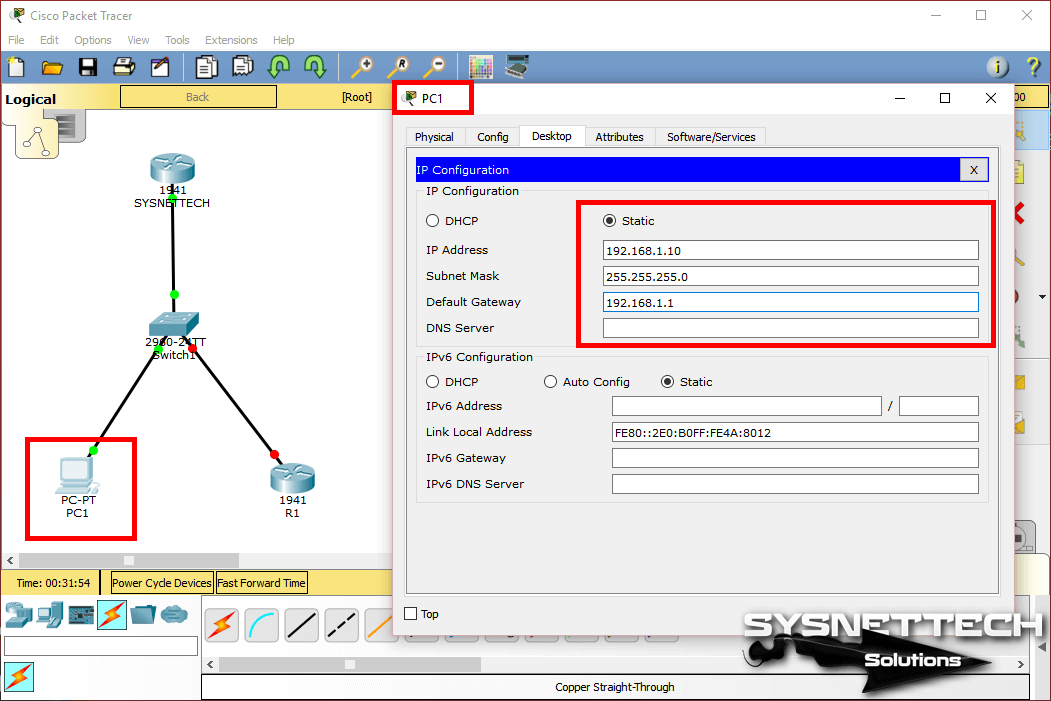
Configure the IP settings of PC1 as follows.
Step 5
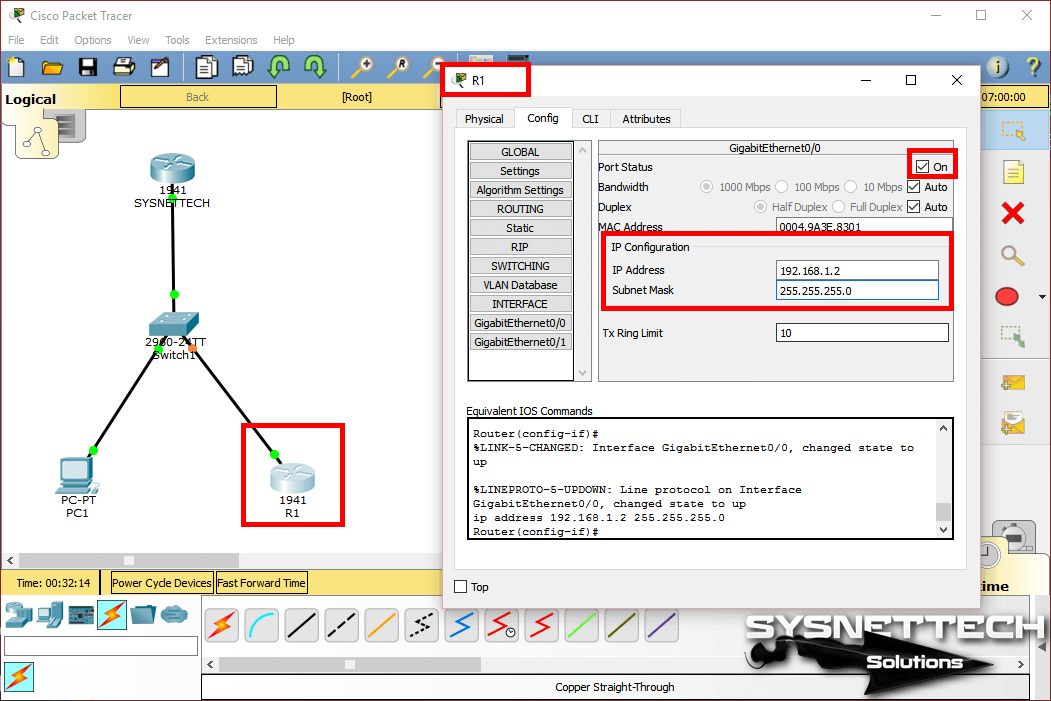
To quickly configure the R1’s interface, double-click on it, click the Config tab in the window that opens, and then configure the Port Status option of the GigabitEthernet0/0 interface to On, then assign the IP address.
Step 6
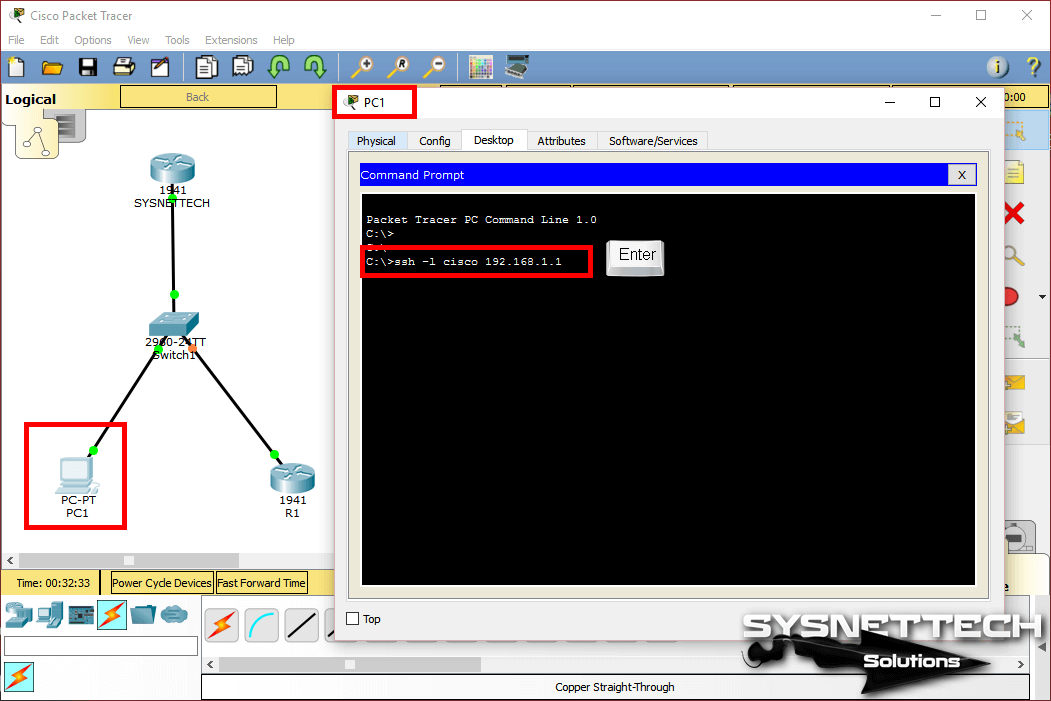
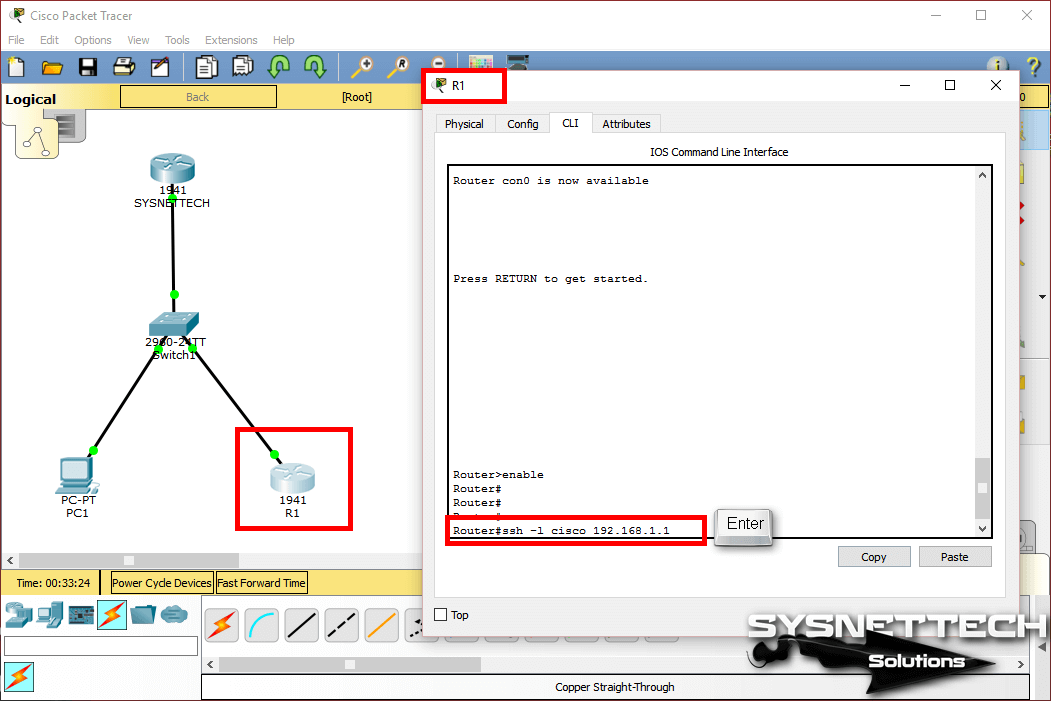
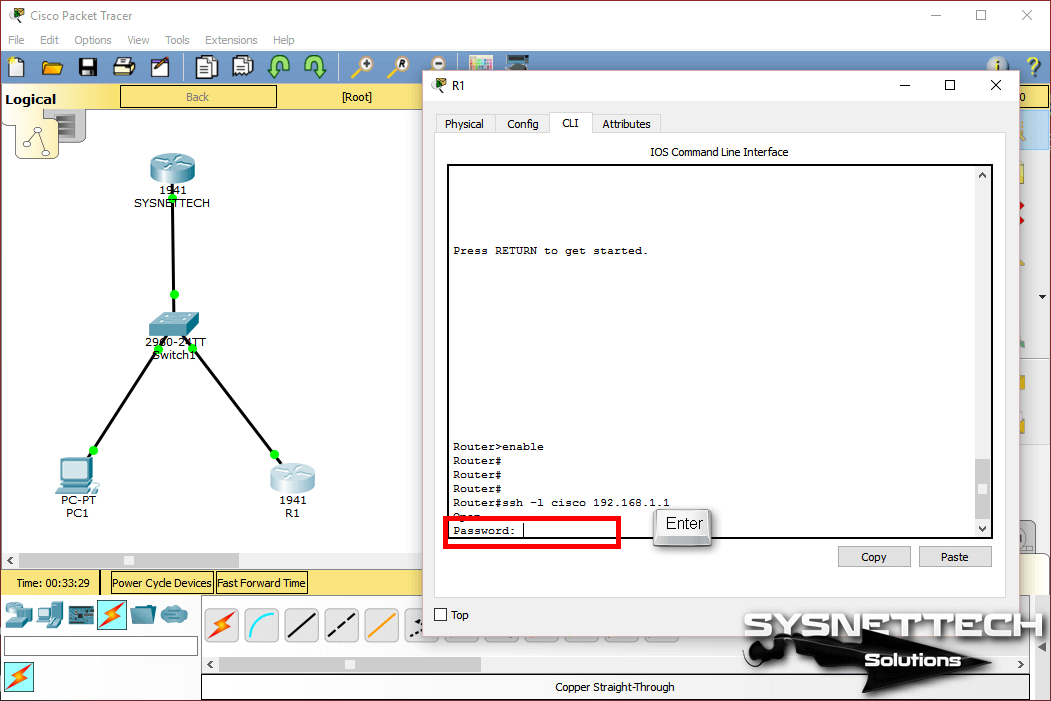
To test whether SSH is running, open the PC1 prompt and establish a connection using the command below.
Step 7
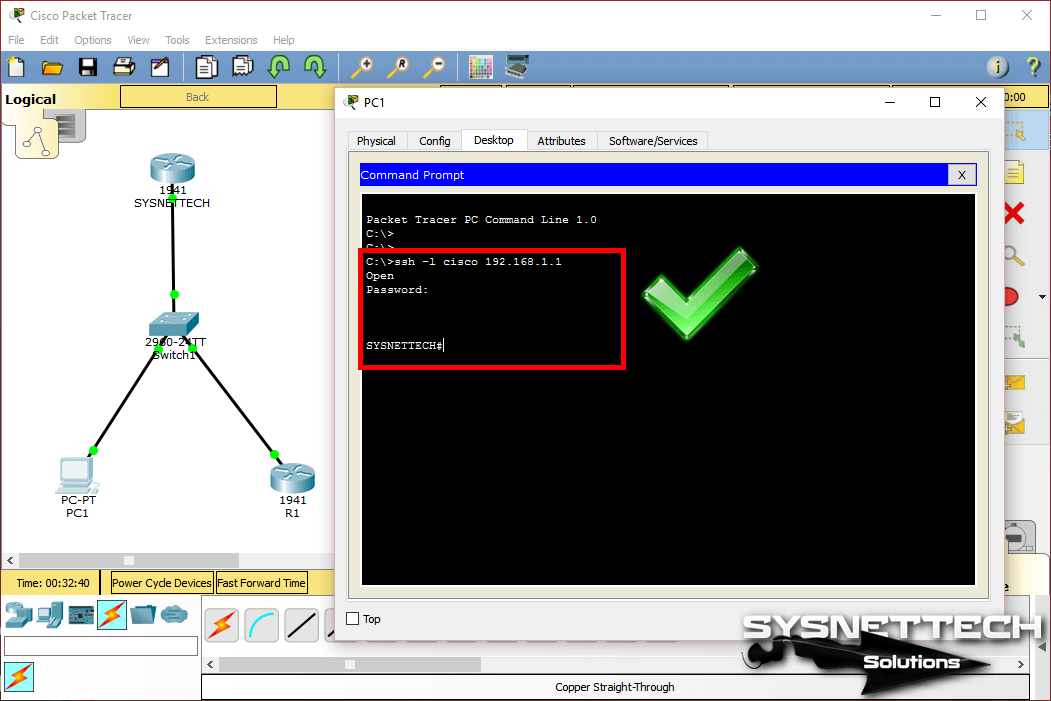
Enter the user name and password you created, and as soon as you press Enter, the connection will be established as in the image below.
Step 8
After executing the show ssh command on PC1 Command Prompt, you can check the version of the SSH protocol that is linked.
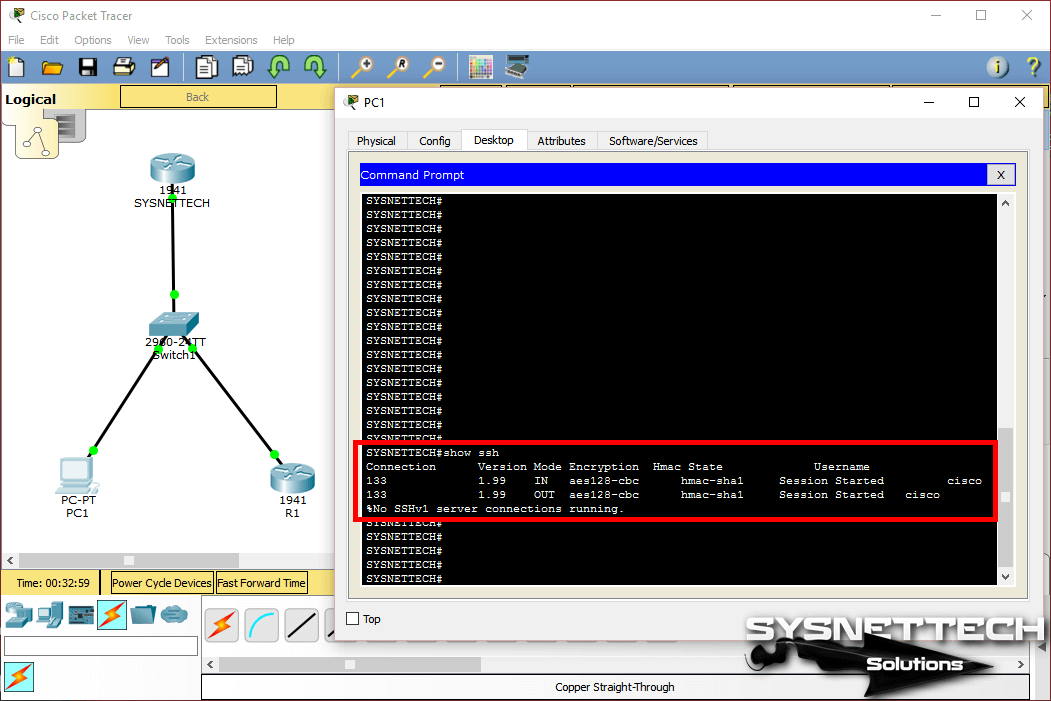
Step 9
In this step, execute the following command to make SSH from router to router.
Step 10
In the same way, enter the user account information you created on the Cisco Router and press Enter.
Step 11
As you can see in the image below, a successful SSH connection is made.

Show Commands
Video
With the simulator, you can watch the video below to enable SSH on the router and connect from the PC and also subscribe to our YouTube channel to support us!
Final Word
In this article, after examining how to enable SSH, we have connected with SSH from PC to Router and Router to Router to verify the connection. In the real scenario, to configure SSH on Routers, make sure the IOS image has k9 (crypto). Thanks for following us!
Отрицательная сторона
Использование JavaScript не всегда безопасно, так как он добавлен к сайтам и обозревателям, поэтому его легко можно использовать для запуска вредоносного кода. Также стоит отметить, что это устаревший код и большинство интернет-страниц используют более простые и современные технологии.
Зная, как включить javascript в браузере можете не переживать, интернет-платформы будут корректно отображать содержимое, а также работа в сети станет более удобной. Не стоит отключать данный инструмент, ведь именно он влияет на функционирование сайтов и браузера в целом.
Как отключить JavaScript в Google Chrome
Для того, чтобы отключить JavaScript в Chrome перейдите в настройки, нажав кнопку с тремя полосками в верхнем правом углу окна браузера. Прокрутите страницу настроек в самый низ и нажмите «Показать дополнительные настройки» внизу. Вы найдете раздел «Личные данные», где нужно нажать на «Настройки контента»:
В разделе «JavaScript» переведите флажок в значение «Запретить выполнение…». Нажмите кнопку «Готово».
Как отключить JavaScript в Mozilla Firefox
Введите в адресной строке браузера:
about:config
Таким способом вы сможете открыть список настроек. С помощью поиска найдите пункт javascript.enabled. Щелкните по нему левой кнопкой мыши и нажмите «Переключить»:
Как отключить JavaScript в Yandex
Пользователи браузера Yandex, который во многом похож на Chrome, должны также начать с кнопки настроек в виде трех полосок в верхнем правом углу. Там нажмите «Показать дополнительные настройки». Найдите раздел «Защита личных данных», где нажмите «Настройки содержимого»:
Зайдя в этот раздел, переведите переключатель в пункт «Запретить JavaScript на всех сайтах». Для подтверждения изменений нажмите «Готово»:
Как отключить JavaScript в Apple Safari
Если вы работаете в Safari, откройте настройки и перейдите в раздел «Безопасность». Далее, в разделе «Веб-контент», снимите галочку с пункта «Включить JavaScript»:
Как отключить JavaScript в Internet Explorer
Откройте настройки, нажав на кнопку с изображением шестеренки в верхнем правом углу браузера. Перейдите в раздел «Свойства браузера» и далее на вкладку «Безопасность». Выберите зону «Интернет» и нажмите кнопку «Другой»:
Найдите раздел «Активные сценарии» и выберите опцию «Отключить». Это же надо сделать и в пункте ниже, «Выполнять сценарии приложений Java»:
SSH Server Keys
SSH requires server keys for secure communications to the Cisco Nexus 5000 Series switch. You can use SSH keys for the following SSH options:
-
SSH version 2 using Rivest, Shamir, and Adelman (RSA) public-key cryptography
-
SSH version 2 using the Digital System Algrorithm (DSA)
Be sure to have an SSH server key-pair with the appropriate version before enabling the SSH service. You can generate the SSH server key-pair according to the SSH client version used. The SSH service accepts three types of key-pairs for use by SSH version 2:
-
The dsa option generates the DSA key-pair for the SSH version 2 protocol.
-
The rsa option generates the RSA key-pair for the SSH version 2 protocol.
By default, the Cisco Nexus 5000 Series switch generates an RSA key using 1024 bits.
SSH supports the following public key formats:
-
OpenSSH
-
IETF Secure Shell (SECSH)
| Caution |
If you delete all of the SSH keys, you cannot start the SSH services. |
Как включить JavaScript в Яндексе браузере?
Есть один, но простой способ включить JavaScript в Яндекс браузере, для его реализации потребуется воспользоваться настройками обозревателя.
Процесс активации JavaScript в Яндекс браузере:
Если не получается включить надстройку JavaScript в браузере Яндекс из-за сложностей в её нахождении, можем на странице «Настройки», в правой части окна, в строку «Поиск настроек» ввести «JavaScript». Веб-обозреватель самостоятельно найдёт раздел, где находится настройка и подсветит кнопку, на которую нужно нажать. Перейдя на страницу с настройками листаем вкладку немного вниз и здесь уже можем включить сценарии JavaScript в Яндекс браузере.
Полезно! Часто пользователи, отключающие JS, стремятся изменить настройки и cookie. Выключение куки влечёт к невозможности использовать часть сайтов полностью. Другие ресурсы готовы работать без куки, но доступ к защищённым разделам и аккаунтам окажется недоступным. Любые фильтры и остальные настройки будут слетать. На большинстве веб-сайтов встречается плотное взаимодействие между cookie и JS.
Включить куки и JavaScript в Яндекс браузере можем одинаковым способом: переходим на страницу «Настройки содержимого»
, нам нужен первый же раздел, называющийся «Файлы cookie», где устанавливаем «Разрешить сохранение локальных данных». Ниже таким же способом включаем JS.
Prerequisites
Requirements
The Cisco IOS image used must be a k9(crypto) image in order to support SSH. For example c3750e-universalk9-tar.122-35.SE5.tar is a k9 (crypto) image.
Components Used
The information in this document is based on Cisco IOS 3600 Software (C3640-IK9S-M), Release 12.2(2)T1.
SSH was introduced into these Cisco IOS platforms and images:
-
SSH Version 1.0 (SSH v1) server was introduced in some Cisco IOS platforms and images that start in Cisco IOS Software Release 12.0.5.S.
-
SSH client was introduced in some Cisco IOS platforms and images starting in Cisco IOS Software Release 12.1.3.T.
-
SSH terminal-line access (also known as reverse-Telnet) was introduced in some Cisco IOS platforms and images starting in Cisco IOS Software Release 12.2.2.T.
-
SSH Version 2.0 (SSH v2) support was introduced in some Cisco IOS platforms and images starting in Cisco IOS Software Release 12.1(19)E.
-
Refer to How to Configure SSH on Catalyst Switches Running CatOS for more information on SSH support in the switches.
Refer to the Software Advisor (registered customers only) for a complete list of feature sets supported in different Cisco IOS Software releases and on different platforms.
The information presented in this document was created from devices in a specific lab environment. All of the devices used in this document started with a cleared (default) configuration. If you are in a live network, make sure that you understand the potential impact of any command before you use it.
Accessing the command-line interface (CLI) on the Aironet AP
You can use any of these methods in order to access the command-line interface (CLI) on the Aironet AP:
-
The console port
-
Telnet
-
SSH
If the AP has a console port and you have physical access to the AP, you can use the console port in order to log in to the AP and change the configuration if necessary. For information on how to use the console port in order to log in to the AP, refer to the section of the document Configuring the Access Point for the First Time.
If you can only access the AP through the Ethernet, use either the Telnet protocol or the SSH protocol in order to log in to the AP.
The Telnet protocol uses port 23 for communication. Telnet transmits and receives data in clear text. Because the data communication happens in clear text, a hacker can easily compromise the passwords and access the AP. RFC 854 defines Telnet and extends Telnet with options by many other RFCs.
SSH is an application and protocol that provides a secure replacement to the Berkley r-tools. SSH is a protocol that provides a secure, remote connection to a Layer 2 or a Layer 3 device. There are two versions of SSH: SSH version 1 and SSH version 2. This software release supports both SSH versions. If you do not specify the version number, the AP defaults to version 2.
SSH provides more security for remote connections than Telnet by providing strong encryption when a device is authenticated. This encryption is an advantage over a Telnet session, in which the communication happens in clear text. For more information on SSH, refer to Secure Shell (SSH) FAQ. The SSH feature has an SSH server and an SSH integrated client. The client supports these user authentication methods:
-
RADIUS (for more information, refer to the section)
-
Local authentication and authorization (for more information, refer to the section)
For more information about SSH, refer to Part 5, «Other Security Features» in the Cisco IOS Security Configuration Guide for Release 12.3.
Note: The SSH feature in this software release does not support IP Security (IPSec).
You can configure APs for SSH with the use of either the CLI or GUI. This document explains both methods of configuration.
Потеря данных выходной очереди
Отбрасывания данных в исходящем потоке вызываются перегрузками интерфейсного устройства. Например, скорость передачи трафика на исходящем интерфейсе не может обеспечить прием всех пакетов, которые необходимо отправить. Чтобы полностью решить эту проблему, необходимо увеличить скорость передачи по линии. Однако существуют способы предотвратить, уменьшить или проконтролировать отбрасывание данных на выходе без увеличения скорости линии. Предотвратить отбрасывание исходящих данных возможно лишь в том случае, если это является результатом передачи коротких блоков данных. Если отбрасывания данных на выходе происходят вследствие постоянной высокой скорости потока, их предотвратить нельзя. Однако ими можно управлять.
Обработанные пакеты передаются в выходную очередь исходящего интерфейса. Выполните команду show interfaces exec в режиме EXEC, чтобы просмотреть размер очереди, текущее число пакетов в очереди и количество отбрасываний. В зависимости от типа интерфейса и настроенной организации очереди количество отбрасываний из выходной очереди явно не отображается, поскольку счетчик отбрасываний из выходной очереди суммирует отбрасывания отдельно на уровне обработки и на уровне прерывания:
Однако обработка пакета занимает больше времени, чем его передача из выходной очереди в линию. Поэтому крайне маловероятно, что отбрасывания из выходной очереди (отбрасывания на уровне обработки) могут произойти без отбрасываний на уровне прерывания. Отобрасывания из выходной очереди происходят, только если интерфейс уже переполнен на уровне прерывания, поэтому пакеты не извлекаются из выходной очереди, прежде чем она заполнится. Поэтому отбрасывания выхода на уровне обработки (отбрасывания исходящей очереди) и отбрасывания выхода на уровне прерываний всегда происходят совместно, и различать эти два счетчика практически нет смысла.
Примечание. Однако существует одно исключение. Если выходная очередь постоянно заполнена и вообще никакие пакеты не отправляются из интерфейса, необходимо проверить наличие аппаратных сбоев на интерфейсе.
Поиск и устранение неполадок, связанных с отбрасыванием пакетов из выходной очереди
Можно сократить или даже предотвратить отбрасывания пакетов из выходной очереди, изменив конфигурацию следующих функций:
-
Дуплексный режим. Если интерфейс работает в полудуплексном режиме, настройте его (если возможно) на работу в полнодуплексном режиме.
Примечание. Никогда не увеличивайте выходную очередь в попытке предотвратить отбрасывания выходных пакетов. Если пакеты остаются в выходной очереди слишком долго, время таймеров TCP может закончиться и будет инициирована повторная передача. Повторно переданные пакеты только увеличивают нагрузку на исходящий интерфейс.
Если отбрасывания выходных пакетов все еще происходят после внесения рекомендованных изменений в конфигурацию маршрутизатора, это означает, что вы не можете предотвратить или уменьшить отбрасывания выходных пакетов. Однако ими можно управлять, и это может быть столь же эффективно, как и их предотвращение. Существует два подхода к управлению отбрасываниями выходных пакетов:
-
Управление перегрузкой
-
Предотвращение перегрузок
Оба подхода основываются на классификации трафика, и можно использовать их одновременно.
Управление перегрузкой позволяет добиться, чтобы в надлежащей конфигурации при высоких перегрузках на канале важные пакеты всегда доставлялись, а менее важные — отбрасывались. Управление перегрузками включает сложные механизмы организации очередей, такие как следующие:
-
Постановка в очередь с установлением приоритета
Если нежелательные отбрасывания выходных пакетов все еще происходят после реализации этих механизмов, необходимо увеличить скорость линии.
Troubleshooting Tips
-
If your SSH configuration commands are rejected as illegal commands, you have not successfully generated a RSA key pair for your router. Make sure you have specified a host name and domain. Then use the crypto key generate rsa command to generate an RSA key pair and enable the SSH server.
-
When you configure the RSA key pair, you might encounter these error messages:
-
No hostname specified
You must configure a host name for the router using the hostname global configuration command.
-
No domain specified
You must configure a host domain for the router using the ip domain-name global configuration command.
-
-
The number of allowable SSH connections is limited to the maximum number of vtys configured for the router. Each SSH connection uses a vty resource.
-
SSH uses either local security or the security protocol that is configured through AAA on your router for user authentication. When you configure AAA, you must ensure that the console is not running under AAA by applying a keyword in the global configuration mode to disable AAA on the console.
-
No SSH server connections running.
This output suggests that the SSH server is disabled or not enabled properly. If you have already configured SSH, it is recommended that you reconfigure the SSH server in the device. Complete these steps in order to reconfigure SSH server on the device.
-
Delete the RSA key pair. After the RSA key pair is deleted, the SSH server is automatically disabled.
Note: It is important to generate a key-pair with at least 768 as bit size when you enable SSH v2.
Caution: This command cannot be undone after you save your configuration, and after RSA keys have been deleted, you cannot use certificates or the CA or participate in certificate exchanges with other IP Security (IPSec) peers unless you reconfigure CA interoperability by regenerating RSA keys, getting the CA’s certificate, and requesting your own certificate again.Refer to for more information on this command.
-
Reconfigure the hostname and domain name of the device.
-
Generate an RSA key pair for your router, which automatically enables SSH.
Refer to for more information on the usage of this command.
Note: You can receive the SSH2 0: Unexpected mesg type received error message due to a packet received that is not understandable by the router. Increase the key length while you generate rsa keys for ssh in order to resolve this issue.
-
Configure SSH server. In order to enable and configure a Cisco router/switch for SSH server, you can configure SSH parameters. If you do not configure SSH parameters, the default values are used.
ip ssh { | }
Refer to for more information on the usage of this command.
-
Configure
Configuration
On the remote device:
!
interface GigabitEthernet0/0
 description LINK TO END USER
 ip vrf forwarding MGMT
 ip address 192.168.100.1 255.255.255.252
 duplex auto
 speed auto
!
!
interface Loopback1 description LOOPBACK TO TELNET INTO FOR MANAGEMENT ACCESS
 ip vrf forwarding MGMT
 ip address 10.0.0.1 255.255.255.255
!
!
line vty 0 4
 access-class 8 in
 password cisco
 login
 transport input all
line vty 5 15
 access-class 8 in
 password cisco
 login
 transport input all
!
On the end user:
!
interface GigabitEthernet0/0
 description LINK TO REMOTE SITE
 ip vrf forwarding MGMT
 ip address 192.168.100.2 255.255.255.252
 duplex auto
 speed auto
!
Configure SSH on Cisco Router or Switch
To configure SSH on Cisco router, you need to do:
- Enable SSH on Cisco router.
- Set Password for SSH.
- Force remote access to use SSH.
- Enable Password Encryption.
- Add domain name Server (DNS).
- Add Username and Password.
Let’s enable and configure SSH on Cisco router or switch using the below packet tracer lab. The configure on a packet tracer lab and real Cisco devices are the same. Just try to learn and do it what the SSH remote authentication needs.
Download the packet tracer lab or create your own lab. SSH Configuration Packet Tracer Lab.
Configure SSH on Cisco Router or Switch – Technig
In this example, I just enable and configure SSH on SW1 and trying to access it from PC1. It’s enough to learn how to configure SSH on Cisco router.
R1>
R1>enable
R1#configure terminal
Enter configuration commands, one per line.  End with CNTL/Z.
R1(config)#
R1(config)#ip domain-name Technig.com
R1(config)#crypto key generate rsa
The name for the keys will be: R1.Technig.com
Choose the size of the key modulus in the range of 360 to 2048 for your
  General Purpose Keys. Choosing a key modulus greater than 512 may take
  a few minutes.

How many bits in the modulus : 1024
% Generating 1024 bit RSA keys, keys will be non-exportable...

R1(config)#
*Mar 1 0:5:57.974:  %SSH-5-ENABLED: SSH 1.99 has been enabled
R1(config)#
R1(config)#username Admin password Technig
R1(config)#line vty 0 4
R1(config-line)#login local
R1(config-line)#transport input ssh
R1(config-line)#exit
R1(config)#ip ssh version 2
R1(config)#ip ssh authentication-retries 3
R1(config)#
R1(config)#ip ssh time-out 120
R1(config)#exit
R1#
That’s all. Let’s check the process one by one.
- I have set DNS domain name with “IP domain-name” command.
- Then configure the router to use RSA key pair with modulus size of 1024 bites for remote service authentication with “crypto key generate rsa” command.
- Add username “Admin” with Password of “Technig” for ssh authentication.
- Enabled ssh with “line vty 0 4” command.
- Configure ssh to use local username and password with “login local” command. Remember that you can set a username and password for ssh with “username Admin password Technig” command as well. But here we configure ssh to use local username and password.
- Configure the router to accept only ssh connection with “transport input ssh” command.
- Configure ssh to version 2 using “IP ssh version 2” and set the authentication times to 3 with “IP ssh authentication-retries 3” command.
- Finally set the ssh timeout to 120 seconds with “IP ssh time-out 120” command.
Related Article: Install SSH on CentOS 8.x and Red Hat Linux
The final step is to test the connectivity of ssh from PC1 with “ssh -l Admin 192.168.1.1” command for command prompt.
C:\>ssh -l Admin 192.168.1.1
Open
Password:


R1>en
R1>enable
Password:
R1#
OK, the ssh works perfectly.
Prerequisites
Components Used
This document is not restricted to specific software and hardware versions.
Note: Basic understanding of VRF’s and Telnet. Knowledge of ACL is also recommended. Configuration of VRF’s must be supported on the device and platform. This document applies to all Cisco routers that run Cisco IOS and where VRF’s and ACL’s are supported.
The information in this document was created from the devices in a specific lab environment. All of the devices used in this document started with a cleared (default) configuration. If the network is live, make sure that you understand the potential impact of any command.
Включить Cisco SSH
Хотите узнать, как включить удаленный доступ Cisco SSH с помощью командной строки? В этом уроке мы расскажем вам все шаги, необходимые для настройки удаленного доступа SSH на коммутаторе Cisco 2960 или 3750 с использованием командной строки.
Cisco Switch Playlist:
На этой странице мы предлагаем быстрый доступ к списку видеороликов, связанных с Cisco Switch.
Playlist
Не забудьте подписаться на наш канал YouTube, названный FKIT.
Связанный учебник Cisco Switch:
На этой странице мы предлагаем быстрый доступ к списку руководств, связанных с коммутатором Cisco.
Список учебных пособий
Учебное пособие — включение удаленного доступа Cisco SSH
Во-первых, вам нужно получить доступ к консоли вашего коммутатора Cisco.
В нашем примере мы будем использовать программное обеспечение Opensource с именем Putty и компьютер под управлением Windows.
Программное обеспечение Putty доступно на веб-сайте putty.org.
По окончании загрузки запустите программное обеспечение и дождитесь следующего экрана.
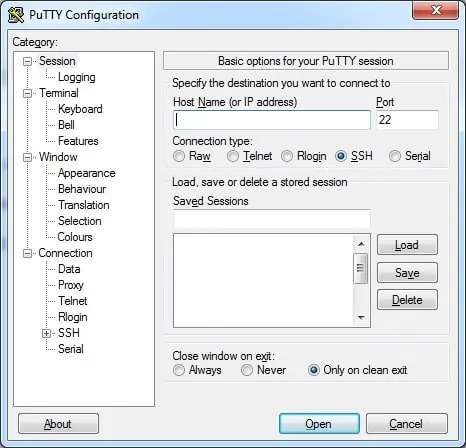
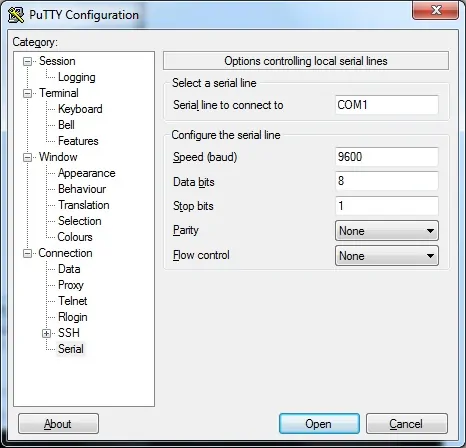
Чтобы получить доступ к консоли модели Cisco Switch 2960 или 3750, вам необходимо выбрать категорию Serial Connection и использовать следующие параметры:
• Тип подключения: последовательный
• Последовательная линия: COM1
• Скорость: 9600
Если COM1 не работает, вам нужно будет попытаться использовать COM2, COM3, COM4 или следующий.
Используя консоль, telnet или ssh, подключитесь к командной строке коммутатора и войдите в систему с пользователем, имеющим административные привилегии.
На экране приглашения введите регистрационную информацию администратора.
После успешного входа в систему отобразится консольная консоль.
Switch>
Используйте команду enable для входа в режим привилегий.
Switch> enable
Используйте команду терминала конфигурации, чтобы войти в режим конфигурации.
Switch# configure terminal
Используйте следующую команду для создания необходимых ключей шифрования:
Switch(config)# crypto key generate rsa
Switch(config)# ip ssh version 2
Если система запрашивает размер ключа, вы должны сообщить самому большому номеру, доступному вашему коммутатору.
На моем коммутаторе максимальное значение: 4096
Вы также должны включить SSH версию 2, которая более безопасна и имеет множество интересных функций.
Создайте учетную запись пользователя для удаленных пользователей.
Switch(config)# username kakarot privilege 15 secret kamehameha123
Switch(config)# username yamcha privilege 1 secret lostbuma123
В нашем примере пользователь kakarot имеет права чтения и записи, а yamcha — только для чтения.
Настройте виртуальный терминал для использования локальной проверки подлинности.
Настройте виртуальные терминалы, чтобы разрешить удаленный доступ SSH.
Switch# configure terminal
Switch(config)# line vty 0 15
Switch(config-line)# login local
Switch(config-line)# transport input ssh
Switch(config-line)# exit
Switch(config)# exit
Не забудьте сохранить конфигурацию коммутатора.
Switch# copy running-config startup-config
Вы успешно включили функцию удаленного доступа Cisco SSH.
Вы успешно настроили удаленные терминалы для приема удаленных подключений.
Вы успешно создали учетные записи пользователей с разными уровнями привилегий.
2018-06-08T10:04:01-03:00
Verify
Use this section in order to confirm that your configuration works properly.
The Output Interpreter Tool (registered customers only) (OIT) supports certain show commands. Use the OIT in order to view an analysis of show command output.
Debug SSH
Issue the debug ssh command in order to turn on SSH debugging.
This output shows that the authentication request from host 10.1.1.2 (outside to PIX) to «pix» is successful:
If a user gives a wrong username, for example, «pix1» instead of «pix», the PIX Firewall rejects the authentication. This debug output shows the failed authentication:
Similarly, if the user provides the wrong password, this debug ouput shows you the failed authentication.
View Active SSH Sessions
Issue this command in order to check the number of SSH sessions that are connected and the connection state to the PIX:
Choose Monitoring > Properties > Device Access > Secure Shell Sessions in order to view the sessions with ASDM.
View Public RSA Key
Issue this command in order to view the public portion of the RSA keys on the security appliance:
Choose Configuration > Properties > Certificate > Key Pair, and click Show Details in order to view RSA keys with ASDM.
Зачем нужен
Если в приложении не работает JavaScript, пользователь лишается ряда полезных опций. Давайте обсудим, какие возможности открываются после активации и зачем нужно пользоваться языком программирования:
- Для проверки разрешения монитора/экрана и подстраивания страницы под нужные размеры;
- Для полноразмерной загрузки миниатюр изображений;
- С целью проведения математических вычислений;
- Для снижения нагрузки на сервер и обработки данных в HTML-формах без подключения к Интернету и без использования серверных языков программирования;
- Для создания выпадающего меню или всплывающих окон;
- С целью добавления анимации и графических элементов.
Это лишь небольшой перечень самых востребованных функций – полный список возможностей намного больше. Если после установки Google Chrome не работает или возникают какие-то другие проблемы прочитайте, как решить их в другой нашей статье.
Мы рассказали все, что нужно знать о включении и отключении языка JavaScript, а также сфере его применения – не забудьте активировать опцию в настройках прямо сейчас!
SSH Client
The SSH client feature is an application running over the SSH protocol to provide device authentication and encryption. The SSH client enables a Cisco Nexus 5000 Series switch to make a secure, encrypted connection to another Cisco Nexus 5000 Series switch or to any other device running an SSH server. This connection provides an outbound connection that is encrypted. With authentication and encryption, the SSH client allows for a secure communication over an insecure network.
The SSH client in the Cisco Nexus 5000 Series switch works with publicly and commercially available SSH servers.