Команды adb для android пользователей
Содержание:
- Usage
- Соединение через Wi-Fi
- Удаление
- Install Android Bootloader Interface through Windows update
- Install ADB and Fastboot Platform Tools
- FAQ & Troubleshooting
- The application doesn’t work. Is there anything I should have installed?
- Do I need an unlocked bootloader or root access to use the app?
- What apps are safe to uninstall?
- What’s the difference between uninstalling and disabling?
- Why does the Uninstaller hang on some apps?
- Why does the Uninstaller fail to uninstall some apps?
- How do I regain uninstalled system apps?
- Основные команды
- Enable USB Debugging on your Device
- Возможные проблемы и их решения
- Лучшая статистика батареи
- Networking commands
- Directing Commands to a Specific Emulator/Device Instance
- How to Setup ADB
- Откройте ZIP-файл платформы Tools Tools
- Commands
- How to setup ADB on Microsoft Windows
- Установка ADB
- 4. Жесткие навигационные жесты
- Install ADB and Fastboot tool on Windows 10
- Android Hacks That Don’t Need Root
- Querying for Emulator/Device Instances
Usage
Connect device
Tip:
- For some devices, you may have to enable MTP on the device, before ADB will work. Some other devices require enable PTP mode to work.
- Many devices’ udev rules are included in , so if you have this installed, the following steps may not be necessary.
- Make sure your USB cable is capable of both charge and data. Many USB cables bundled with mobile devices do not include the USB data pin.
To connect to a real device or phone via ADB under Arch, you must:
- You might want to install if you wish to connect the device to the proper entries.
- plug in your android device via USB.
- Enable USB Debugging on your phone or device:
- Jelly Bean (4.2) and newer: Go to Settings > About Phone tap Build Number 7 times until you get a popup that you have become a developer. Build number may be under a menu called Software info on newer Android OS versions. Then go to Settings > Developer > USB debugging and enable it. The device will ask to allow the computer with its fingerprint to connect. Allowing it permanently will copy onto the devices folder.
- Older versions: This is usually done from Settings > Applications > Development > USB debugging. Reboot the phone after checking this option to make sure USB debugging is enabled.
If ( shows it as , or it is visible and accessible in IDE), you are done. Otherwise see the instructions below.
Figure out device IDs
Each Android device has a USB vendor/product ID. An example for HTC Evo is:
vendor id: 0bb4
product id: 0c8d
Plug in your device and execute:
$ lsusb
It should come up something like this:
Bus 002 Device 006: ID 0bb4:0c8d High Tech Computer Corp.
Adding udev rules
/etc/udev/rules.d/51-android.rules
SUBSYSTEM=="usb", ATTR{idVendor}=="", MODE="0660", GROUP="adbusers"
SUBSYSTEM=="usb",ATTR{idVendor}=="",ATTR{idProduct}=="",SYMLINK+="android_adb"
SUBSYSTEM=="usb",ATTR{idVendor}=="",ATTR{idProduct}=="",SYMLINK+="android_fastboot"
Then, to reload your new udev rules, execute:
# udevadm control --reload-rules
Make sure you are member of user group to access devices.
Detect the device
After you have setup the udev rules, unplug your device and replug it.
After running:
$ adb devices
you should see something like:
List of devices attached
HT07VHL00676    device
If adb still does not detect the device after plugging your device back in, kill and restart the adb server as root and check devices again:
# adb kill-server
# adb start-server
$ adb devices
If adb devices still shows «unauthorized» next to your device, make sure that that device has debugging permission allowed on the device itself. A ‘Allow USB Debugging?’ dialog should be presented when you physically connect the device. Select ‘Always Allow…», then tap «OK». If the dialog was never presented, try Settings > Developer Options > Revoke USB Debugging Authorizations (then «OK»), and repeat the steps in this section. If you still do not see the ‘Allow USB Debugging?’ dialog, and the device is listed as unauthorized, then enter the Developer Options on the device and first uncheck «USB Debugging» and then check it again.
Transferring files
You can now use adb to transfer files between the device and your computer. To transfer files to the device, use
$ adb push <what-to-copy> <where-to-place>
To transfer files from the device, use
$ adb pull <what-to-pull> <where-to-place>
Also see .
Backup and restore
You can also backup and restore your device with adb. Moreover, no root is required to follow the process. The commands below led to backup your device to a single file which can also be successively restored.
The command to create a backup is
$ adb backup -apk -shared -all -f backupFileName.ab
The command parameters list is
adb backup
Then confirm the process on your device’s display and provide a password whether a backup password has been set before.
The command to restore a previous backup is
$ adb restore mybackup.ab
Note: Remember that restoring replaces your device contents with the backup.
Соединение через Wi-Fi
Обычно для тестирования программы на реальном устройстве использует USB-соединение. Предположим, кот уволок куда-то USB-кабель или расшатал USB-порт (ага, валите всё котов). В этом случае можно попробовать использовать Wi-Fi. Описанный ниже способ не гарантирует работоспособность на всех устройствах. Пробуйте.
Сначала соединитесь обычным способом через USB (не знаю, как вы собираетесь это сделать, если у вас утащили кабель и сломали порт). Включите Wi-Fi на компьютере и на устройстве.
Запустите команду:
Появится ответ.
Убедитесь, что устройство присоединено.
Ответ (у вас будет свой набор символов):
Меняем режим работы с USB на TCP/IP:
Ответ:
Теперь вам надо узнать IP-адрес вашего устройства. Пример для Nexus 7: Запускаем Настройки | О планшете | Общая информация | IP-адрес. Перепишите адрес на бумажку. Запускаем команду с этим адресом (у вас будет свой адрес).
Ответ:
Теперь можете отсоединить кабель. Отдайте его коту, пусть играет.
Проверяем, что устройство по прежнему на связи.
Ответ:
Отлично! Запускайте приложение и оно по воздуху установится на устройстве.
Учтите, что передача данных будет идти медленнее и для больших приложений будет не слишком удобно использовать данный способ. Хотя я особых тормозов не заметил для учебных примеров.
Если вам надо вернуться к старому способу, то вызываем команду:
Указанный способ очень удобен. Недаром на баше есть такие строчки:
Слава Wi-Fi! Котэ не может его перегрызть.
Звонок в техподдержку одного интернет-провайдера.
ТП(техподдержка): Добрый день! Я вас слушаю.
А (абонент): У меня тут проблема возникла.
ТП: Какая у вас проблема?
А: Я гонял кота шашкой и перерубил кабель.
Если бы абонент позаботился о настройке через Wi-Fi, то и проблемы бы не было.
Удаление
Допустим вы сделали все что хотели, и ADB на вашем девайсе больше не нужен, вы хотите его удалить. Как же это сделать?
Если же вы не планируете в ближайшем будущем использовать Termux — вы можете просто удалить это приложение. При этом ADB будет полностью удален с вашего устройства.
Но если эта утилита заинтересовала вас, и вы хотите поэкспериментировать с функционалом — это повод все-таки оставить Termux и удалить только сам ADB. И тут у нас, как и в установке, существует два режима удаления — обычный и тихий. Чем они отличаются мы описывали выше. Если вы не уверены в своем выборе — выбирайте тихий режим.
Для обычного удаления выполните в Termux’е эту команду:
Ну, а для тихого — эту:
Вот и все! Больше статей и инструкций читайте в разделе Статьи и Хаки Android. Оставайтесь вместе с сайтом Android +1, дальше будет еще интересней!
Install Android Bootloader Interface through Windows update
Starting with Windows version 20H2, Microsoft has quietly added it to Optional Updates. This means that you will have to go into the settings and install this software, which I am giving below in the steps and the steps are quite easy, you hardly need to face any problem in doing this from the office, for this you need an internet connection.
QUIckly open Windows settings and then Windows Updates (find under Update and security). Under the Check for update button you can see optional updates button right beneath it.
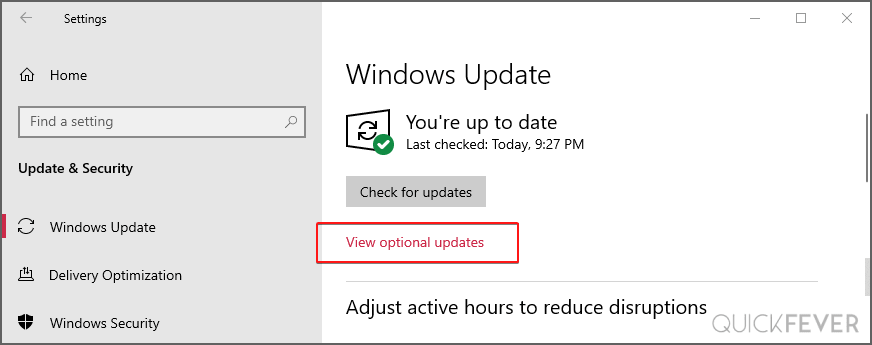
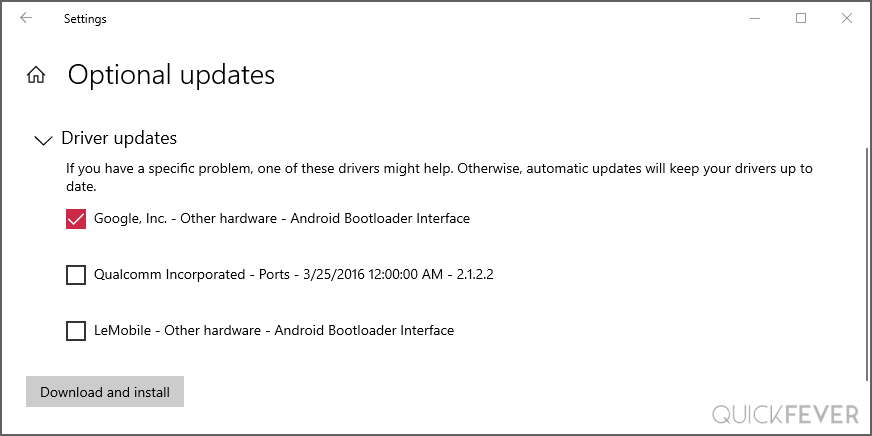
Now you have to click on the arrow icon. All optional updates will be shown here, select any update and download and install it. For this, you will need an internet connection. If you have a metered connection to your internet connection, then you can install such updates by coming here.
That’s it.
Install ADB and Fastboot Platform Tools
- For these commands to run, you would either be required to download ADB and Fastboot Platform Tools (Windows | Linux | macOS). This is the official tool provided by Google and you should only use this one, not any other third-party ADB binaries.
- If you are using ADB and Platform Tools, then after installing them, you need to execute the codes using the PowerShell Window or the Command Prompt. Let’s say you installed the tools in C:\adb, then for using the Powershell or Command Prompt:
- Go inside that folder (i.e C:\adb\platform-tools),
- While pressing the Shift key right-click on an empty location.
- Select ‘Open PowerShell window here. Begin typing the codes.
- On the other hand, if you prefer to use Command Prompt, then head over to the platform-tools folder, type in CMD in the address bar, and hit Enter. This will launch the CMD window.
FAQ & Troubleshooting
The application doesn’t work. Is there anything I should have installed?
Yes, the Xiaomi ADB/Fastboot Tools was developed in Kotlin for the Java Virtual Machine so it needs the JRE to run, version 11 or later.
Linux
Do I need an unlocked bootloader or root access to use the app?
The Flasher, Wiper and Camera2 modules in Fastboot mode require an unlocked bootloader but everything else works without rooting or unlocking.
What apps are safe to uninstall?
All applications in the list are safe to uninstall. You might lose access to some services but the device will keep working just fine. Some other apps, like Gallery or Security, aren’t listed because uninstalling them would soft brick your device.
What’s the difference between uninstalling and disabling?
The OS sees which apps have been disabled and it can re-enable them whenever it pleases but it cannot do the same with uninstalled apps. Apps you disable may come back anytime and you can also re-enable them in the Settings, while uninstalled apps will only return if you reinstall them (using ADB or an APK) or factory reset the device. There’s no difference when it comes to their impact on the system, however, functionality or performance wise, so I recommend uninstalling apps which you believe pose a security/privacy risk and disabling everything else.
Why does the Uninstaller hang on some apps?
There are some apps Global MIUI doesn’t let you uninstall but Chinese MIUI does. If you try to uninstall an app like that, the tool might hang. If that happens, close the tools, disconnect your device, uninstall the app manually, then launch the tools again and reconnect your device to proceed.
Why does the Uninstaller fail to uninstall some apps?
If the attempted uninstallation of an application results in a failure or anything other than success, that isn’t a bug or an issue within the program. It means that ADB was not able to uninstall the application and there is nothing we can do about it. Similary, if an uninstallation has no result at all (neither success nor failure), that means that ADB didn’t report anything, therefore the program cannot derive any information about the successfulness of the uninstallation.
How do I regain uninstalled system apps?
Simply reinstall them using the Reinstaller module when connected in ADB mode. In case the Reinstaller module is disabled because your device doesn’t support it, you must perform a factory reset.
No. Fastboot ROM flashing is available so MiFlash can mostly be replaced but implementing EDL flashing or bootloader unlocking on MIUI would only make the program unnecessarily complex.
Основные команды
Работа с ADB осуществляется через командную строку: в адресной строке папки с установленным ADB ввести cmd и нажать Enter.
После подключения андроид-устройства в окне нужно ввести adb devices. Если ПК обнаружил смартфон, в окне появится серийный номер подключенного устройства. Надпись Online сигнализирует о его готовности принимать директивы.
Инсталляция приложений через .apk происходит через команду adb install, после написания ее в этой же строке нужно указать путь из корневого каталога к установочному файлу. Для этого его можно открыть через Проводник и скопировать путь.
Аналогично проводится удаление программ через — adb uninstall. После команды нужно указать название пакета приложения. Например, com.piriform.ccleaner, чтобы удалить программу CCleaner с телефона
Важно, что удаление проводится полностью, кэш на устройстве не остается. Если важно сохранить его, в конце следует дописать ключ -k
adb push создана для передачи файлов на Android: после самой команды необходимо написать путь к файлу на ПК и место назначения (через косую черту или слэш).
adb pull – обратная сторона, с ее помощью данные копируют на компьютер со смартфона.
Команда adb reboot выручит при проблемах к управлению телефонов – она перезагрузит гаджет. При проблемах включения андроид-устройства в режим bootloader позволит перейти введение adb reboot-bootloader. В режим восстановления вводит adb reboot recovery, но она доступна лишь на некоторых ПК.
Еще несколько полезных директив (все доступные команды можно посмотреть после ввода adb help в командую строку):
- adb connect – подключение смартфона к Wi-Fi, придется указать IP-адрес и порт смартфона.
- adb shell – открывает доступ ко всем файлам телефона.
- adb fastboot devices – запрет на принятие смартфоном любых команд, fastboot oem unlock – разблокирует загрузчик.
- adb logcat – вывод содержимого log-файла, текст нужно сохранить в текстовый файл.
- adb backup и adb restore создают бэкап и проводят восстановление данных из него.
Таким образом, с помощью адб-команд можно решить массу вопросов, которые вручную делать гораздо дольше
Важно не забыть установку Android SDK, иначе работать не получится
Enable USB Debugging on your Device
- For entering any ADB or Fastboot commands, you need to make sure that the PC recognizes your device. For that to happen, you need to enable the ‘USB Debugging’ option on your device. Follow the below points for the same:
- Go to the ‘Settings’ options on your device.
- Head over to ‘About Phone’.
- Tap on ‘Build Number’ 7 times. You will get a toast message indicating that ‘You are now a developer!’.
- Go back to ‘Settings’.
- Go to ‘System’ > ‘Advanced’.
- Navigate to ‘Developer Options.
- Enable ‘USB Debugging’ from there. If you are also going to unlock the bootloader, then enable ‘OEM Unlocking’ from there as well.
IMPORTANT NOTES
- Wherever you will need to enter ‘filename’ in any command, always enter it with its extension. For example, if you are sideloading a recovery (named twrp.img), the correct code would be adb sideload twrp.img .
- Also, if you want to flash/send/boot any file to the device, make sure to move the file to the location where ADB and Fastboot Platform Tools or Minimal ADB and Fastboot is installed.
Возможные проблемы и их решения
Даже если полностью соблюдать пошаговую инструкцию, могут возникнуть ошибки. Чаще всего их легко решить без помощи специалиста. Достаточно знать, в чем проблема:
- Прошивка Xiaomi через Fastboot не устанавливается. Причина в некорректном файле установке. Чтобы не столкнуться с такой ошибкой, нужно загрузить оболочку с официального сайта Mi Community. Антивирус при этом отключите, т.к. он может распознать файл, как “вредоносный”.
- Смартфон полностью разрядился. Такое случается, если батарея была заряжена менее, чем на 60%. Достаточно подключить телефон к сети и дождаться, пока аккумулятор наполнится до 100%.
- Связь с телефоном теряется. Это возникает, если USB кабель или вход поврежден. Сначала нужно попробовать подключиться к компьютеру через другой провод. Если проблема возникнет снова, нужно отнести смартфон в ремонт.
- XiaoMi Flash не устанавливается. Это случается редко. В качестве замены можно подобрать другую программу. Debloater выводит список приложений и позволяет его редактировать. Однако сделать полную перепрошивку через него сложнее.
ADB Fastboot Tools — приложение, которое позволяет настроить смартфон Xiaomi под себя. Без него установка новой оболочки стала бы проблемой для пользователя. Не понадобится много времени, чтобы разобраться с интерфейсом. Все управление в программе Xiaomi ADB Fastboot Tools сделано интуитивно понятным. При этом программное обеспечение позволяет установить на телефон оболочку, минимизируя риск повреждения.
ОСТАВЬТЕ СВОЙ КОММЕНТАРИЙ: Статья была вам полезна?
Лучшая статистика батареи
Поиск приложений, вызывающих разрядку аккумулятора телефона, — загадка. Откуда вы знаете, что конкретное приложение переходит в состояние сна, когда вы выходите из него? И как вы можете измерить эффективность приложений для экономии заряда аккумулятора, таких как Naptime?
Better Battery Stats извлекает подробные данные о вашей батарее. Он показывает приложения, которые выводят ваше устройство из состояния глубокого сна, обнаруживает необычные изменения в поведении и происходящем за кулисами, а также собирает информацию об использовании приложений и блокировках пробуждения. Данные отображаются в разных категориях — начиная с загрузки, отключения, отключения экрана и т. Д.
Настройка ADB
Ранее это приложение было доступно только для рутованных устройств. Но с АБР любой может начать использовать его. Вставьте и выполните эти команды по порядку:
Уникальные черты
- Показывает экран по отношению к бодрствующему. В идеале время экрана должно быть равно времени пробуждения.
- Найдите изменения в профиле пробуждения / сна и быстро определите мошеннические приложения.
- Статистика заряда батареи показывает вам подробные метрики Doze, чтобы вы могли проверить, насколько эффективны приложения по экономии заряда батареи.
- Он может выбирать приложения, которые приводят к частичным wakelocks или приложениям, которые используют CPU в wakelocks ядра.
Скачать: Лучшая Статистика Батареи (2 $)
Networking commands
Connect to a device over TCP/IP. If you do not specify a port, then the default port, , is used.
Disconnect from the specified TCP/IP device running on the specified port. If you do not specify a host or a port, then all devices are disconnected from all TCP/IP ports. If you specify a host, but not a port, the default port, , is used.
List all forwarded socket connections.
Forward socket connections from the specified local port to the specified remote port on the device. You can specify both local and remote ports in the following ways:
- . To choose any open port, make the local value .
- .
- .
- .
- .
- .
Remove the specified forwarded socket connection.
List all reverse socket connections from the device.
Reverse a socket connection. The option means the reversal fails if the specified socket is already bound through a previous command. You can specify the port for both local and remote arguments in the following ways:
- . To choose any open port, make the remote value .
- .
- .
- .
Remove the specified reverse socket connection from the device.
Remove all reverse socket connections from the device.
Directing Commands to a Specific Emulator/Device Instance
If multiple emulator/device instances are running, you must specify a target instance
when issuing adb commands. To do so, use the option in the commands. The usage
for the option is:
adb -s <serialNumber> <command>
As shown, you specify the target instance for a command using its adb-assigned serial number.
You can use the command to obtain the serial numbers of running
emulator/device instances. For example:
adb -s emulator-5556 install helloWorld.apk
Note that, if you issue a command without specifying a target emulator/device instance
while multiple devices are available, adb generates an error.
If you have multiple devices available (hardware or emulated), but only one is an emulator,
simply use the option to send commands to the emulator. Likewise if there’s multiple
devices but only one hardware device attached, use the option to send commands to
the hardware device.
How to Setup ADB
Note: Setting up ADB on the computer is just half the equation since you’ll also need to do some things on the smartphone or tablet to accept the ADB commands.
Phone Setup
- Launch the Settings application on your phone.
- Tap the About Phone option generally near the bottom of the list.
- Then tap the Build Number option 7 times to enable Developer Mode. You will see a toast message when it is done.
- Now go back to the main Settings screen and you should see a new Developer Options menu you can access.
- Go in there and enable the USB Debugging mode option.
- You are partially done with the phone setup process. Next up, you will need to scroll below and follow the rest of the instructions for your particular operating system.
Follow along for the operating system on your computer.
Откройте ZIP-файл платформы Tools Tools

Перейдите в любую папку, в которую вы также сохранили инструменты Platform, и извлеките содержимое ZIP-файла.
В вашей операционной системе есть встроенные инструменты, которые могут сделать это для вас, но некоторые другие варианты включают открытие ZIP-файла с помощью бесплатной утилиты для извлечения файлов.
Windows
- Щелкните правой кнопкой мыши platform-tools-latest-windows.zip и выберите вариант извлечения. Это называется Извлечь все… в некоторых версиях Windows.
- Когда его спросят, где сохранить файл, как вы видите на изображении выше, выберите папку, подходящую для размещения в ADB, а не где-то временную, как папку с загрузкой, или где-то, что легко захламлено, как рабочий стол.Я выбрал корень моего диска C: в папке с именем АБР .
- Поставьте чек в поле рядом сПоказывать извлеченные файлы по завершении.
- Нажмитеэкстракт для сохранения там файлов.
- Папка, которую вы выбрали на шаге 1, должна открыться и показать платформенные инструменты которая была извлечена из ZIP-файла, загруженного ранее.
7-Zip и PeaZip — это сторонние программы, которые могут открывать ZIP-файлы в Windows.
Macos
- Двойной щелчок platform-tools-latest-darwin.zip чтобы сразу же извлечь содержимое в ту же папку, в которой вы находитесь.
- Появится новая папка платформенные инструменты .
- Вы можете перемещать эту папку в любом месте, или хотите сохранить ее там, где она есть.
Если вы предпочитаете, вы можете вместо этого использовать Unarchiver или Keka для открытия ZIP-файла.
Linux
Пользователи Linux могут использовать следующую команду терминала, заменяя папка назначения с какой папкой вы хотите Платформа-инструмент папка, чтобы попасть в нее.
Commands
The table below lists all of the supported adb commands and explains their meaning and usage.
Table 1. Available adb commands
| Category | Command | Description | Comments |
|---|---|---|---|
| Target Device | Direct an adb command to the only attached USB device. | Returns an error if more than one USB device is attached. | |
| Direct an adb command to the only running emulator instance. | Returns an error if more than one emulator instance is running. | ||
| Direct an adb command a specific emulator/device instance, referred to by its adb-assigned serial number (such as «emulator-5556»). | See . | ||
| General | Prints a list of all attached emulator/device instances. | See for more information. | |
| Prints a list of supported adb commands. | |||
| Prints the adb version number. | |||
| Debug | Prints log data to the screen. | ||
| Prints , , and data to the screen, for the purposes of bug reporting. | |||
| Prints a list of available JDWP processes on a given device. | You can use the port-forwarding specification to connect to a specific JDWP process. For example: | ||
| Data | Pushes an Android application (specified as a full path to an .apk file) to an emulator/device. | ||
| Copies a specified file from an emulator/device instance to your development computer. | |||
| Copies a specified file from your development computer to an emulator/device instance. | |||
| Ports and Networking | Forwards socket connections from a specified local port to a specified remote port on the emulator/device instance. | Port specifications can use these schemes: | |
Run PPP over USB.
Note that you should not automatically start a PPP connection. |
|||
| Scripting | Prints the adb instance serial number string. | See for more information. | |
| Prints the adb state of an emulator/device instance. | |||
| Blocks execution until the device is online — that is, until the instance state is . | You can prepend this command to other adb commands, in which case adb will wait until the emulator/device instance is connected before issuing the other commands. Here’s an example:
adb wait-for-device shell getprop Note that this command does not cause adb to wait until the entire system is fully booted. For that reason, you should not prepend it to other commands that require a fully booted system. As an example, the requires the Android package manager, which is available only after the system is fully booted. A command such as adb wait-for-device install <app>.apk would issue the command as soon as the emulator or device instance connected to the adb server, but before the Android system was fully booted, so it would result in an error. |
||
| Server | Checks whether the adb server process is running and starts it, if not. | ||
| Terminates the adb server process. | |||
| Shell | Starts a remote shell in the target emulator/device instance. | See for more information. | |
| Issues a shell command in the target emulator/device instance and then exits the remote shell. |
How to setup ADB on Microsoft Windows
- Download the Android SDK Platform Tools ZIP file for Windows.
- Extract the contents of this ZIP file into an easily accessible folder (such as C:\platform-tools)
- Open Windows explorer and browse to where you extracted the contents of this ZIP file
- Then open up a Command Prompt from the same directory as this ADB binary. This can be done by holding Shift and Right-clicking within the folder then click the “Open command window here” option. (Some Windows 10 users may see “PowerShell” instead of “command window”.)
- Connect your smartphone or tablet to your computer with a USB cable. Change the USB mode to “file transfer (MTP)” mode. Some OEMs may or may not require this, but it’s best to just leave it in this mode for general compatibility.
- In the Command Prompt window, enter the following command to launch the ADB daemon:
- On your phone’s screen, you should see a prompt to allow or deny USB Debugging access. Naturally, you will want to grant USB Debugging access when prompted (and tap the always allow check box if you never want to see that prompt again).
- Finally, re-enter the command from step #6. If everything was successful, you should now see your device’s serial number in the command prompt (or the PowerShell window).
Yay! You can now run any ADB command on your device! Now go forth and start modding your phone by following our extensive list of tutorials!
Установка ADB
На устройствах под управлением Windows, установите драйвер для вашего Android-устройства.
Если драйвера для вашего устройства не нашлось на указанных страницах, попробуйте поискать его на сайте производителя.
Для MacOS и Linux установка драйверов не требуется.
Далее потребуется установить Android SDK Platform Tools. Если вы используете , скорее всего SDK Platform Tools у вас уже установлен.
Установка ADB в Windows
Скачайте и распакуйте папку platform-tools на диск (рекомендуется в С:\platform-tools).
В системную переменную Path добавьте путь к распакованной папке, для этого:
- перейдите в Панель управления – Система и безопасность – Система;
- выберите пункт Дополнительные параметры системы;
- нажмите кнопку Переменные среды;
- в поле Системные переменные выберите значение Path и нажмите кнопку Изменить, чтобы добавить новое значение;
- укажите путь к папке platform-tools содержащую adb;
- перезагрузите компьютер.
Установка ADB в Linux
Чтобы установить SDK Platform Tools в Ubuntu выполните следующую команду.
apt-get install adb
или
sudo apt-get install android-tools-adb
Либо вручную скачать , распаковать на диск и добавить путь к распакованной папке с platform-tools в переменную среды $PATH.
Установка ADB в MacOS
Самый простой способ установить SDK Platform Tools на MacOS, используя Homebrew.
brew cask install android-platform-tools
Либо установить вручную.
Сперва удалите предыдущую версию android-platform-tools, если такая имеется.
rm -rf ~/.android-sdk-macosx/
Затем скачайте .
Перейдите в папку с загрузками, распакуйте скачанный архив и переместите файлы программы в удобное для вас место, например в домашнюю директорию.
cd ~/Downloads/ unzip platform-tools_*.zip mkdir ~/.android-sdk-macosx mv platform-tools/ ~/.android-sdk-macosx/platform-tools
Добавить путь к platform-tools в переменную среды $PATH.
echo ‘export PATH=$PATH:~/.android-sdk-macosx/platform-tools/’ >> ~/.bash_profile
Обновите bash профиль или перезапустите терминал.
source ~/.bash_profile
Проверка ADB
Зайдите в консоль и введите следующую команду:
adb version
Если все сделали верно, в ответ в консоль будет выведена информация о версии ADB.
4. Жесткие навигационные жесты
Использование жестов для навигации по вашему устройству не является чем-то новым. Но большинство производителей Android используют собственные жесты, которые работают по-разному. С таким большим количеством вариантов они не являются интуитивно понятными или настраиваемыми. В большинстве случаев вы можете только включить или выключить их.
Жидкие навигационные жесты позволяют настраивать практически все аспекты навигационных жестов. Для начала он предлагает три основных жеста: пролистывание, удерживание и перетаскивание. Вы можете использовать эти жесты на левом и правом краях экрана, внизу слева и справа и внизу по центру.
Настройка ADB
Чтобы использовать определенные функции и скрыть клавиши навигации, используйте эту команду:
Чтобы восстановить клавиши навигации, отключите приложение и удалите. Или введите эту команду:
Уникальные черты
- Вы можете скрыть клавиши навигации и использовать жесты для навигации.
- Установите действия для быстрого и во время удержания. Сконфигурируйте кнопку «Назад» для быстрого пролистывания, недавних приложений при пролистывании и удержании, переключения быстрых настроек и многого другого.
- Вы можете установить чувствительность, местоположение и звук для обратной связи жеста.
Загрузить: Жидкие навигационные жесты (бесплатная, премиум-версия доступна)
Install ADB and Fastboot tool on Windows 10
Google made a relatively small package called “Platform-tools” that includes ADB and Fastboot along with some other utilities.
Step 1. Download Google SDK Tools for Windows 10
Google named Platform Tools package that includes Fastboot, ADB and other utilities. To download the Platform-tools package , These are the separate package for Windows, Linux, and Mac.
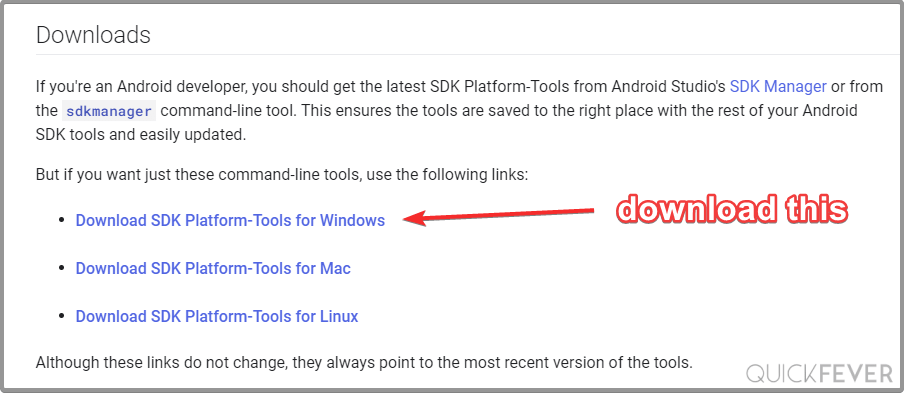
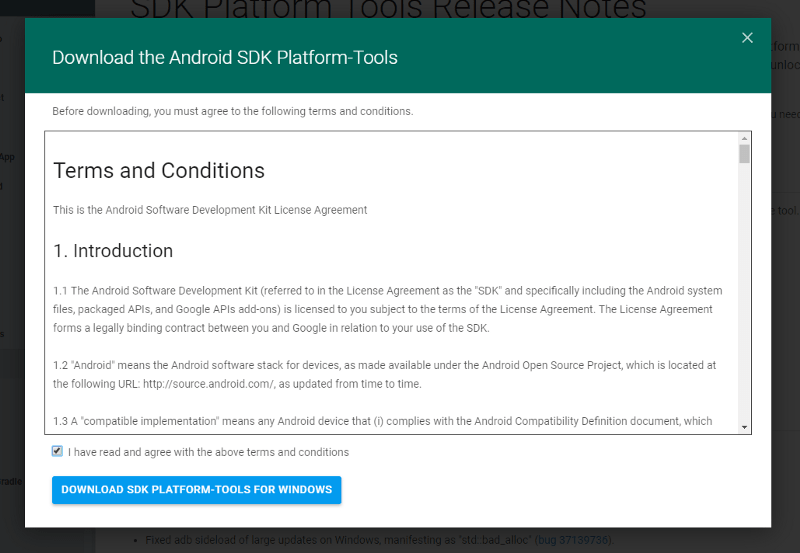
Choose an appropriate version of Platform tool, select terms and click on the big blue button to download.
Step 2. Run
Navigate to the Platform Tools folder, Right click and choose “open command prompt” from here. If you see Powershell option instead on the command prompt, use this guide.
To use ADB commands you must enable “USB Debugging” feature on your phone. Otherwise, it won’t work.
ADB commands Application
Pulling/pushing a file
Use “adb push filename /path” to send the file to the mobile device.
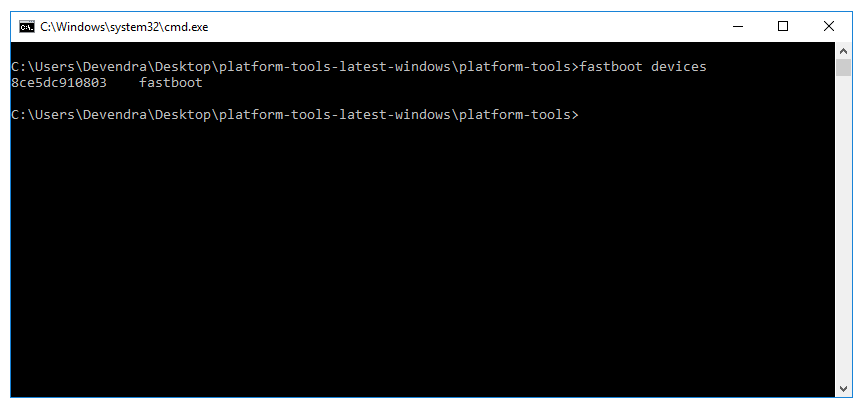
For starters, I used the “” command will display all the connected devices which are in fastboot mode. For example to enter in fastboot mode in a Xiaomi device you have to turn off the phone, start it pressing Power + Vol Down simultaneously.
Step 3. Optional, Modify Adb Path
- Open “Advanced system settings.”
- Click “View Advanced system settings.”
- Click the box that says “Environment Variables.”
- Under “System Variables” click on the variable named “Path.”
- Click “Edit…” and enter ADB folder location.
Android Hacks That Don’t Need Root
Rooting opens up your phone with a whole bunch of great tweaks. But it can prevent some apps from working, and increases the risk to your device with potential security problems. For many users, rooting is not a viable option.
With ADB and some amazing third-party apps as discussed above, you can enhance the user experience even without rooting. For more, take a look at some popular hacks that you can perform without rooting your device.
What Is an ISO File and What Does ISO Mean?
Is it a file? Or an organization? No, wait, you want to buy something? Well, what does ISO mean anyway?
Read Next
About The Author
Rahul Saigal
(162 Articles Published)
With his M.Optom Degree in Eye Care Speciality, Rahul worked as a lecturer for many years in the college. Writing and teaching others is always his passion. He now writes about technology and make it digestible for readers who don’t understand it well.
More
From Rahul Saigal
Querying for Emulator/Device Instances
Before issuing adb commands, it is helpful to know what emulator/device instances are connected to the adb server. You can generate a list of attached emulators/devices using the command:
adb devices
In response, adb prints this status information for each instance:
- Serial number — A string created by adb to uniquely identify an emulator/device instance by its
console port number. The format of the serial number is .
Here’s an example serial number: - State — The connection state of the instance may be one of the following:
- — the instance is not connected to adb or is not responding.
-
— the instance is now connected to the adb server. Note that this state does not
imply that the Android system is fully booted and operational, since the instance connects to adb
while the system is still booting. However, after boot-up, this is the normal operational state of
an emulator/device instance. - — there is no emulator/device connected.
The output for each instance is formatted like this:
Here’s an example showing the command and its output:
adb devices
List of devices attached
emulator-5554  device
emulator-5556  device
emulator-5558  device